1. Įvadas
The Velleman DVM810 is a compact and economical 3 1/2 digit digital multimeter designed for measuring DC and AC voltages, DC currents, resistance, and for performing diode and transistor (hFE) tests. It features overload protection and automatic polarity indication, making it suitable for hobbyists, field use, and workshops. This manual provides essential information for the safe and effective operation of your DVM810 multimeter.
2. Produkto ypatybės
- Automatic polarity indication
- ttage measurements: AC 500V and DC 500V maximum
- Current measurements: DC 10A maximum (0.2A fused, 10A unfused)
- Resistance measurements: Up to 2MΩ
- Diode and transistor (hFE) test functions
- Apsauga nuo perkrovos
- Compact design with 3 1/2 digit LCD display
3. Pakuotės turinys
Patikrinkite pakuotės turinį, kad įsitikintumėte, jog yra visi reikalingi daiktai:
- Skaitmeninis multimetras Velleman DVM810
- Bandymo laidai (vienas raudonas, vienas juodas)
- Instrukcijų vadovas
4. Svarbi saugos informacija
Read all safety warnings and instructions carefully before using this product. Failure to follow these instructions may result in electric shock, fire, or serious injury.
- Always ensure the multimeter is set to the correct function and range before making any measurements.
- Never exceed the maximum input limits for any range. The maximum voltage for AC/DC is 500V.
- Do not attempt to measure current on circuits with voltagviršija 250 V.
- Inspect test leads for damaged insulation or exposed metal before each use. Replace damaged leads immediately.
- Nenaudokite multimetro, jei jis atrodo pažeistas arba jei korpusas yra atidarytas.
- Exercise extreme caution when working with live circuits. Use appropriate personal protective equipment.
- Always disconnect power to the circuit and discharge high-voltage capacitors before measuring resistance or performing diode/transistor tests.
- Replace the battery when the low battery indicator appears on the display to ensure accurate readings.
5. Produktas baigtasview
Familiarize yourself with the components of your Velleman DVM810 multimeter:
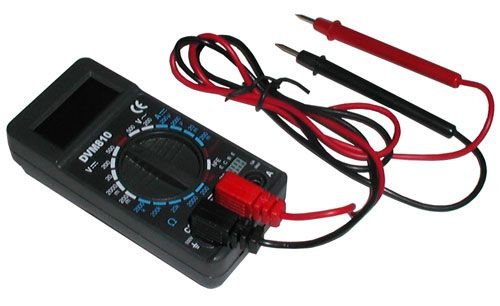
Figure 1: Velleman DVM810 Digital Multimeter. This image displays the front view of the compact multimeter, highlighting its liquid crystal display (LCD), the central rotary function switch, and the input jacks for test leads at the bottom.
- LCD ekranas: Shows measurement readings, units, and polarity.
- Sukamasis jungiklis: Naudojamas norint pasirinkti norimą matavimo funkciją ir diapazoną.
- Įvesties lizdai:
- COM lizdas: Common (negative) input for all measurements. Connect the black test lead here.
- VΩmA lizdas: Teigiamas tūrio įėjimastage, resistance, and current measurements up to 200mA. Connect the red test lead here.
- 10A lizdas: Positive input for high current measurements (up to 10A). Connect the red test lead here for 10A measurements.
- Bandymo laidai: Red and black leads used to connect the multimeter to the circuit under test.
6. Sąranka
6.1 Akumuliatoriaus įdėjimas
The DVM810 multimeter requires a 9V battery (not always included). To install or replace the battery:
- Ensure the multimeter is turned OFF (rotary switch set to OFF).
- Įrenginio gale suraskite baterijų skyriaus dangtelį.
- Remove the screw(s) securing the cover and carefully lift it off.
- Prijunkite naują 9 V bateriją prie baterijos spaustuko, stebėdami teisingą poliškumą.
- Įdėkite bateriją į skyrių ir uždėkite dangtelį, pritvirtindami jį varžtu (-ais).
6.2 Bandymo laidų prijungimas
Visada teisingai prijunkite bandymo laidus, kad matavimai būtų tikslūs ir saugūs:
- Įkiškite juodą bandymo laidą į COM (įprastas) domkratas.
- Daugumai matavimų (tūriotage, resistance, diode, hFE, and current up to 200mA), insert the red test lead into the VΩmA domkratas.
- Didelės srovės matavimams (iki 10 A) įkiškite raudoną bandymo laidą į 10A domkratas.
7. Naudojimo instrukcijos
Before making any measurement, ensure the test leads are correctly connected and the rotary switch is set to the appropriate function and range.
7.1 DC matavimas Voltage (V=)
- Įkiškite raudoną laidą į VΩmA jack and the black lead into the COM domkratas.
- Nustatykite sukamąjį jungiklį į norimą nuolatinės srovės įtampątage (V=) range. Start with the highest range if the voltage nežinomas.
- Connect the test leads across the component or circuit to be measured (in parallel).
- Perskaitykite ttage value on the LCD display. The display will show the correct polarity.
7.2 AC matavimas, ttage (V~)
- Įkiškite raudoną laidą į VΩmA jack and the black lead into the COM domkratas.
- Nustatykite sukamąjį jungiklį į norimą kintamosios srovės garsumo lygį.tage (V~) range. Start with the highest range if the voltage nežinomas.
- Connect the test leads across the component or circuit to be measured (in parallel).
- Perskaitykite ttage reikšmė LCD ekrane.
7.3 Measuring DC Current (A=)
Caution: Never connect the multimeter in parallel with a voltagMatuodami srovę, naudokite maitinimo šaltinį, nes tai gali perdegti saugiklį arba sugadinti skaitiklį.
- Determine the expected current. For currents up to 200mA, insert the red lead into the VΩmA lizdą. Srovei iki 10 A įkiškite raudoną laidą į 10A jack. Always insert the black lead into the COM domkratas.
- Set the rotary switch to the appropriate DC Current (A=) range. Start with the highest range if the current is unknown.
- Turn off power to the circuit. Open the circuit where the current is to be measured.
- Prijunkite multimetrą nuosekliai prie grandinės.
- Restore power to the circuit and read the current value on the LCD display.
7.4 Varžos (Ω) matavimas
Caution: Ensure the circuit is completely de-energized and all capacitors are discharged before measuring resistance.
- Įkiškite raudoną laidą į VΩmA jack and the black lead into the COM domkratas.
- Set the rotary switch to the desired Resistance (Ω) range. Start with a higher range if the resistance is unknown.
- Prijunkite bandymo laidus prie matuojamo komponento.
- Nuskaitykite varžos vertę LCD ekrane.
7.5 Diodų bandymas
Caution: Ensure the diode is disconnected from the circuit or the circuit is de-energized before testing.
- Įkiškite raudoną laidą į VΩmA jack and the black lead into the COM domkratas.
- Set the rotary switch to the Diode symbol (→|).
- Connect the red lead to the anode and the black lead to the cathode of the diode. The display will show the forward voltage kritimas (paprastai nuo 0.5 V iki 0.8 V silicio diodams).
- Reverse the leads. The display should show 'OL' (Overload) for a good diode. If it shows a reading in both directions or 'OL' in both directions, the diode may be faulty.
7.6 Transistor (hFE) Test
Caution: Ensure the transistor is disconnected from the circuit before testing.
- Įkiškite raudoną laidą į VΩmA jack and the black lead into the COM domkratas.
- Pasukite sukamąjį jungiklį į hFE padėtį.
- Identify if the transistor is NPN or PNP. Insert the transistor's emitter, base, and collector leads into the corresponding holes in the hFE socket on the multimeter.
- LCD ekrane nuskaitykite hFE (nuolatinės srovės stiprinimo) vertę.
8. Specifikacijos
| Parametras | Vertė |
|---|---|
| Prekės ženklas | Velmanas |
| Modelio numeris | DVM810 |
| Matavimo tipas | Multimetras |
| DC ttage Diapazonas | Iki 500V |
| AC ttage Diapazonas | Iki 500V |
| DC srovės diapazonas | Up to 10A (0.2A fused, 10A unfused) |
| Atsparumo diapazonas | Iki 2 MΩ |
| Diodo testas | Taip |
| Tranzistoriaus (hFE) bandymas | Taip |
| Ekranas | 3 1/2 Digit LCD |
| Maitinimo šaltinis | 9 V baterija (nepridedama) |
| Matmenys | Maždaug 3.70 colio x 1.81 colio x 1.03 colio |
| Prekės svoris | Maždaug 3.2 uncijos (0.2 svaro) |
| UPC | 836479002272 |
9. Priežiūra
9.1 Akumuliatoriaus keitimas
When the low battery indicator appears on the LCD, replace the 9V battery as described in Section 6.1. A weak battery can lead to inaccurate readings.
9.2 Valymas
Norėdami išvalyti multimetrą, nuvalykite korpusą drėgnu skudurėliu.amp cloth and a mild detergent. Do not use abrasives or solvents. Ensure the unit is completely dry before use.
9.3 Bandymo laidų apžiūra
Regularly inspect the test leads for any signs of damage, such as cracked insulation, exposed wires, or loose connections. Replace damaged leads immediately to prevent electric shock hazards.
10. Problemų sprendimas
- Nėra ekrano arba ekranas silpnas: Patikrinkite bateriją. Jei reikia, pakeiskite.
- Neteisingi rodmenys:
- Ensure the rotary switch is set to the correct function and range.
- Patikrinkite akumuliatoriaus tūrįtage; replace if low.
- Įsitikinkite, kad bandymo laidai yra tinkamai prijungti ir nepažeisti.
- Matuojant varžą, įsitikinkite, kad grandinėje nėra įtampos.
- Rodomas užrašas „OL“ (perkrova): The measured value exceeds the selected range. Select a higher range or ensure the circuit is within the meter's capabilities.
- Fuse blown (during current measurement): If the meter stops measuring current, the internal fuse may have blown. Refer to a qualified technician for fuse replacement.
11. Garantija ir palaikymas
Warranty information for the Velleman DVM810 Digital Multimeter is typically provided with your purchase documentation or can be found on the official Velleman website. For technical support, service, or further inquiries, please refer to the contact information provided by your retailer or the manufacturer's official support channels.


