1. Įvadas
The Snom PA1 is a SIP-based public address system designed to integrate with existing public announcement speaker systems and SIP-based voice communication solutions. It functions as a SIP bridge, enabling paging and announcement capabilities over IP networks. The device includes a 4-watt amplifier for small-scale speaker projects and can also serve as a preamp for larger systems utilizing external high-wattage ampgelbėtojai.
Pagrindinės funkcijos:
- Integruota 4 vatų galia amplifier for direct speaker connection.
- Support for larger PA systems via external ampgelbėtojai.
- Microphone input for two-way communication.
- Functions as a phone ringer amplifier with visual indicator support.
- Multicast relay for up to four SIP identities to four multicast IP addresses.
- Power over Ethernet (PoE) support for simplified installation.
2. Saugos informacija
Please read and follow these safety instructions to prevent damage to the device or injury to yourself or others.
- Maitinimo šaltinis: Use only the specified power supply (5V DC) or Power over Ethernet (PoE) as indicated on the device. Incorrect voltage gali sukelti žalą.
- Vėdinimas: Užtikrinkite tinkamą vėdinimą aplink įrenginį. Neužblokuokite ventiliacijos angų.
- Aplinka: Avoid exposing the device to moisture, extreme temperatures, direct sunlight, or dust.
- Montavimas: Install the device on a stable surface or mount it securely. Do not place it near heat sources.
- Aptarnavimas: Nebandykite patys atidaryti ar taisyti įrenginio. Visus techninės priežiūros darbus patikėkite kvalifikuotiems specialistams.
3. Pakuotės turinys
Patikrinkite, ar jūsų pakuotėje yra šie elementai:
- Snom PA1 Public Address System unit.
- Greitas pradmenų gidas.
- Mounting brackets (if included with your specific model).
- Connector plugs for speaker, microphone, and I/O ports.
Jei trūksta kokių nors prekių arba jos pažeistos, susisiekite su savo tiekėju.
4. Produktas baigtasview
The Snom PA1 features a compact design with various ports for connectivity and integration into your communication system.

1 paveikslas: Priekyje view of the Snom PA1 Public Address System. The device is a black rectangular unit with the 'snom PA1' logo in yellow on the top surface.
4.1. Galinio skydelio jungtys

2 paveikslas: Rear panel of the Snom PA1, showing the power input, two Ethernet ports (Port 1 PoE, Port 2), EXT port, and I/O 1 port.
- IP/Reset Button: Used for resetting the device or accessing IP configuration.
- Maitinimo šviesos diodas: Nurodo maitinimo būseną.
- Call LED: Indicates call activity.
- 5V DC: Power input for an optional external power adapter.
- Port 2: Standartinis Ethernet prievadas.
- Port 1 PoE: Ethernet port that supports Power over Ethernet (PoE). This port also provides network connectivity.
- EXT: Extension port (specific functionality may vary).
- I/O 1: Input/Output port for external devices (e.g., door opener).
4.2. Priekinio skydelio jungtys

3 paveikslas: Front panel of the Snom PA1, displaying the VDD, I/O 2, KBD ports, Speaker terminals, Mic-in, and Line Out jacks.
- VDD: ttage supply output.
- I/O 2: Second Input/Output port for external devices.
- KBD: Keyboard port (specific functionality may vary).
- Pranešėjas: Terminals for connecting an 8-ohm speaker directly to the internal 4-watt ampgyvesnis.
- Mikrofonas: 3.5mm jack for connecting an external microphone.
- Išrikiuoti: 3.5mm jack for connecting to an external ampkeltuvas arba garso sistema.
5. Sąranka
This section guides you through the physical installation and initial configuration of your Snom PA1.
5.1. Montavimas
The Snom PA1 can be placed on a flat surface or mounted using the integrated mounting tabs. Ensure the location allows for proper ventilation and easy access to ports.
5.2. Maitinimas ir tinklo prijungimas
- Connect an Ethernet cable from your network switch (preferably PoE-enabled) to Port 1 PoE on the rear panel of the Snom PA1. If using a non-PoE switch, connect an external 5V DC power adapter to the 5V DC uostas.
- The Power LED should illuminate, indicating the device is receiving power.
5.3. Garsiakalbio prijungimas
The Snom PA1 can drive speakers directly or act as a preamp for larger systems.
- For Small PA Systems (Internal Ampgyvybingesnis): Connect an 8-ohm speaker directly to the Pranešėjas terminals on the front panel. Ensure correct polarity (red to positive, black to negative). The internal 4-watt amplifier is suitable for single or a few speakers.
- For Large PA Systems (External Ampgyvybingesnis): Prijunkite Line Out 3.5mm jack on the front panel to the audio input of your external high-wattage ampkeltuvas. Išorinis amplifier will then drive the speakers.
5.4. Microphone and I/O Connections
- Mikrofonas: Connect a compatible microphone to the Mikrofonas 3.5mm jack for two-way communication or announcements.
- I/O prievadai: Naudokite I/O 1 ir I/O 2 ports to connect external devices such as door openers, relays, or sensors, depending on your system's requirements. Refer to the Snom documentation for specific wiring and configuration details for these ports.
5.5. Sistemos integravimo schema
The following diagram illustrates a typical setup for the Snom PA1 within a SIP environment.
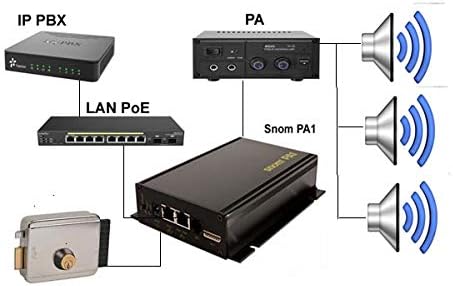
4 paveikslas: Diagram showing the Snom PA1 connected to an IP PBX via LAN PoE, an external PA amplifier, speakers, and a door lock system.
5.6. Pradinė konfigūracija (Web Sąsaja)
After physical setup, the Snom PA1 requires network configuration and SIP registration. The device obtains an IP address via DHCP by default.
- To find the IP address, you may use a network scanner or consult your DHCP server logs. Alternatively, some Snom phones can display the IP address of connected PA1 units.
- Atidarykite a web browser and enter the IP address of the Snom PA1.
- Log in using the default credentials (consult the Quick Start Guide or Snom documentation for default username and password).
- Navigate to the SIP settings to register the PA1 as an extension on your SIP PBX. Configure the necessary account details (SIP identity, password, server address).
- Adjust audio settings, including speaker volume and amplifier gain, as needed for your specific speaker setup.
6. Operacija
Once configured, the Snom PA1 can be used for various public address functions.
6.1. Making Announcements
To make an announcement, dial the SIP extension registered to the Snom PA1 from any phone connected to your SIP PBX. The PA1 will auto-answer, allowing you to broadcast your message through the connected speakers.
6.2. Phone Ringer Functionality
The PA1 can be configured to act as a phone ringer amplifier. When the associated SIP extension receives an incoming call, the PA1 can play a ringing tone through the speakers, providing an audible alert in noisy environments. It can also trigger a strobe light via its I/O ports for visual indication.
6.3. Multicast Paging
The Snom PA1 supports multicast relay, allowing it to receive and broadcast audio streams from up to four SIP identities to four different multicast IP addresses. This feature is useful for zoned paging or broadcasting to multiple PA1 units simultaneously.
7. Priežiūra
Regular maintenance ensures optimal performance and longevity of your Snom PA1.
- Valymas: Įrenginiui valyti naudokite minkštą, sausą šluostę. Nenaudokite skystų valiklių ar aerozolių.
- Firmware atnaujinimai: Periodically check the Snom website for firmware updates. Keeping the firmware current can improve performance, add features, and address security vulnerabilities. Firmware updates are typically performed via the web sąsaja.
- Aplinkos sąlygos: Ensure the device remains in a cool, dry environment, free from excessive dust or vibrations.
8. Problemų sprendimas
This section addresses common issues you might encounter with the Snom PA1.
8.1. Nėra garso išvesties
- Patikrinkite jungtis: Ensure speakers are correctly wired to the PA1's speaker terminals or that the Line Out is properly connected to an external amplifier'io indėlis.
- Maitinimas ir tinklas: Verify the PA1 is powered on and has network connectivity (Power and Call LEDs should be active).
- Garsumo nustatymai: Prisijunkite prie web interface and check the speaker volume and amplifier gain settings. Incorrect settings (e.g., very high speaker volume with high amplifier gain) can sometimes lead to audio issues or lock-ups, requiring a power cycle. Adjust these settings carefully.
- SIP registracija: Confirm that the PA1's SIP extension is registered correctly with your PBX and that calls are successfully reaching it.
- Išorinis Ampgyvybingesnis: Jei naudojate išorinį amplifier, ensure it is powered on, its volume is adjusted, and its input source is correctly selected.
8.2. Device Not Registering with PBX
- Tinklo ryšys: Ensure the PA1 has a valid IP address and can reach the PBX server. Check network cables and switch ports.
- SIP Credentials: Verify that the SIP username, password, and server address configured in the PA1's web interface match those on your PBX.
- Ugniasienė: Check if any firewall rules on your network or PBX are blocking SIP traffic to/from the PA1.
- Firmware: Ensure the PA1's firmware is up to date and compatible with your PBX.
8.3. Difficulty with Configuration
The Snom PA1 requires specific configuration for optimal performance with various PBX systems. Refer to the Snom support website for detailed configuration guides and FAQs specific to your PBX model. Online resources and community forums can also provide valuable insights.
9. Specifikacijos
Technical specifications for the Snom PA1 Public Address System.
| Funkcija | Specifikacija |
|---|---|
| Modelio numeris | 2226 |
| Gaminio matmenys | 1.9 x 0.94 x 9 colio |
| Prekės svoris | 1 svaras |
| Maitinimo įvestis | 5V DC or Power over Ethernet (PoE) |
| Ampgyvybingesnė išvestis | 4 Watt (for 8-ohm speakers) |
| Ryšys | 2 x Ethernet (1 PoE), Mic-in (3.5mm), Line Out (3.5mm), I/O ports |
| SIP palaikymas | Taip |
| Gamintojas | SNOM Technology |

5 paveikslas: Bottom label of the Snom PA1, showing the model number, serial number, and MAC address. This information is crucial for support and registration.
10. Garantija ir palaikymas
The Snom PA1 is covered by a manufacturer's warranty. For specific warranty terms and conditions, please refer to the documentation provided with your purchase or visit the official Snom websvetainę.
For technical support, firmware downloads, and detailed configuration guides, please visit the Snom support portal or contact your authorized Snom reseller. When contacting support, please have your device's model number, serial number, and MAC address (found on the bottom label) readily available.


