1. Įvadas
Ačiū, kad pirkoteasing the Atlanta 1669/19 Quartz Alarm Clock. This digital alarm clock features a silent movement, a light sensor for automatic display illumination, and a snooze function. This manual provides detailed instructions for setup, operation, and maintenance to ensure optimal performance and longevity of your device.
2. Saugos informacija
- Saugokite įrenginį nuo vandens ir didelės drėgmės.
- Avoid exposing the clock to direct sunlight or extreme temperatures.
- Nebandykite patys ardyti ar taisyti laikrodžio. Kreipkitės į kvalifikuotus techninės priežiūros darbuotojus.
- Naudotas baterijas išmeskite atsakingai pagal vietines taisykles.
- Nemaišykite senų ir naujų baterijų arba skirtingų tipų baterijų.
3. Pakuotės turinys
- Atlanta 1669/19 Quartz Alarm Clock Unit
- Vartotojo vadovas (šis dokumentas)
Pastaba: Baterijos neįskaičiuotos ir turi būti įsigytos atskirai.
4. Produktas baigtasview
The Atlanta 1669/19 features a clear digital display, intuitive controls, and a light sensor for enhanced visibility in low-light conditions.
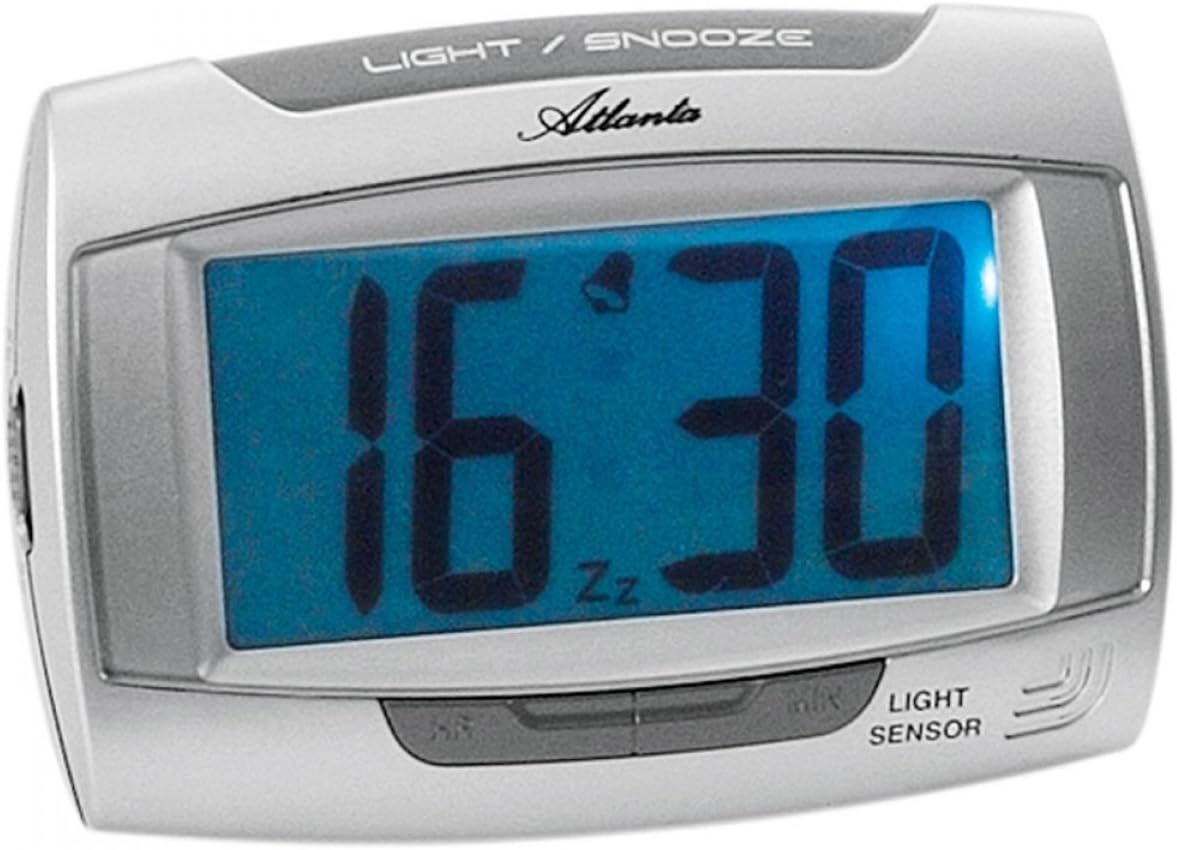
1 paveikslas: Priekyje view of the Atlanta 1669/19 Quartz Alarm Clock. The clock features a large digital display, a "LIGHT / SNOOZE" button at the top, and a "LIGHT SENSOR" indicator at the bottom right. The display shows the time 16:30, with an alarm bell icon and 'Zz' indicating snooze functionality.
Pagrindiniai komponentai:
- Skaitmeninis ekranas: Shows time and alarm status.
- LIGHT / SNOOZE Button: Activates temporary backlight and snooze function.
- Šviesos jutiklis: Automatically illuminates the display in dark environments.
- Control Buttons (Rear/Side): For setting time and alarm.
- Battery Compartment (Rear): Talpina reikiamas baterijas.
5. Sąranka
5.1. Akumuliatoriaus įdėjimas
- Žadintuvo gale raskite baterijų skyriaus dangtelį.
- Nuimkite dangtelį jį stumdami arba keldami.
- Insert the required batteries (typically 1x AA, refer to compartment markings) ensuring correct polarity (+ and -).
- Saugiai uždėkite akumuliatoriaus skyriaus dangtelį.
5.2. Pradinis laiko nustatymas
Upon battery installation, the display will typically show a default time. You will need to set the current time.
- Locate the time setting buttons, usually labeled "SET", "HOUR", and "MINUTE" or similar, on the back or side of the clock.
- Press the "SET" button (or equivalent) to enter time setting mode. The hour digits may start flashing.
- Use the "HOUR" button to adjust the hour.
- Press "SET" again to move to minute setting. The minute digits may start flashing.
- Use the "MINUTE" button to adjust the minutes.
- Press "SET" one more time to confirm and exit time setting mode.
6. Naudojimo instrukcijos
6.1. Signalo nustatymas
- Locate the alarm setting buttons, typically labeled "ALARM SET", "ALARM HOUR", and "ALARM MINUTE" or similar.
- Press the "ALARM SET" button to enter alarm setting mode. The alarm hour digits may flash.
- Use the "ALARM HOUR" button to adjust the desired alarm hour.
- Press "ALARM SET" again to move to alarm minute setting. The alarm minute digits may flash.
- Use the "ALARM MINUTE" button to adjust the desired alarm minutes.
- Press "ALARM SET" one more time to confirm and exit alarm setting mode.
6.2. Signalizacijos įjungimas / išjungimas
There is usually a switch or button to turn the alarm on or off. Look for a switch labeled "ALARM ON/OFF" or an alarm icon button. When the alarm is active, an alarm icon (e.g., a bell) will typically appear on the display.
6.3. Snaudimo funkcija
When the alarm sounds, press the large "LIGHT / SNOOZE" button located on the top of the clock. This will temporarily silence the alarm, and it will sound again after a few minutes (typically 5-9 minutes). The "Zz" icon on the display indicates that the snooze function is active.
6.4. Light Sensor and Display Backlight
- Automatic Backlight (Light Sensor): The clock is equipped with a light sensor. When enabled, the display will automatically illuminate with a soft, constant light in dark environments, making it easy to read the time at night without pressing any buttons. Look for a switch or button labeled "SENSOR ON/OFF" or similar to enable or disable this feature.
- Temporary Backlight: To briefly illuminate the display in any lighting condition, press the "LIGHT / SNOOZE" button on the top of the clock. The backlight will stay on for a few seconds and then turn off automatically.
7. Priežiūra
- Valymas: Laikrodį valykite minkšta, sausa šluoste. Nenaudokite abrazyvinių valiklių ar tirpiklių, nes jie gali pažeisti laikrodį.asing arba ekranas.
- Baterijos keitimas: When the display dims or the clock stops functioning correctly, it is time to replace the batteries. Follow the battery installation steps in Section 5.1.
- Saugykla: If the clock will not be used for an extended period, remove the batteries to prevent leakage and damage.
8. Problemų sprendimas
| Problema | Galima priežastis | Sprendimas |
|---|---|---|
| Laikrodžio ekranas tuščias arba blankus. | Žemas arba išsikrovusios baterijos; neteisingas baterijų įdėjimas. | Pakeiskite baterijas naujomis, užtikrindami teisingą poliškumą. |
| Signalizacija neskamba. | Alarm is not activated; alarm time is incorrect; low batteries. | Ensure alarm is switched ON (bell icon visible); verify alarm time setting; replace batteries. |
| Automatic backlight not working. | Light sensor feature is disabled; insufficient darkness. | Ensure the light sensor switch is ON; test in a completely dark room. |
| Laikas neteisingas. | Time was not set correctly; batteries were removed/replaced. | Reset the current time following Section 5.2. |
9. Specifikacijos
| Modelis | 1669/19 |
| Prekės ženklas | Atlanta |
| Veikimo režimas | Skaitmeninis |
| Ypatingos savybės | Alarm, Lighting (Light Sensor) |
| Medžiaga | Plastikiniai |
| Rėmo medžiaga | Plastikiniai |
| Montavimo tipas | Stalviršis |
| Spalva | Blue (display), Silver-coloured (case) |
| Reikalingos baterijos | Yes (Type not specified, typically AA or AAA for such clocks) |
| Baterijos įtrauktos | Nr |
| Matmenys (apytiksliai) | 11 x 7 cm |
10. Garantija ir palaikymas
Dėl garantijos informacijos ar techninės pagalbos žr. pirkimo metu pateiktus dokumentus arba susisiekite su pardavėju. Išsaugokite pirkimo įrodymą, jei prireiktų pateikti pretenziją dėl garantijos.


