1. Įvadas
Thank you for choosing the LTC 3-Channel 60W Public Address Amplifier with USB/SD-MP3. This manual provides essential information for the safe and efficient operation of your new amplifier. Please read it thoroughly before use and keep it for future reference. This amplifier is designed for public address applications, offering versatile input options including microphones, auxiliary devices, and integrated USB/SD card playback.
2. Saugos instrukcijos
Norėdami užtikrinti saugų darbą ir išvengti žalos, laikykitės šių saugos priemonių:
- Maitinimo šaltinis: Prijunkite amplifier only to the specified power sources (12V DC or 220V AC) as indicated on the unit. Ensure the voltage atitinka jūsų vietinį maitinimo šaltinį.
- Vėdinimas: Neužblokuokite jokių ventiliacijos angų. Užtikrinkite pakankamą oro cirkuliaciją aplink įrenginį, kad jis neperkaistų.
- Drėgmė: Neatskleiskite amplifier to rain, moisture, or excessive humidity. Keep it away from liquids.
- Valymas: Prieš valydami atjunkite maitinimą. Naudokite sausą, minkštą šluostę. Nenaudokite skystų valiklių ar aerozolių.
- Aptarnavimas: Nebandykite patys taisyti šio gaminio. Visus techninės priežiūros darbus patikėkite kvalifikuotiems techninės priežiūros specialistams. Atidarius įrenginį, galite būti paveikti pavojingo aukšto slėgio vandens.tages ar kitų pavojų.
- Vieta: Padėkite ampPastatykite šaldytuvą ant stabilaus, lygaus paviršiaus. Nelaikykite jo šalia šilumos šaltinių arba tiesioginiuose saulės spinduliuose.
- Perkrova: Neperkraukite ampĮsitikinkite, kad prijungti garsiakalbiai atitinka ampLifierio varža ir galios įvertinimai.
3. Produktas baigtasview
The LTC 3-Channel 60W Public Address Amplifier is a versatile audio solution designed for various PA applications. It features multiple input options and an integrated MP3 player for convenience.
3.1 Priekinio skydelio valdikliai ir jungtys
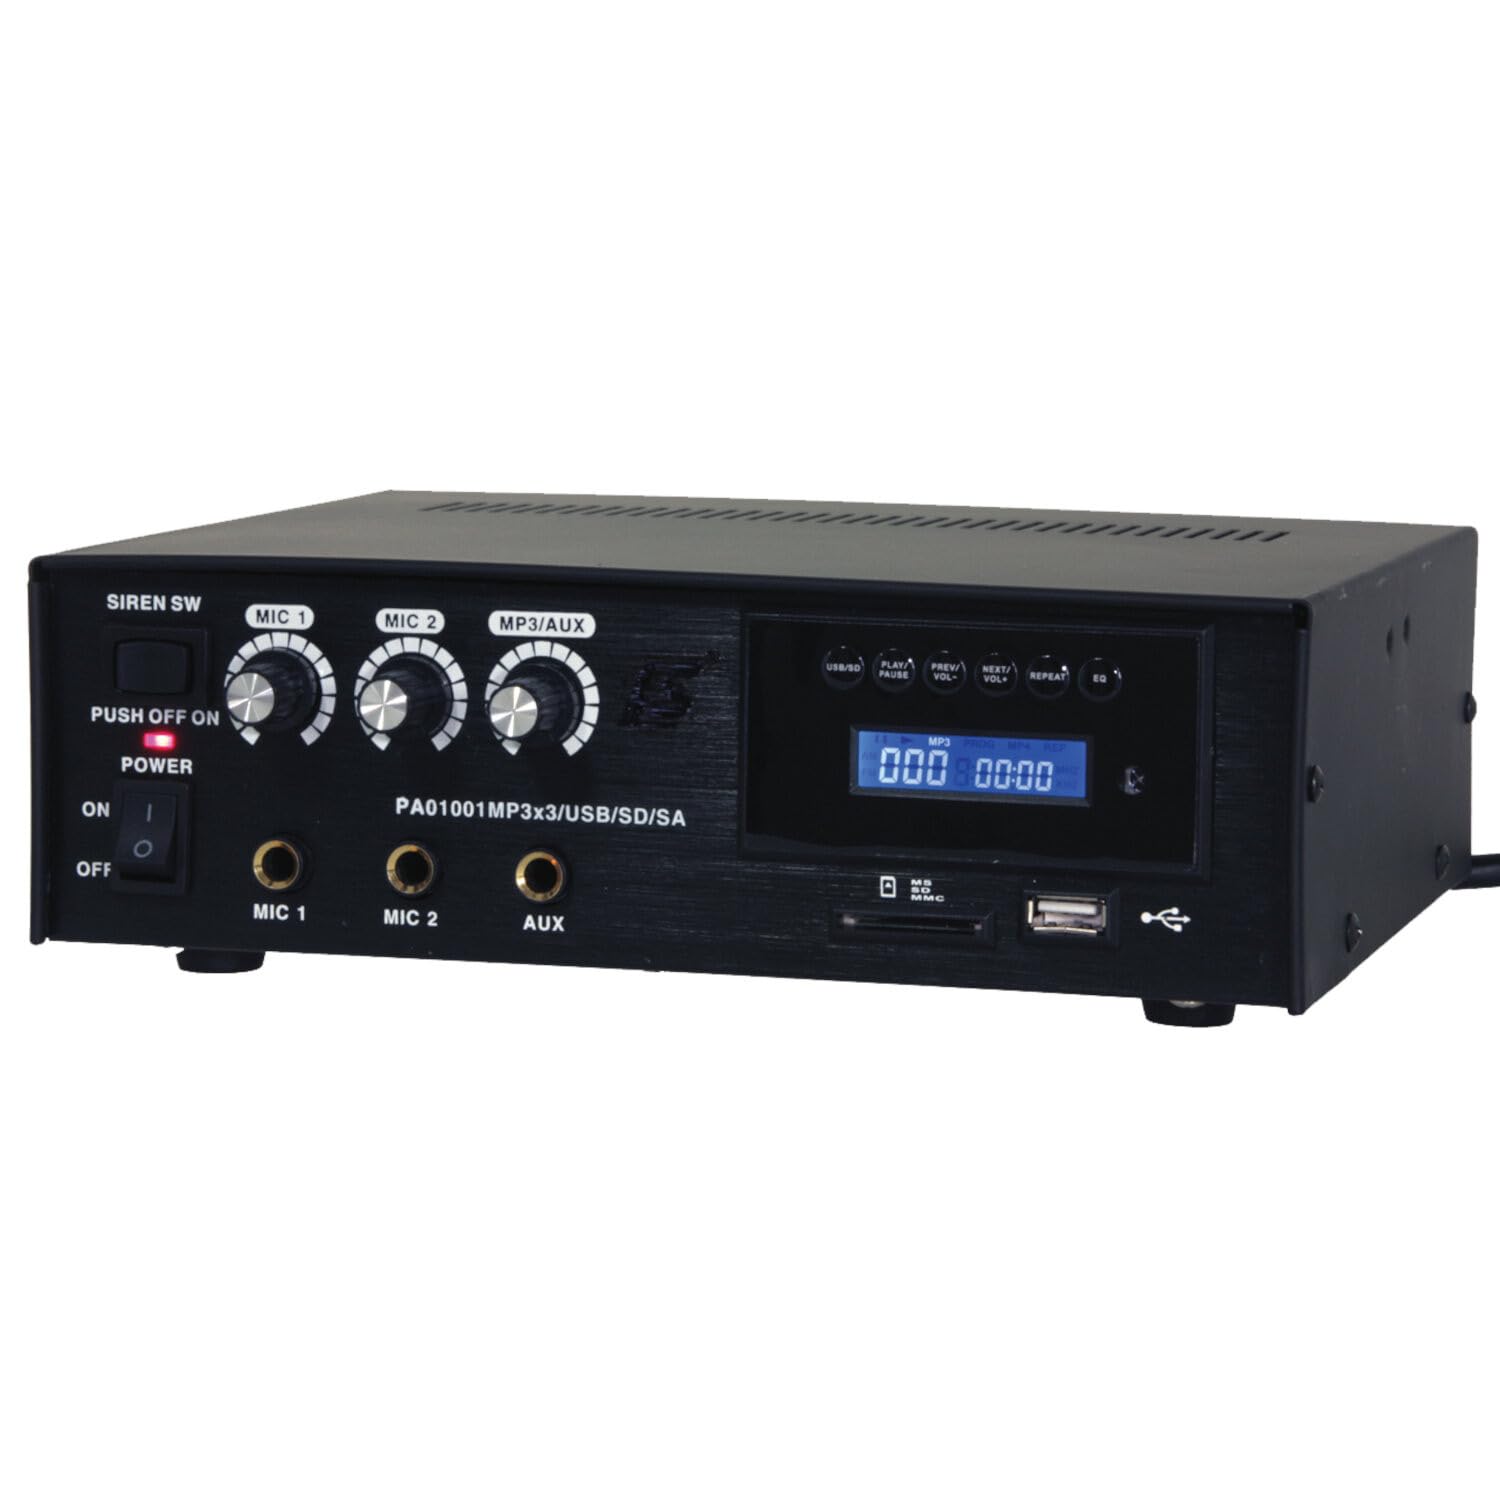
Image: Front panel of the LTC 3-Channel 60W Public Address Amplifier. Visible controls include volume knobs for MIC1, MIC2, and MP3/AUX, a Master volume knob, a Power switch, a Siren switch, and input jacks for MIC1, MIC2, and AUX. The MP3 player section features a display, USB port, and SD card slot.
- SIREN SW: Switch to activate the built-in siren sound.
- PUSH OFF / ON / OF Power Switch: Pagrindinis maitinimo jungiklis ampgyvesnis.
- MIC 1 Volume: Rotary knob to adjust the volume level for Microphone Input 1.
- MIC 2 Volume: Rotary knob to adjust the volume level for Microphone Input 2.
- MP3/AUX Volume: Rotary knob to adjust the volume level for the MP3 player and Auxiliary input.
- PAGRINDINIS garsumas: Rotary knob to control the overall output volume of the ampgyvesnis.
- MIC 1 įvestis: 6.3mm jack for connecting Microphone 1.
- MIC 2 įvestis: 6.3mm jack for connecting Microphone 2.
- AUX įvestis: 6.3mm jack for connecting external audio sources (e.g., CD player, smartphone).
- USB/SD MP3 Player: Integrated player with USB port and SD card slot for direct playback of audio files. Includes control buttons (Play/Pause, Prev/Vol-, Next/Vol+, Repeat, EQ) and an LCD display.
3.2 Pagrindinės savybės
- Mobile or fixed amplifier with 12V battery (car, boat) or 220V mains power supply.
- Integrated MP3 player with USB and SD ports for music playback.
- Includes a siren for powerful sound and an MP3 control screen with a blue LCD display.
4. Sąranka
Atlikite šiuos veiksmus, kad nustatytumėte savo ampgyvybingesnis:
4.1 Maitinimo jungtis
- For 220V AC Operation: Connect the supplied power cord to the AC input on the rear panel of the amplifier and then to a standard 220V AC wall outlet.
- 12 V nuolatinės srovės veikimui: Connect a 12V DC power source (e.g., car battery) to the 12V DC input terminals on the rear panel. Ensure correct polarity (+ to + and - to -).
- Užtikrinti, ampPrieš prijungdami prie elektros tinklo, įsitikinkite, kad „lifier“ maitinimo jungiklis yra padėtyje „OFF“.
4.2 Garsiakalbio prijungimas
- Locate the speaker output terminals on the rear panel of the ampgyvesnis.
- Connect your speakers to these terminals, ensuring correct polarity (positive to positive, negative to negative).
- Verify that the total impedance of the connected speakers is compatible with the amplifier's output specifications to prevent damage.
4.3 Garso įvesties jungtis
- Mikrofonai: Insert your microphones into the MIC 1 and/or MIC 2 input jacks on the front panel.
- Pagalbiniai įrenginiai: Connect external audio sources (e.g., smartphone, laptop, CD player) to the AUX input jack on the front panel using an appropriate 6.3mm audio cable.
- USB/SD laikmena: Insert a USB flash drive into the USB port or an SD card into the SD card slot on the front panel for MP3 playback.
5. Naudojimo instrukcijos
Kartą ampKai lifteris yra nustatytas, atlikite šiuos veiksmus:
5.1 Įjungimas / išjungimas
- Įsitikinkite, kad visos jungtys yra saugios.
- Turn the MASTER volume knob to its minimum position.
- Flip the POWER switch to the 'ON' position. The power indicator light will illuminate.
- To power off, turn the MASTER volume to minimum and then flip the POWER switch to 'OFF'.
5.2 Mikrofono naudojimas
- Connect your microphone(s) to the MIC 1 and/or MIC 2 inputs.
- Slowly increase the MIC 1 and/or MIC 2 volume knob(s) to the desired level.
- Adjust the MASTER volume for overall output.
- Avoid pointing microphones directly at speakers to prevent feedback (howling).
5.3 AUX įvesties naudojimas
- Connect your external audio device to the AUX input.
- Ensure the volume on your external device is set to a moderate level.
- Slowly increase the MP3/AUX volume knob to the desired level.
- Adjust the MASTER volume for overall output.
5.4 MP3/USB/SD Playback
- Insert a USB flash drive into the USB port or an SD card into the SD card slot. The amp„Lifier“ automatiškai aptiks mediją ir pradės atkūrimą.
- Norėdami pradėti arba pristabdyti atkūrimą, naudokite mygtuką „PLAY/PAUSE“.
- Use the 'PREV/VOL-' button to go to the previous track or press and hold to decrease volume.
- Use the 'NEXT/VOL+' button to go to the next track or press and hold to increase volume.
- Use the 'REPEAT' button to cycle through repeat modes (e.g., repeat one, repeat all).
- Use the 'EQ' button to cycle through equalizer presets.
- Adjust the MP3/AUX volume knob and MASTER volume for desired output.
5.5 Sirenos funkcija
- To activate the siren, flip the SIREN SW to the 'ON' position.
- To deactivate, flip the SIREN SW back to the 'OFF' position.
- Use the MASTER volume to control the siren's output level.
6. Priežiūra
Proper maintenance ensures the longevity of your ampgyvybingesnis:
- Valymas: Reguliariai valykite įrenginį minkštu, sausu skudurėliu. Nenaudokite abrazyvinių valiklių, vaško ar tirpiklių.
- Vėdinimas: Ensure that the ventilation grilles are free from dust and debris. Use a soft brush or vacuum cleaner to clear them if necessary.
- Saugykla: Jei saugote ampJei nenaudojate šaldytuvo ilgesnį laiką, atjunkite jį nuo maitinimo šaltinio ir laikykite vėsioje, sausoje vietoje, toliau nuo tiesioginių saulės spindulių ir ekstremalių temperatūrų.
- Jungtys: Periodically check all cable connections for tightness and signs of wear.
7. Problemų sprendimas
Jei kyla problemų dėl jūsų amplifier, refer to the table below for common problems and solutions:
| Problema | Galima priežastis | Sprendimas |
|---|---|---|
| Nėra galios | Power cable not connected; Power outlet faulty; Power switch off; 12V DC battery depleted or incorrectly connected. | Check power cable connection; Try a different outlet; Ensure power switch is ON; Check 12V DC battery charge and polarity. |
| Nėra garso išvesties | Master volume too low; Input volume too low; Speakers not connected or faulty; Incorrect input selected (for MP3/AUX); Mute activated. | Increase Master and input volumes; Check speaker connections and functionality; Ensure correct input source is active; Check if any mute function is engaged. |
| Iškraipytas garsas | Volume too high (clipping); Speaker impedance mismatch; Faulty cables or connections. | Reduce volume; Verify speaker impedance compatibility; Check and replace faulty cables. |
| MP3/USB/SD not playing | Neteisinga file format; USB drive/SD card faulty or not inserted correctly; MP3/AUX volume too low. | Užtikrinti files are MP3 format; Reinsert USB/SD card; Try a different USB/SD card; Increase MP3/AUX volume. |
| Feedback (howling) from microphones | Microphone too close to speakers; Microphone volume too high. | Reposition microphones away from speakers; Reduce microphone volume. |
Jei problema išlieka ir išbandžius šiuos sprendimus, susisiekite su klientų aptarnavimo tarnyba.
8. Specifikacijos
Technical specifications for the LTC 3-Channel 60W Public Address Ampgyvybingesnis:
| Funkcija | Specifikacija |
|---|---|
| Modelio numeris | LTCAUDIO95-1000 |
| Output Power (12V) | RMS 35W, Max. 45W |
| Output Power (220V) | RMS 45W, Max. 60W |
| Kanalų skaičius | 3 (MIC1, MIC2, AUX/MP3) |
| ttage | 220 voltų (kintamoji srovė), 12 voltų (nuolatinė srovė) |
| Didžiausia tiekimo apimtistage | 240 voltų |
| Minimali tiekimo apimtistage | 220 voltai (kintamoji srovė) |
| Gaminio matmenys (I x P x A) | 48 x 9 x 35 cm (18.9 x 3.5 x 13.8 colio) |
| Produkto svoris | 3.26 kilogramo (7.19 svaro) |
| Montavimo tipas | Stalo laikiklis |
| Integruotos funkcijos | USB/SD MP3 Player, Siren |
9. Garantija ir palaikymas
This product is manufactured by Ibiza and sold under the LTC brand. Spare parts availability is indicated for 2 years from the date of purchase. For technical support, troubleshooting assistance beyond what is provided in this manual, or warranty claims, please contact your retailer or the authorized service center. Keep your proof of purchase for warranty validation.


