1. Įvadas
This manual provides detailed instructions for the installation, operation, and maintenance of your Gewiss GW10701 Programmable Thermostat. This device is designed to control heating and air conditioning systems, allowing you to manage room temperature efficiently and comfortably. Please read this manual thoroughly before installation and use to ensure proper functionality and safety.
2. Saugos informacija
Visada laikykitės šių saugos priemonių, kad išvengtumėte sužalojimų ar įrenginio sugadinimo:
- Montavimą turėtų atlikti tik kvalifikuoti specialistai, laikydamiesi vietinių elektros kodeksų ir taisyklių.
- Disconnect power to the heating/cooling system at the main circuit breaker before installing or servicing the thermostat.
- Saugokite termostatą nuo vandens ar per didelės drėgmės.
- Naudokite tik nurodytą baterijų tipą ir įdėdami užtikrinkite teisingą poliškumą.
- Keep batteries out of reach of children. Do not dispose of batteries in fire.
- Do not attempt to open or repair the thermostat yourself. Contact qualified service personnel.
3. Produktas baigtasview
The Gewiss GW10701 is a wall-mounted programmable thermostat featuring an LCD display and intuitive controls for temperature management.
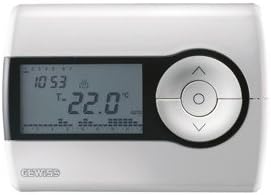
1 paveikslas: Priekyje view of the Gewiss GW10701 Thermostat. It features a clear LCD screen displaying time and temperature, alongside a circular control panel with directional buttons and a central confirmation button for easy navigation and setting adjustments.
3.1. Komponentai
- LCD ekranas: Shows current time, temperature, operating mode, and programming settings.
- Valdymo mygtukai: Typically include UP/DOWN arrows for temperature adjustment, MODE button for selecting operating modes (e.g., Heat, Cool, Auto, Off), and a SET/PROG button for accessing programming menus. (Note: Specific button functions may vary slightly; refer to on-screen prompts.)
- Baterijų skyrius: Located on the rear or side, houses the power supply batteries.
- Montavimo plokštė: Saugiam montavimui ant sienos.
4. Montavimas
4.1. Vietos pasirinkimas
Select a central location on an interior wall, approximately 1.5 meters (5 feet) above the floor. Avoid locations near heat sources (lamps, direct sunlight, fireplaces), drafts (windows, doors), or areas with poor air circulation.
4.2. Termostato montavimas
- Atjunkite maitinimą: Turn off the power to your heating/cooling system at the main circuit breaker.
- Atskira pagrindo plokštė: Carefully detach the front cover of the thermostat from its base plate.
- Pažymėkite ir gręžkite: Hold the base plate against the wall at your chosen location. Mark the drilling points. Drill holes and insert wall anchors if necessary.
- Tvirta pagrindo plokštė: Fasten the base plate to the wall using the provided screws.
- Laidų instaliacija (jei taikoma): Connect the system wires to the appropriate terminals on the base plate. Refer to the wiring diagram provided with your heating/cooling system or consult a qualified electrician. Note: While the thermostat is battery-powered, it controls a 230V system. Ensure correct wiring.
- Įdėkite baterijas: Insert the required batteries into the battery compartment, observing correct polarity (+/-).
- Termostato prijungimas: Carefully reattach the thermostat front cover to the base plate, ensuring it clicks securely into place.
- Atkurti maitinimą: Turn on the power to your heating/cooling system at the main circuit breaker.
5. Operacija
5.1. Pradinė sąranka
Upon first power-up or after battery replacement, you may need to set the current time and date. Follow the on-screen prompts or refer to the programming section.
5.2. Temperatūros nustatymas
Naudokite UP ir ŽEMYN arrow buttons to adjust the desired temperature. The display will show the set temperature temporarily, then revert to the current room temperature.
5.3. Veikimo režimai
Paspauskite REŽIMAS button (or similar) to cycle through available operating modes:
- HEAT: Termostatas įjungs šildymo sistemą, kai kambario temperatūra nukris žemiau nustatytos temperatūros.
- SAUNUS: The thermostat will activate the air conditioning system when the room temperature rises above the set temperature.
- AUTOMATINIS: Termostatas automatiškai persijungia tarp šildymo ir vėsinimo, kad palaikytų nustatytą temperatūros diapazoną.
- IŠJUNGTA: Šildymo ir vėsinimo sistemos yra išjungtos.
6. Programavimas
The Gewiss GW10701 allows you to create custom heating/cooling schedules for different times of the day and days of the week. This feature helps optimize energy consumption and comfort.
6.1. Laiko ir datos nustatymas
- Paspauskite NUSTATYTI or PROG mygtuką, kad patektumėte į nustatymų meniu.
- Navigate using the arrow buttons to find "Time" or "Date" settings.
- Use the arrow buttons to adjust the values (hour, minute, day, month, year).
- Patvirtinkite kiekvieną nustatymą paspausdami NUSTATYTI or central button.
6.2. Creating a Program Schedule
The thermostat typically offers daily or weekly programming options. You can set different temperatures for various periods (e.g., Wake, Day, Evening, Sleep).
- Paspauskite PROG mygtuką, norėdami įjungti programavimo režimą.
- Select the day or group of days you wish to program (e.g., Mon-Fri, Sat-Sun, or individual days).
- For each period (e.g., "Wake"), set the desired start time and temperature using the arrow buttons.
- Advance to the next period and repeat the process.
- Save your program and exit programming mode.
Consult the on-screen menu and specific button labels on your device for precise programming steps, as interfaces can vary.
7. Priežiūra
7.1. Baterijos keitimas
The thermostat is powered by batteries. When the battery indicator appears on the display, replace the batteries promptly to ensure continuous operation. Typically, 2x AA or AAA alkaline batteries are required.
- Atsargiai nuimkite termostato priekinį dangtelį.
- Išimkite senas baterijas ir atsakingai jas išmeskite.
- Įdėkite naujas baterijas, užtikrindami teisingą poliškumą.
- Vėl uždėkite priekinį dangtį.
7.2. Valymas
Clean the thermostat's exterior with a soft, dry cloth. Do not use abrasive cleaners, solvents, or spray cleaners directly onto the device, as this can damage the display or internal components.
8. Problemų sprendimas
| Problema | Galima priežastis | Sprendimas |
|---|---|---|
| Ekranas tuščias arba blankus. | Išsikrovusios arba išsikrovusios baterijos. | Pakeiskite baterijas naujomis. |
| Šildymo / vėsinimo sistema nereaguoja. |
|
|
| Temperatūros rodmenys atrodo netikslūs. | Termostato vietai įtakos turi skersvėjai arba šilumos šaltiniai. | Įsitikinkite, kad termostatas nėra veikiamas tiesioginių saulės spindulių, skersvėjų ar šilumą skleidžiančių prietaisų. |
9. Specifikacijos
- Gamintojas: Gewiss
- Modelio numeris: GW10701 (Chorus)
- Matmenys (P x P x A): 13 x 2.3 x 9.2 cm
- Svoris: 9.07 g
- Spalva: Baltas
- Medžiaga: Plastikiniai
- Maitinimas: Maitinamas baterijomis
- Perjungimas Voltage: 230 Volt (for controlled system)
- Ekrano tipas: LCD arba LED
- Montavimo tipas: Montuojamas ant sienos
- Valdymo funkcijos: Programmable, Button control
- Naudojimas: Heating systems, Air conditioning systems
10. Garantija ir palaikymas
For warranty information, technical support, or service inquiries regarding your Gewiss GW10701 Thermostat, please refer to the warranty card included with your product or visit the official Gewiss website. You may also contact your local Gewiss distributor or retailer for assistance.
Gewiss Official Websvetainė: www.gewiss.com