1. Įvadas
This manual provides comprehensive instructions for the safe and effective operation of the KORAD KA3005P Programmable DC Power Supply. The KA3005P is a high-precision, variable, and adjustable linear power supply designed for laboratory, educational, and industrial applications. It offers stable and reliable DC power output with advanced features such as programmable control, memory storage, and multiple safety protections.

1.1 paveikslas: KORAD KA3005P Programmable DC Power Supply. This image shows the front and side view of the power supply unit, highlighting its compact design and the clear digital display.
2. Saugos instrukcijos
To ensure safe operation and prolong the life of your KORAD KA3005P power supply, please observe the following safety precautions:
- Always connect the power supply to a properly grounded AC outlet.
- Do not operate the unit in a wet or damp aplinką.
- Užtikrinkite tinkamą vėdinimą aplink įrenginį, kad jis neperkaistų. Neužblokuokite ventiliacijos angų.
- Neatidarykite casinMaitinimo šaltinio g. Viduje nėra dalių, kurias galėtų aptarnauti vartotojas. Visus techninės priežiūros darbus patikėkite kvalifikuotiems darbuotojams.
- Patikrinkite įvesties tūrįtage selector switch (110V/220V) on the rear panel is set correctly for your local power supply before connecting to AC mains.
- Disconnect the power cord before performing any maintenance or when the unit is not in use for extended periods.
- Avoid short-circuiting the output terminals. Although the unit has short-circuit protection, prolonged short circuits can cause damage.
- Use appropriate test leads and ensure they are rated for the voltage and current levels you intend to use.
3. Kas yra dėžutėje
Upon unpacking your KORAD KA3005P, please verify that all the following items are included:
- 1 x KORAD KA3005P Power Supply Unit
- 1 x kintamosios srovės laidas
- 1x USB laidas
- 1 x Set of 5 Amp Test Leads (Banana plug to Crocodile clip)
- 1 x Vartotojo vadovas
- 1 x CD containing Remote Control Software
4. Produkto ypatybės
The KORAD KA3005P is equipped with a range of features designed for precision and ease of use:
- High Precision Output: Provides stable and accurate 0-30V and 0-5A DC output.
- 4 skaitmenų LED ekranas: Bright and clear display for precise voltage (0.001V resolution) and current (0.001A resolution) readings.
- Programuojamas valdymas: USB and RS232 ports for remote control via PC software.
- Atminties saugykla: Four dedicated memory locations (M1-M4) to save and recall frequently used voltage ir dabartiniai nustatymai.
- Pastovus ttage (CV) & Constant Current (CC) Modes: Automatically switches between modes to maintain stable output.
- Visapusiškos saugos priemonės: Apima viršsrovės apsaugą (OCP), viršįtampių apsaugątage Protection (OVP), and Short-Circuit Protection.
- Output ON/OFF Button: Allows safe connection and disconnection of loads without powering down the unit.
- Užrakto funkcija: Apsaugo nuo atsitiktinio nustatymų pakeitimo veikimo metu.
- Perjungiamas įvesties garsumastage: Supports 110V/220V AC input, making it suitable for international use.
- Tylus aušinimo ventiliatorius: Built-in variable speed fan for efficient heat dissipation and reduced operational noise.

4.1 paveikslas: Key features of the KORAD KA3005P. This image illustrates the power and protection mechanisms, memory settings, the bright 4-digit LED display, and the switchable power input on the rear panel.
5. Panel Overview
5.1 Priekinis skydelis

5.1 paveikslas: Front Panel Layout of the KORAD KA3005P. This image provides a detailed view of the front panel with numbered labels indicating the function of each control and indicator.
- ttage Readout (V): Rodo išvesties tūrįtage voltais.
- Current Readout (A or mA): Displays the output current in Amperes arba miliamperes.
- Power Readout (Watts): Displays the calculated output power in Watts.
- Pastovus ttage Mode Indicator (CV): Illuminates when the unit is operating in Constant Voltage režimas.
- Constant Current Mode Indicator (CC): Illuminates when the unit is operating in Constant Current mode.
- Memory Setting Indicator (M1-M4): Indicates which memory preset is currently active.
- Over-Current Protection Indicator (OCP): Illuminates when Over-Current Protection is active.
- Virš ttage Protection Indicator (OVP): Illuminates when Over-Voltage Protection is active.
- Front Panel Lock Indicator (LOCK): Illuminates when the front panel controls are locked.
- Output On/Off Indicator (ON): Illuminates when the output is active.
- A/mA Button: Perjungia tarp Amperage and milliAmperage display, and also serves as the Panel Lock button when held.
- OCP mygtukas: Activates/deactivates Over-Current Protection.
- OCP SET Button: Used to set the Over-Current Protection limit.
- OVP mygtukas: Activates/deactivates Over-Voltage Apsauga.
- OVP SET Button: Used to set the Over-Voltage Protection limit.
- ĮJUNGIMO/IŠJUNGIMO mygtukas: Toggles the output power ON or OFF.
- Memory Save/Recall Buttons (M1-M4): Used to save and recall voltage ir dabartiniai nustatymai.
- BEEP Button: Toggles the audible feedback (beeper) ON or OFF.
- SENSE Button: (Functionality may vary, typically for remote sensing).
- Setting Adjustment Dial: Rotary encoder for adjusting voltage ir dabartinės vertės.
- Digit Selection Buttons (Left/Right Arrows): Used to select the digit to be adjusted by the Setting Adjustment Dial.
- ttage/Current Adjustment Selector: Toggles between adjusting voltage ir srovė.
- Išvesties gnybtai: Raudoni (+) ir juodi (-) gnybtai apkrovai prijungti.
- Įžeminimo terminalas (GND): Green terminal for chassis ground connection.
- Maitinimo mygtukas: Pagrindinis įrenginio maitinimo jungiklis.
5.2 Galinis skydelis

5.2 paveikslas: Rear Panel Layout of the KORAD KA3005P. This image displays the rear panel, showing the AC input, voltage selector, cooling fan, and communication ports.
- Kintamosios srovės įvesties lizdas: Skirta prijungti pridedamą kintamosios srovės maitinimo laidą.
- ttage Selector Switch (110V/220V): Allows selection of the appropriate input voltage jūsų regionui. Ensure this is set correctly before connecting to power.
- Aušinimo ventiliatorius: Automatically adjusts speed based on internal temperature to maintain optimal operating conditions.
- USB prievadas: For connecting to a computer for programmable control.
- RS232 prievadas: For connecting to a computer or other devices for programmable control.
- Saugiklio laikiklis: Contains the main AC input fuse.
6. Sąranka
6.1 Pirminė apžiūra
Before connecting the power supply, inspect the unit for any signs of physical damage that may have occurred during shipping. If any damage is found, contact your supplier immediately.
6.2 Setting Input Voltage
Raskite ttage selector switch on the rear panel of the unit. Ensure it is set to match your local AC mains voltage (110V or 220V). Incorrect setting can damage the unit.

6.1 paveikslas: Rear panel showing the 110V/220V voltage selector switch. This switch must be correctly set to match the local AC power supply before operation.
6.3 Maitinimo jungtis
Connect the supplied AC power cord to the AC input socket on the rear panel and then plug it into a grounded wall outlet.
6.4 Išvesties jungtys
Connect your load to the output terminals on the front panel using the provided test leads or other suitable leads. Ensure correct polarity: Red for positive (+), Black for negative (-). The green terminal is for chassis ground.
7. Naudojimo instrukcijos
7.1 Įjungimas / išjungimas
- Paspauskite GALIA button on the front panel to turn the unit ON. The display will illuminate.
- Paspauskite GALIA button again to turn the unit OFF.
7.2 Nustatymas Voltage ir srovė
- Paspauskite VOLTAGE/DARBINĖ button to select whether you are adjusting voltage or current. The corresponding display will flash.
- Naudokite Rodyklė kairėn/dešinėn buttons to select the digit you wish to adjust. The selected digit will flash.
- Pasukite Setting Adjustment Dial to change the value of the selected digit.
- Kartą norimą ttage and current limit are set, press the ĮJUNGTA/IŠJUNGTA button to enable the output. The ON užsidegs indikatorius.

7.1 paveikslas: Close-up of the bright 4-digit LED display. This display provides precise and clear readouts of voltage and current, essential for accurate power delivery.
7.3 Atminties funkcijos (M1–M4)
The unit allows you to save and recall up to four sets of voltage ir dabartiniai nustatymai.
- Išsaugoti: Nustatykite norimą tūrįtage and current. Press and hold the desired memory button (M1, M2, M3, or M4) until you hear a beep or the display indicates saving.
- Prisiminti: Briefly press the desired memory button (M1, M2, M3, or M4). The saved settings will be loaded.

7.2 paveikslas: Close-up of the memory save/recall buttons (M1-M4). These buttons allow users to quickly store and retrieve frequently used voltage ir dabartiniai nustatymai.
7.4 Output ON/OFF Control
The ĮJUNGTA/IŠJUNGTA button controls the output power to the terminals independently of the main power switch.
- Paspauskite ĮJUNGTA/IŠJUNGTA to enable output. The ON užsidegs indikatorius.
- Paspauskite ĮJUNGTA/IŠJUNGTA again to disable output. The ON indikatorius išsijungs.
- It is recommended to disable the output before connecting or disconnecting loads.
7.5 Užrakinimo funkcija
To prevent accidental changes to settings during operation, you can lock the front panel controls.
- Paspauskite ir palaikykite A/mA mygtuką kelias sekundes, kol pasirodys UŽRAKTAS indicator illuminates. All front panel controls will be disabled.
- Norėdami atrakinti, paspauskite ir palaikykite A/mA mygtuką dar kartą, kol UŽRAKTAS indikatorius išsijungia.
7.6 Over-Current Protection (OCP) and Over-Voltage apsauga (OVP)
These features protect your connected load and the power supply from damage due to excessive current or voltage.
- Setting OCP/OVP: Paspauskite OCP SET or OVP SET mygtuką. Naudokite Setting Adjustment Dial ir Rodyklė kairėn/dešinėn buttons to set the desired protection limit.
- Activating OCP/OVP: Paspauskite OCP or OVP button to enable the protection. The corresponding indicator will light up.
- When an OCP or OVP event occurs, the output will automatically shut off, and the respective indicator will flash. To reset, disable the protection or resolve the fault, then press the ĮJUNGTA/IŠJUNGTA button to re-enable output.

7.3 paveikslas: Close-up of the protection and control buttons. This image highlights the OCP, OVP, and Lock buttons, which are crucial for safe operation and preventing accidental changes.
8. Programmable Control
The KORAD KA3005P can be controlled remotely via a computer using the USB or RS232 ports located on the rear panel.
- Programinės įrangos diegimas: Insert the provided CD into your computer and follow the on-screen instructions to install the remote control software. Drivers for the USB/RS232 interface may also be included.
- Ryšys: Connect the power supply to your computer using the supplied USB cable or an RS232 cable (not included for RS232).
- Programinės įrangos veikimas: Launch the installed software. Select the correct COM port corresponding to your connected power supply. The software allows you to set voltage, current, enable/disable output, and configure protection limits from your computer. Some software versions may support programmable sequences or data logging.
- Serijos protokolas: For advanced users, the user manual and CD typically contain documentation on the serial communication protocol, allowing for custom software development or integration with other programming environments (e.g., LabVIEW, Python).
8.1 paveikslas: Rear panel showing USB and RS232 ports for programmable control. The image also displays the included user manual, USB cable, test leads, and software CD, which facilitate remote operation.
For software downloads or updates, please refer to the official KORAD website or the link provided in the manual (e.g., www.koradtechnology.com).
9. Priežiūra
The KORAD KA3005P is designed for reliable operation with minimal maintenance. Follow these guidelines:
- Valymas: Prieš valydami atjunkite maitinimo šaltinį nuo kintamosios srovės tinklo. Išorę nuvalykite minkšta, sausa šluoste. Nenaudokite abrazyvinių valiklių ar tirpiklių.
- Vėdinimas: Ensure the ventilation openings on the sides and rear of the unit are free from dust and obstructions. Periodically clean the fan vents with compressed air if necessary.
- Saugiklio keitimas: If the unit does not power on, check the fuse located in the fuse holder on the rear panel. Replace only with a fuse of the same type and rating (e.g., 5A/250V for 110V input, 3A/250V for 220V input). Always disconnect the power cord before replacing the fuse.
- Saugykla: Kai prietaisas ilgesnį laiką nenaudojamas, laikykite jį vėsioje, sausoje vietoje, toliau nuo tiesioginių saulės spindulių ir ekstremalių temperatūrų.
10. Problemų sprendimas
If you encounter issues with your KORAD KA3005P, refer to the following common problems and solutions:
| Problema | Galima priežastis | Sprendimas |
|---|---|---|
| Įrenginys neįsijungia. | No AC power; Blown fuse; Incorrect voltage selektoriaus nustatymas. | Check power cord connection and wall outlet. Replace fuse if blown. Verify voltage selector (110V/220V) on rear panel is correct. |
| Nėra išėjimo tūriotage/dabartinis. | Output is OFF; OCP/OVP triggered; Short circuit at output. | Paspauskite ĮJUNGTA/IŠJUNGTA button to enable output. Check if OCP/OVP indicators are flashing; resolve fault and reset. Check for short circuits in the load or test leads. |
| Išėjimo tūristage/current is unstable. | Poor load connection; Overheating; Faulty test leads. | Ensure secure connections to the load. Check ventilation and allow unit to cool. Inspect and replace test leads if damaged. |
| Display shows incorrect readings. | Calibration issue; External interference. | If readings are consistently inaccurate, contact support for calibration. Minimize external electromagnetic interference. |
| Software communication issues. | Incorrect COM port; Driver issues; Software incompatibility. | Verify COM port selection in software. Reinstall USB/RS232 drivers. Ensure software version is compatible with your operating system. Refer to software documentation. |
If the problem persists after attempting these solutions, please contact KORAD customer support.
11. Specifikacijos
Technical specifications for the KORAD KA3005P Programmable DC Power Supply:

11.1 paveikslas: KORAD KA3005P Unit Specifications. This image provides a visual summary of the key technical parameters of the power supply.
| Parametras | Vertė |
|---|---|
| ttage Diapazonas | 0-30V |
| Dabartinis diapazonas | 0-5A |
| Apkrovos reguliavimas (tūristage) | ≤0.01%+2mV |
| Apkrovos reguliavimas (srovė) | ≤0.1%+10mA |
| Line Regulation (Voltage) | ≤0.01%+3mV |
| Line Regulation (Current) | ≤0.1%+3mA |
| Setup Resolution (Voltage) | 10mV |
| Setup Resolution (Current) | 1 mA |
| Setup Accuracy (25°C ± 5°C) (Voltage) | ≤0.5%+20mV |
| Setup Accuracy (25°C ± 5°C) (Current) | ≤0.5%+10mA |
| Ripple (20-20M) (Voltage) | ≤2 mVrms |
| Ripple (20-20M) (Current) | ≤2 mArms |
| Temperatūros koeficientas (ttage) | ≤150 ppm |
| Temperature Coefficient (Current) | ≤150 ppm |
| Read Back Resolution (Voltage) | 10mV |
| Read Back Resolution (Current) | 1 mA |
| Reaction Time (Voltage Rise) | ≤100mS (Voltage lašas) |
| Sąsaja | Programmable (USB, RS232) |
| Svoris | 9.52 svaro / 4.32 kg |
| Matmenys (P x A x G) | 100 mm (plotis) x 156 mm (aukštis) x 260 mm (gylis) |
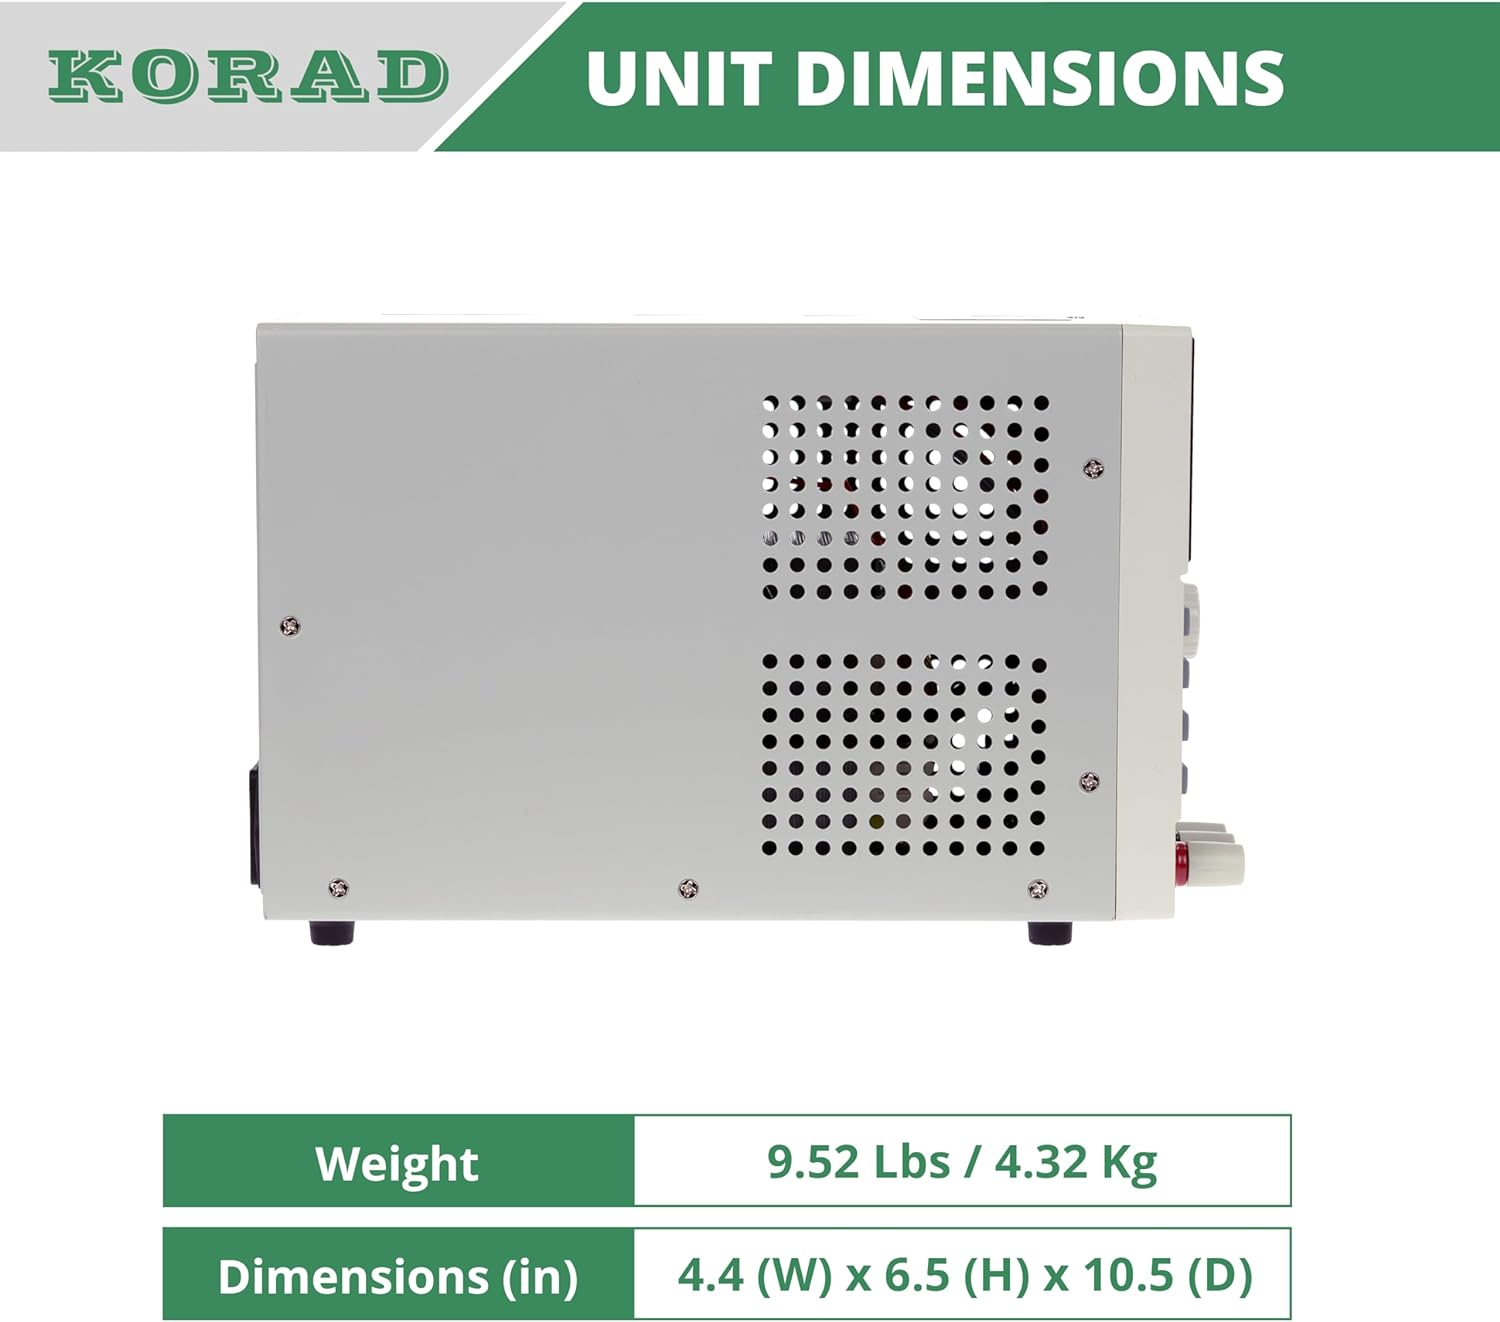
11.2 paveikslas: Šoninė view of the KORAD KA3005P, illustrating its physical dimensions. The unit measures 4.4 inches (W) x 6.5 inches (H) x 10.5 inches (D).
12. Garantija ir palaikymas
KORAD products are manufactured to high quality standards. For warranty information and technical support, please refer to the documentation included with your purchase or visit the official KORAD websvetainę.
- Garantija: Prašome išsaugoti pirkimo įrodymą garantiniams reikalavimams. Garantijos sąlygos ir nuostatos gali skirtis priklausomai nuo regiono.
- Techninė pagalba: For technical assistance, troubleshooting beyond this manual, or service inquiries, please contact KORAD customer support through their official channels.
- Internetiniai ištekliai: Check the KORAD website for updated manuals, software, and FAQs.


