1. Įvadas
The Contour +2 HD GPS Wearable Video Camera is designed for capturing high-definition video in various environments. This camera features a built-in GPS receiver for tracking speed, elevation, and distance, which can be overlaid onto your video footage. Mobile connectivity allows for real-time video preview and camera setting adjustments via a smartphone or tablet. The instant-on record switch ensures quick capture, and the included waterproof case extends its usability to underwater activities.
2. Pakuotės turinys
Verify that all the following items are included in your Contour +2 package:
- Contour +2 HD GPS Wearable Video Camera
- Waterproof Case (submersible up to 60 meters)
- 4GB Micro SD kortelė
- Profile Montuoti
- Rotating Flat Surface Mount
- Įkraunama baterija
- USB 2.0 kabelis
- Mini HDMI laidas
- Mikrofono kabelis
- Contour Flex Mount Strap (Amazon exclusive)
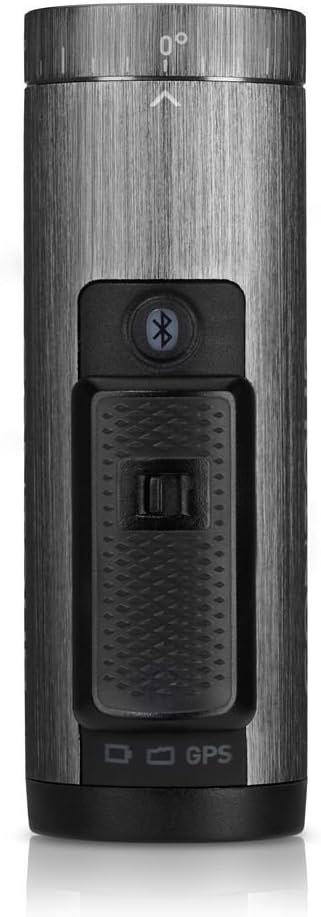
3. Fotoaparatas baigtasview
Familiarize yourself with the key components of your Contour +2 camera.


4. Sąranka
4.1. Akumuliatoriaus įkrovimas
Before first use, fully charge the camera's rechargeable battery. Connect the camera to a USB power source using the provided USB 2.0 cable. The status indicator light will show charging progress.
4.2. Micro SD kortelės įdėjimas
Open the battery/SD card compartment at the rear of the camera (refer to Figure 3.5). Insert the 4GB Micro SD card into the designated slot until it clicks into place. Ensure the card is oriented correctly. For optimal performance, it is recommended to format the SD card using the camera's format switch or the Contour mobile app.
4.3. Kameros montavimas
The Contour +2 camera utilizes a rail mount system. Attach the desired mount (e.g., Profile Mount, Rotating Flat Surface Mount, or Flex Mount Strap) to your helmet, handlebars, or other surfaces. Slide the camera onto the mount until it locks securely. The camera's lens can rotate up to 270 degrees to achieve the desired recording angle.
4.4. Pairing with Mobile App (Bluetooth)
Download the Contour mobile app (available for iOS/Android devices). Enable Bluetooth on your mobile device and on the Contour +2 camera by pressing the Bluetooth button (refer to Figure 3.3). Follow the app's instructions to pair your camera. This allows for live preview, remote control, and advanced setting adjustments.
5. Operacija
5.1. Įjungimas / išjungimas ir įrašymas
To power on the camera and begin recording, slide the Instant On-Record Switch (located on top of the camera, refer to Figure 3.3) into its forward, locked position. The camera will power on and immediately start recording. To stop recording and power off the camera, slide the switch back to its original position.
5.2. Using the Laser Level
The integrated laser level assists in aligning your shot. When the camera is powered on, a laser line will project from the front of the camera (near the lens). Adjust the camera's rotation until the laser line is horizontal, ensuring a level recording angle.
5.3. Customizing Settings via Mobile App
The Contour mobile app provides extensive control over camera settings:
- Vaizdo įrašo kokybė: Select from various recording modes, including 1080p and 480p at up to 120 frames per second (fps) for slow-motion effects.
- Vaizdo nustatymai: Adjust white balance, contrast, sharpness, exposure, and exposure metering.
- Garsas: Control microphone gain, especially useful when using an external microphone via the external mic jack.
- GPS: Enable or disable GPS tracking for data overlay.
5.4. GPS funkcionalumas
The built-in GPS receiver tracks speed, elevation, and distance during recording. This data can be integrated and displayed with your video footage using the Contour Storyteller app or other compatible software.
5.5. Vandeniui atsparaus dėklo naudojimas
For underwater activities or protection in wet conditions, place the Contour +2 camera inside the provided waterproof case. Ensure the case is properly sealed before submersion. The case is rated for depths up to 60 meters.
6. Priežiūra
6.1. Kameros ir dėklo valymas
Wipe the camera body with a soft, dry cloth. For the lens, use a specialized lens cleaning cloth and solution. Clean the waterproof case with fresh water after saltwater exposure and ensure all seals are free of debris.
6.2. Akumuliatoriaus priežiūra
To prolong battery life, avoid extreme temperatures. Store the camera with a partially charged battery if not in use for extended periods. The rechargeable battery provides up to 2.5 hours of recording, depending on settings and environmental conditions.
6.3. SD kortelių valdymas
Regularly transfer recorded footage to a computer to free up space on the Micro SD card. Format the SD card periodically using the camera's format switch or the mobile app to maintain optimal recording performance and prevent data corruption.
7. Problemų sprendimas
| problema | Galima priežastis | Sprendimas |
|---|---|---|
| Kamera neįsijungia. | Baterija išsikrovusi arba netinkamai įdėta. | Charge the battery fully. Ensure the battery is correctly seated in its compartment. |
| Camera does not record. | SD card is full, corrupted, or not inserted. | Insert a valid SD card. Format the SD card. Transfer files atlaisvinti vietos. |
| Vaizdo įrašo kokybė prasta. | Incorrect settings or dirty lens. | Check video resolution settings in the mobile app. Clean the camera lens. |
| Mobile app cannot connect to camera. | „Bluetooth“ išjungtas arba kyla problemų dėl susiejimo. | Ensure Bluetooth is enabled on both camera and mobile device. Re-attempt pairing through the app. |
| GPS data not overlaying. | GPS feature disabled or poor signal. | Ensure GPS is enabled in camera settings via the mobile app. Record in an open area with clear sky view. |
8. Specifikacijos
| Funkcija | Detalė |
|---|---|
| Gaminio matmenys | 3.88 x 1.25 x 2.25 colio |
| Prekės svoris | 5.3 uncijos |
| Baterijos | 1 ličio jonų baterija (pridedama) |
| Nuotraukų jutiklių technologija | CMOS |
| Vaizdo įrašymo raiška | 1080p, 480p |
| „Flash“ atminties tipas | Micro SD |
| Vaizdo įrašymo formatas | MP4 |
| Palaikomas garso formatas | AAC, MP3 |
| Ekrano dydis | 2.7 Inches (for preview via mobile app) |
| Ryšio technologija | „Bluetooth“, HDMI, USB |
| Ypatinga funkcija | Atsparus vandeniui (su pridedamu dėklu) |
| Gamintojas | Kontūras |
9. Garantija ir palaikymas
For warranty information and technical support, please refer to the official Contour websvetainėje arba susisiekite su jų klientų aptarnavimo skyriumi. Išsaugokite pirkimo įrodymą, jei prireiktų garantijos.


