Įvadas
„Phanteks Enthoo Primo“ yra viso bokšto dydžio kompiuterio korpusas, skirtas entuziastams, ieškantiems išskirtinių aušinimo galimybių ir funkcionalaus dizaino. Šiame vadove pateikiamos išsamios instrukcijos, kaip nustatyti, naudoti, prižiūrėti ir šalinti triktis, užtikrinant optimalų našumą ir ilgaamžiškumą.

Figure 1: Phanteks Enthoo Primo Ultimate Full Tower Computer Case (Black/Blue)
Sąranka ir diegimas
Proper installation is crucial for the performance and stability of your system. Follow these steps carefully.
1. Maitinimo šaltinio (PSU) įrengimas
The Enthoo Primo features a unique thermally isolated PSU location at the rear of the case, promoting cooler temperatures and improved cable management.
- Locate the PSU compartment at the bottom rear of the case.
- Slide your PSU into the designated area.
- Secure the PSU with the provided screws from the rear of the case.
Video 1: Animated demonstration of internal case features, including PSU placement, HDD trays, and cable management. This video highlights the thermally isolated PSU location and hidden cable routing.

2 pav.: galinis view of the Enthoo Primo case, showing the PSU mounting area at the bottom.
2. Drive Installation (HDD/SSD)
The case supports up to 6 HDDs with dual repositionable and removable HDD cages, and features Drop-n-Lock double stack SSD brackets.
- Access the hidden HDD trays by removing the side panel.
- Slide your 3.5" HDDs into the trays and secure them.
- For 2.5" SSDs, utilize the removable Drop-n-Lock brackets. These can be installed in three different locations within the case.
- Ensure all drives are securely fastened to prevent vibration.

3 pav. Vidus view of the Enthoo Primo, highlighting the hidden HDD trays and SSD mounting points.
3. Pagrindinės plokštės ir komponentų montavimas
The Enthoo Primo supports ATX motherboards and offers ample space for various components.
- Install your ATX motherboard onto the standoffs.
- Install your CPU, RAM, and graphics cards as per their respective manuals.
- Utilize the pre-installed cable management tools behind the motherboard tray to route cables neatly.
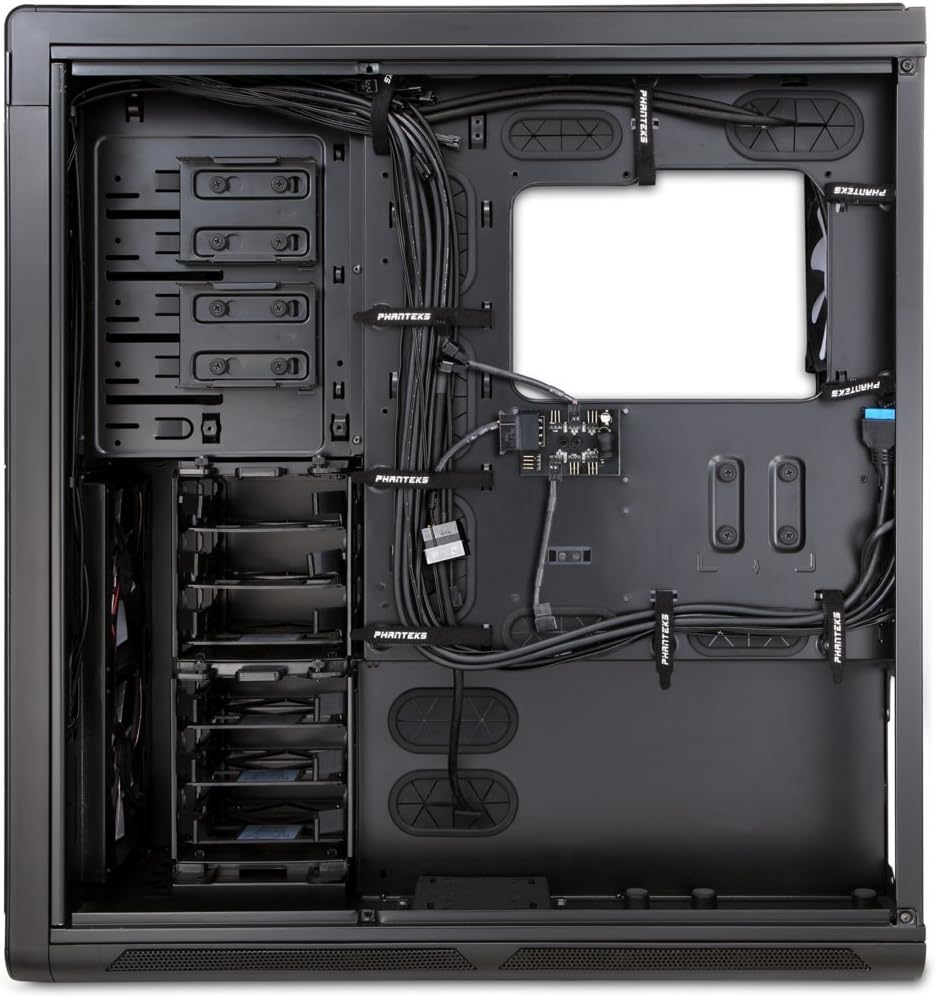
4 pav. Vidus view of the Enthoo Primo, showcasing the cable management features behind the motherboard tray.
Veikimo ypatybės
The Enthoo Primo is designed with user convenience and optimal performance in mind.
Priekinio skydelio I/O
The front I/O panel provides easy access to essential ports and controls:
- 2 USB 3.0 prievadai: Dėl didelės spartos duomenų perdavimo.
- 2 USB 2.0 prievadai: Standartinėms periferinėms jungtims.
- Mikrofono lizdas: Dėl garso įvesties.
- 3.5 mm garso lizdas: Dėl garso išvesties.
- LED jungiklis: Controls the integrated LED lighting (LED strip & Fan LED).

Figure 5: Top angled view of the Enthoo Primo, illustrating the accessible front I/O panel.
Aušinimo sistema
The Enthoo Primo offers extensive cooling support for both air and liquid cooling configurations.
- Iš anksto įdiegti ventiliatoriai: Includes 1x 140mm fan on top, 2x 140mm LED fans in front, 1x 140mm fan in the rear, and 1x 140mm fan on the bottom. All are Phanteks' PH-F140SP fans.
- Oro aušinimas: Supports up to 14x 120mm fans or 11x 140mm fans for comprehensive airflow.
- Vandens aušinimas: Provides up to 5 different installation areas for slim and thick radiators (120mm and 140mm form factors), including clearance for push-pull fan configurations. Innovative liquid cooling mounting systems include radiator brackets and a versatile reservoir/pump bracket.

6 pav.: priekis view of the Enthoo Primo, showcasing the clean design and intake areas.
Priežiūra
Regular maintenance ensures optimal performance and extends the lifespan of your computer case.
- Dulkių filtrai: The Enthoo Primo features removable dust filters located at the front, top, bottom (2x), and side panel (2x). Regularly remove and clean these filters to maintain optimal airflow and prevent dust buildup inside the case.
- Išorinis valymas: Naudokite minkštą, damp cloth to wipe down the aluminum front and top panels. Avoid abrasive cleaners.
- Vidaus valymas: Periodically use compressed air to clear dust from internal components and fan blades. Ensure the system is powered off and unplugged before cleaning.
Trikčių šalinimas
Šiame skyriuje aptariamos dažniausiai pasitaikančios problemos, su kuriomis galite susidurti.
- Nėra galios:
- Ensure the PSU is properly seated and connected to the motherboard and wall outlet.
- Verify that the front panel power switch cable is correctly connected to the motherboard's header.
- Fans Not Spinning / LED Not Lighting:
- Check fan connections to the motherboard or fan hub.
- Ensure the fan hub is powered (SATA connection).
- Verify the LED switch on the front panel is in the 'on' position.
- Neveikiantys USB prievadai:
- Confirm that the USB 3.0 and USB 2.0 headers from the front panel are securely connected to the motherboard.
- Per didelis triukšmas:
- Check if all fans are securely mounted and free from obstructions.
- Ensure drive trays are properly secured to minimize vibration.
- Clean dust filters and fan blades if necessary.
Specifikacijos
| Funkcija | Detalė |
|---|---|
| Modelio pavadinimas | PH-ES813P_BL |
| Atvejo tipas | Pilnas bokštas |
| Pagrindinės plokštės suderinamumas | ATX |
| Medžiaga | Aluminum Faceplates, Steel Chassis |
| Spalva | Juoda/mėlyna |
| Matmenys (IxPxH) | 23.62 x 9.84 x 25.59 colio |
| Prekės svoris | 50 svaro |
| USB 3.0 prievadai | 2 |
| USB 2.0 prievadai | 2 |
| Garso prievadai | 1x Microphone, 1x 3.5mm Audio Jack |
| Išplėtimo lizdai | 8 |
| Aušinimo būdas | Oras / Vanduo |
| Iš anksto įdiegti ventiliatoriai | 5x 140mm (1 top, 2 front LED, 1 rear, 1 bottom) |
| Maksimalus ventiliatoriaus palaikymas | 14 x 120 mm arba 11 x 140 mm |
| Radiatoriaus palaikymas | Up to 5 locations (120mm/140mm form factors) |
Garantija ir palaikymas
For warranty information and technical support, please refer to the official Phanteks websvetainėje arba išsamiame naudotojo vadove.
You can download the complete user manual in PDF format here: Phanteks Enthoo Primo User Manual (PDF)


