1. Įvadas
This manual provides detailed instructions for the installation, operation, and maintenance of your REXING F9US Dash Camera. Please read this manual thoroughly before using the device to ensure proper functionality and to maximize your user experience.
2. Pakuotės turinys
Patikrinkite, ar jūsų siuntinyje yra visi toliau išvardyti daiktai:
- REXING F9US Dash Camera
- In-car charging cable
- Windshield Suction Cup mount
- USB kabelis
- Vartotojo vadovas
Pastaba: A Micro SD Card (Class 10 or higher, up to 128GB) is required for operation and is not included in the package.
3. Produktas baigtasview
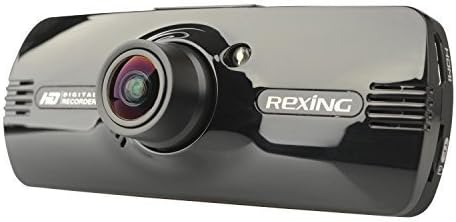
Image: REXING F9US Dash Camera
The REXING F9US Dash Camera is a compact, high-definition car dashboard camera designed to record your driving. It features a 170-degree wide-angle lens, a 2.7-inch 16:9 TFT LCD screen, and supports Full HD 1080p video recording. Key features include G-Sensor for automatic accident detection, Wide Dynamic Range (WDR) technology for optimal video quality in varying light conditions, and motion detection for recording when the vehicle is parked.
4. Sąranka
4.1 „Micro SD“ kortelės įdėjimas
- Įsitikinkite, kad vaizdo registratorius yra išjungtas.
- Raskite „Micro SD“ kortelės lizdą kameros šone.
- Insert a Class 10 or higher Micro SD card (up to 128GB) into the slot until it clicks into place.
- Norėdami išimti, švelniai stumkite kortelę, kol ji iššoks.
4.2 Vaizdo registratoriaus montavimas
- Kruopščiai nuvalykite norimą priekinio stiklo vietą.
- Pritvirtinkite siurbtuko laikiklį prie kameros.
- Tvirtai prispauskite siurbtuką prie priekinio stiklo ir pasukite svirtį, kad jį pritvirtintumėte.
- Sureguliuokite kameros kampą, kad užtikrintumėte aiškų vaizdą view kelio.
4.3 Maitinimo prijungimas
- Connect the in-car charging cable to the camera's power input port.
- Plug the other end of the cable into your vehicle's 12V power outlet (cigarette lighter socket).
- The camera will typically power on automatically when the vehicle's ignition is turned on.
4.4 Pradiniai nustatymai
Upon first use, or after a reset, you may need to set the date, time, and language. Navigate through the menu using the camera's buttons.
5. Naudojimo instrukcijos
5.1 Pagrindinis įrašymas
- Once powered on and connected to power, the camera will automatically begin loop recording. A flashing red record indicator will confirm recording is active.
- Norėdami rankiniu būdu paleisti / sustabdyti įrašymą, paspauskite REC mygtuką.
5.2 Meniu naršymas
The camera features several buttons for navigation and control:
- MENIU mygtukas (bottom left): Press once to enter video settings, press twice to enter tool settings.
- EVENT Button (top right, with a triangle): Functions as an 'Up' button in menus. When held for 3 seconds during recording, it locks the current video file.
- MIC mygtukas: Functions as a 'Down' button in menus.
- REC mygtukas: Functions as 'Select' or 'OK' in menus.
- Paveikslėlio mygtukas (bottom right): When held, enters review režimas į view įrašytas files.
5.3 Atkūrimas ir File Valdymas
- Į view recordings on the camera, enter review mode using the Picture button.
- Norėdami perkelti files to a computer, connect the camera via the USB cable. The camera will appear as a removable disk.
- The camera also supports HDMI output for viewdidesniame ekrane.
6. Funkcijų paaiškinimas
6.1 Ciklo įrašymas
The camera continuously records video in segments (e.g., 2, 3, or 5 minutes). When the memory card is full, the oldest unlocked video file is automatically overwritten by the newest recording. This ensures continuous recording without manual intervention.
6.2 G-Sensor (Accident Auto Detection Feature)
The built-in G-Sensor detects sudden movements or impacts (e.g., in case of a collision). When triggered, the current video segment is automatically locked and saved to prevent it from being overwritten by loop recording. These files are stored in a protected folder.
6.3 Wide Dynamic Range (WDR) Technology
WDR technology enhances video quality by balancing exposure in scenes with high contrast, such as driving from a dark tunnel into bright sunlight. This ensures clearer images with more detail in both bright and dark areas.
6.4 Judesio aptikimas
When enabled, the camera will automatically start recording if it detects motion in front of the lens while the vehicle is parked. This feature is useful for monitoring your vehicle when it's unattended.
6.5 Naktinis matymas
The camera supports night vision capabilities to improve recording quality in low-light conditions. Note that the built-in LED light is primarily for use when the camera is outside the car in battery mode, acting as a flashlight. For in-car recording, it's generally recommended to keep it off to avoid windshield reflections.
7. Priežiūra
- Valymas: Kameros objektyvą ir ekraną valykite minkštu, sausu skudurėliu. Venkite naudoti abrazyvinius valiklius ar tirpiklius.
- SD kortelės formatavimas: It is recommended to format the Micro SD card periodically (e.g., once a month) within the camera's settings to ensure optimal performance and prevent data corruption. Back up any important files prieš formatavimą.
- Saugykla: Kai nenaudojate, laikykite fotoaparatą vėsioje, sausoje vietoje, toliau nuo tiesioginių saulės spindulių ir ekstremalių temperatūrų.
8. Problemų sprendimas
| Problema | Galimas sprendimas |
|---|---|
| Kamera neįsijungia. | Ensure the power cable is securely connected to both the camera and the vehicle's 12V outlet. Check the vehicle's power outlet for functionality. |
| Camera powers off unexpectedly or stops recording. | Verify the power connection is stable. Ensure the Micro SD card is Class 10 or higher and formatted correctly. Try a different Micro SD card. |
| Vaizdo įrašo kokybė prasta arba vaizdas neryškus. | Clean the camera lens. Ensure the protective film (if any) has been removed from the lens. Check if the windshield is clean. |
| Micro SD kortelės klaida. | Format the Micro SD card within the camera's settings. Ensure the card is Class 10 or higher. Try a different, reputable brand Micro SD card. |
| Date and time are incorrect. | Datos ir laiko nustatymus koreguokite fotoaparato meniu. |
9. Specifikacijos
| Funkcija | Detalė |
|---|---|
| Vaizdo raiška | 1080FHD (1920x1080), 1080P (1440x1080), 720P (1280x720), WVGA (848x480), VGA (640x480), QVGA (320x240) |
| Objektyvas | 170 degree 6-layers glass lens |
| Ekrano dydis | 2.7 inch 16:9 TFT LCD |
| Vaizdo įrašas File Formatas | MOV |
| Vaizdas File Formatas | JPG |
| Atminties kortelių palaikymas | Up to 128GB Class10 or upper Micro SD/TF Card (not included) |
| Ryšys | HDMI, AV-OUT, USB |
| Garso įrašymas | Palaikoma |
| Kalbos sistema | Anglų, prancūzų, ispanų, portugalų, vokiečių, italų, supaprastinta kinų, tradicinė kinų, rusų, japonų |
| Gaminio matmenys | 7 x 5 x 3 colio |
| Prekės svoris | 12.1 uncijos |
| Baterija | Reikalinga 1 ličio polimerų baterija (vidinė) |
10. Garantija ir palaikymas
For information regarding product warranty, technical support, or service inquiries, please visit the official REXING website or contact REXING customer service directly. Please have your product model number (F9US) and purchase details available when contacting support.


