1. Įvadas
Thank you for choosing the Mastech MS2115B True RMS Digital Clamp Meter. This instrument is designed for safe and accurate measurement of various electrical parameters. This manual provides essential information for the proper and safe operation, maintenance, and troubleshooting of your device. Please read this manual thoroughly before use and retain it for future reference.
2. Saugos informacija
Norint užtikrinti saugų skaitiklio naudojimą ir techninę priežiūrą, laikykitės šių saugos priemonių:
- Visada laikykitės vietinių ir nacionalinių saugos taisyklių.
- Nenaudokite matuoklio, jei jis atrodo pažeistas arba jei pažeista bandymo laidų izoliacija.
- Niekada netepkite daugiau nei vardinis tūristage, kaip pažymėta ant skaitiklio, tarp gnybtų arba tarp bet kurio gnybto ir įžeminimo.
- Būkite ypač atsargūs dirbdami su voltagesant didesnei nei 60 V nuolatinės srovės arba 30 V kintamosios srovės RMS įtampai. Šios įtampostagtai kelia šoko pavojų.
- Keep your fingers behind the probe barriers when making measurements.
- Prieš keisdami funkcijas, atjunkite bandymo laidus nuo grandinės.
- Prieš atidarydami baterijų dangtelį, atjunkite bandymo laidus nuo matuoklio.
- Kad išvengtumėte neteisingų rodmenų, pakeiskite bateriją, kai tik pasirodys išsikrovusios baterijos indikatorius.
- Nenaudokite matuoklio sprogioje dujų, garų ar dulkių aplinkoje.
- Įsitikinkite, kad klamp jaw is fully closed when taking current measurements.
3. Produktas baigtasview
The Mastech MS2115B is a True RMS digital clamp meter designed for professional and home use. It offers a wide range of measurement capabilities and features for electrical testing.
3.1 Pagrindinės savybės
- Dual Display with 6000 counts for clear readings.
- Jaw size up to Ø40mm (1.6 inch) for various conductor sizes.
- Auto Ranging and Manual Ranging capabilities.
- DC/AC current measurement up to 1000A.
- Tests AC/DC voltage and current, resistance, capacitance, frequency, and duty cycle.
- True RMS (Root Mean Square) measurement for accurate readings on non-sinusoidal waveforms.
- NCV (Non-Contact Voltage Detector) for identifying live wires without direct contact.
- Inrush current measurement for motor startup analysis.
- Data Hold, MAX/MIN Value Measurement, and Relative Measurement functions.
- Diode test and Continuity Buzzer (<50 ohm).
- Display Backlight and Work Light for use in dimly lit areas.
- Low Battery Display and Auto Power Off for extended battery life.
- USB interface for data communication with Windows OS.
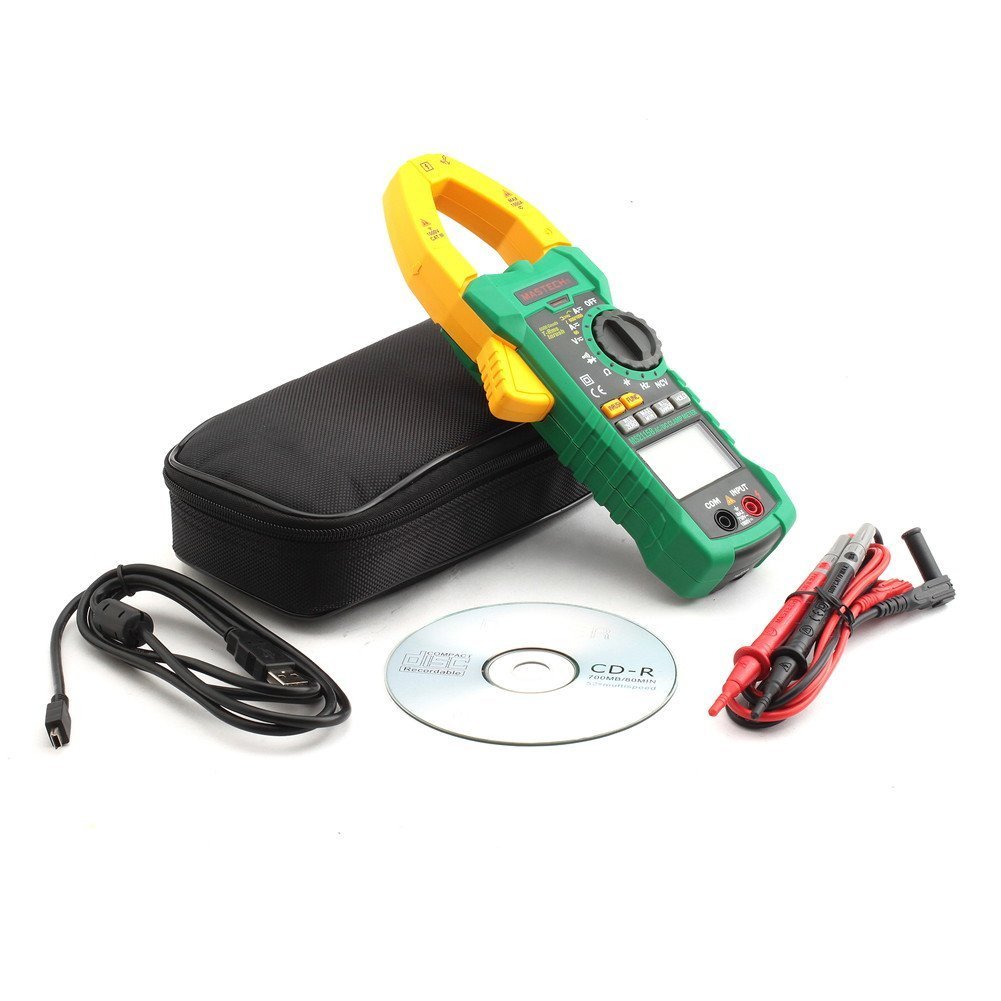
3.2 Komponentai
Familiarize yourself with the main components of the MS2115B clamp metras:


4. Sąranka
4.1 Akumuliatoriaus įdėjimas
The Mastech MS2115B requires batteries for operation. Please note that batteries are not included in the package.
- Įsitikinkite, kad matuoklis yra IŠJUNGTAS, ir atjunkite visus bandymo laidus.
- Suraskite baterijų skyriaus dangtelį matuoklio gale.
- Atsuktuvu atlaisvinkite varžtą, tvirtinantį akumuliatoriaus dangtelį.
- Atsargiai nuimkite akumuliatoriaus dangtelį.
- Insert the required batteries, observing correct polarity (+ and -).
- Uždėkite akumuliatoriaus dangtelį ir pritvirtinkite varžtu.

4.2 Bandymo laidų prijungimas
Už ttage, resistance, capacitance, frequency, diode, and continuity measurements, connect the test leads:
- Insert the red test lead into the "INPUT" terminal.
- Insert the black test lead into the "COM" (common) terminal.
4.3 USB Interface Setup (for Windows OS)
The MS2115B features a USB interface for data logging and analysis on a computer running Windows OS.
- Install the provided communication software from the included CD onto your Windows computer.
- Connect the USB communication cable to the meter's USB port and to an available USB port on your computer.
- Follow the software instructions to establish communication and begin data transfer.
5. Naudojimo instrukcijos
5.1 Power On/Off and Auto Power Off
- To power on, rotate the rotary switch from "OFF" to any desired measurement function.
- To power off, rotate the rotary switch back to "OFF".
- The meter features an Auto Power Off function to conserve battery life. It will automatically turn off after approximately 15 minutes of inactivity. To disable this feature temporarily, refer to the full user manual for specific button combinations during power-on.
5.2 Funkcijos mygtukai
- FUNC.: Selects between different measurement modes within a single rotary switch position (e.g., AC/DC voltage, diodas/tęstinumas).
- DIAPAZONAS: Toggles between auto-ranging and manual ranging. In manual ranging, press repeatedly to cycle through ranges.
- LAIKYTI: Įšaldo dabartinį rodmenį. Paspauskite dar kartą, kad atleistumėte.
- MAX/MIN: Displays the maximum or minimum reading recorded since activation. Press repeatedly to cycle through MAX, MIN, and current readings.
- REL/ZERO: Activates relative measurement mode, displaying the difference between the current reading and a stored reference value. Also used for zeroing DC current readings.
- INRUSH: Measures the inrush current (startup current) of motors or other inductive loads.
- Backlight/Work Light: Activates the display backlight and work light for improved visibility.
5.3 Matavimo procedūros
5.3.1 DC/AC ttage Matavimas
- Prijunkite raudoną bandymo laidą prie „INPUT“ gnybto, o juodą bandymo laidą – prie „COM“ gnybto.
- Rotate the rotary switch to the V (Ttage) position. Press FUNKCIJA to select between DC V= arba AC V~.
- Touch the test probes to the desired test points in the circuit.
- Perskaitykite ttage reikšmė ekrane.
5.3.2 DC/AC Current Measurement (Clamp)
- Rotate the rotary switch to the A (Current) position. Press FUNKCIJA to select between DC A= arba AC A~.
- Atidarykite klamp jaw and enclose only one conductor of the circuit. Ensure the jaw is fully closed.
- For DC current, press REL/NULIS to zero the display before measurement if needed.
- Nuskaitykite dabartinę vertę ekrane.
5.3.3 Atsparumo matavimas
- Prijunkite bandymo laidus kaip ir tūrio matavimuitage.
- Rotate the rotary switch to the Ω (Pasipriešinimo) pozicija.
- Įsitikinkite, kad bandomoji grandinė yra atjungta nuo įtampos.
- Touch the test probes across the component or circuit to measure resistance.
- Perskaitykite pasipriešinimo vertę ekrane.
5.3.4 Talpos matavimas
- Prijunkite bandymo laidus kaip ir tūrio matavimuitage.
- Rotate the rotary switch to the BŽŪP (Talpos) padėtis.
- Prieš matavimą įsitikinkite, kad kondensatorius yra visiškai išsikrovęs.
- Palieskite bandymo zondus prie kondensatoriaus gnybtų.
- Ekrane perskaitykite talpos vertę.
5.3.5 Dažnio ir darbo ciklo matavimas
- Prijunkite bandymo laidus kaip ir tūrio matavimuitage.
- Rotate the rotary switch to the Hz/% (Frequency/Duty Cycle) position.
- Paspauskite FUNKCIJA to toggle between Frequency (Hz) and Duty Cycle (%).
- Prilieskite bandymo zondus prie signalo šaltinio.
- Nuskaitykite dažnio arba darbo ciklo vertę ekrane.
5.3.6 Diodų bandymas ir tęstinumas
- Prijunkite bandymo laidus kaip ir tūrio matavimuitage.
- Rotate the rotary switch to the Diodas / tęstinumas padėtis.
- Paspauskite FUNKCIJA to select between Diode test or Continuity test.
- For Diode Test: Touch the red probe to the anode and the black probe to the cathode. The display shows the forward voltage kritimas. Apkeiskite zondus, kad patikrintumėte, ar nėra nutrūkusios grandinės.
- For Continuity Test: Touch the probes to the circuit. A continuous beep indicates continuity (resistance less than 50 ohms).
5.3.7 NCV (bekontaktis tūrinistage) aptikimas
- Rotate the rotary switch to the NCV padėtis.
- Perkelkite cl viršųamp meter near a conductor or outlet.
- Matuoklis pyptels ir užsidegs NCV indikatorius, jei kintamosios srovės įtampatagaptinkamas e.
5.3.8 Įjungimo srovės matavimas
- Rotate the rotary switch to the A~ (Kintamosios srovės) padėtis.
- Paspauskite NUOTRAUKA mygtuką.
- Atidarykite klamp jaw and enclose only one conductor of the circuit where the inrush current is to be measured.
- Turn on the device or motor. The meter will capture and display the peak inrush current.
6. Priežiūra
6.1 Valymas
- Periodiškai nuvalykite dėklą su skelbimuamp audiniu ir švelniu plovikliu. Nenaudokite abrazyvinių ar tirpiklių.
- Saugokite įvesties gnybtus nuo purvo ir drėgmės.
6.2 Akumuliatoriaus keitimas
When the low battery indicator appears on the display, replace the batteries immediately to ensure accurate readings. Refer to Section 4.1 for battery installation instructions.
6.3 Saugykla
- If the meter is not used for an extended period, remove the batteries to prevent leakage and damage.
- Matuoklį laikykite vėsioje, sausoje vietoje, toliau nuo tiesioginių saulės spindulių ir ekstremalių temperatūrų.
7. Problemų sprendimas
If you encounter issues with your Mastech MS2115B, refer to the following common troubleshooting steps:
| Problema | Galima priežastis | Sprendimas |
|---|---|---|
| Matuoklis neįsijungia. | Neišsikrovusios arba neteisingai įdėtos baterijos. | Patikrinkite baterijų poliškumą; pakeiskite baterijas. |
| Rodmuo nerodomas arba nėra „OL“. | Open circuit, out of range, or incorrect function selected. | Check circuit connections, select appropriate range/function, ensure continuity. |
| Netikslūs rodmenys. | Low battery, dirty test leads/terminals, external interference. | Replace batteries, clean leads/terminals, move away from strong electromagnetic fields. |
| Auto Power Off activates too quickly. | Normal operation (15 min inactivity). | Press any button or rotate the switch to reset the timer. Refer to the full manual to disable this feature if needed. |
| Clamp current reading is zero or incorrect. | Multiple conductors in jaw, jaw not fully closed, DC current not zeroed. | Ensure only one conductor is in the jaw, close jaw completely, press REL/ZERO for DC current. |
If the problem persists after trying these steps, please contact Mastech customer support or your local distributor for assistance.
8. Techninės specifikacijos
The following table outlines the technical specifications for the Mastech MS2115B Digital Clamp Matuoklis:
| Matavimo funkcija | Diapazonas | Tikslumas |
|---|---|---|
| DC ttage | 600 mV / 6 V / 60 V / 600 V / 1000 V | ±(0.5% + 3) for 600mV-600V, ±(0.8% + 2) for 1000V |
| AC ttage | 600 mV / 6 V / 60 V / 600 V / 750 V | ±(0.8% + 3) for 600mV-600V, ±(1% + 4) for 750V |
| DC srovė | 60A / 600A / 1000A | ± (3.0% + 3) |
| Kintamosios srovės srovė | 60A / 600A / 1000A | ± (2.5% + 3) |
| Atsparumas | 600Ω / 6kΩ / 60kΩ / 600kΩ / 6MΩ / 60MΩ | ±(1.0% + 3) for 600Ω-6MΩ, ±(1.5% + 3) for 60MΩ |
| Talpa | 6nF / 60nF / 600nF / 6uF / 60uF / 600uF / 6mF / 60mF | ± (4.0% + 3) |
| Frequency (from Clamp) | 0 ~ 10kHz | ± (1.5% + 5) |
| Frequency (AC Voltage) | 0 ~ 10kHz | ± (1.5% + 5) |
| Loginis dažnis | 0 ~ 60MHz | ± (0.5% + 3) |
| Darbo ciklas | 10 % ~ 90 % | ±3.0 % |
| Diodo testas | 2.7 V | Pirmyn ttage lašas |
| Tęstinumo garsinis signalas | <50 omų | Garsinis pyptelėjimas |
Bendrosios specifikacijos:
- Ekranas: Dual Display, 6000 counts
- Žandikaulio atidarymas: Ø40 mm (1.6 colių)
- Tikrasis RMS: Taip
- NCV: Taip
- Inrush: Taip
- Duomenų sulaikymas: Taip
- MAX/MIN: Taip
- Santykinis matavimas: Taip
- Backlight/Work Light: Taip
- Išsikrovusio akumuliatoriaus indikatorius: Taip
- Automatinis išjungimas: Taip
- USB sąsaja: Yes (Windows OS compatible)
- Maitinimo šaltinis: Maitinamas baterijomis (baterijos nepridedamos)
- Matmenys: Apytiksliai 26 x 14 x 6.6 cm
- Svoris: Maždaug 720 g
- Gamintojas: MASTECH
- Modelio numeris: MS2115B
- ASIN: B00LD8IIJS
- UPC: 702382755386, 702382755881, 706551142168
9. Garantija ir palaikymas
For warranty information, please refer to the documentation provided with your purchase or contact the seller directly. Mastech products typically come with a manufacturer's warranty against defects in materials and workmanship.
For technical support, troubleshooting assistance beyond this manual, or inquiries about replacement parts, please contact Mastech customer service or your authorized Mastech distributor. Contact details can usually be found on the manufacturer's official websvetainėje arba pirkimo sąskaitoje faktūroje.


