1. Įvadas
This manual provides comprehensive instructions for the setup, installation, operation, maintenance, and troubleshooting of your Antec VSK2000-U3 Micro-ATX Desktop Case. Please read this manual thoroughly before beginning installation to ensure proper assembly and optimal performance.
Video 1: Computer Case Display. This video provides a visual overview of a computer case, demonstrating its external features and design.
2. Pagrindinės savybės
The Antec VSK2000-U3 Micro-ATX Desktop Case is designed for efficient and compact PC builds. Key features include:
- Palaikomos pagrindinės plokštės: iki „Micro-ATX“
- Cooling: 1 x 92 mm temperature-controlled fan included
- Power Supply Unit (PSU) Support: TFX form factor
- Drive Bays: Supports up to 1 x 5.25” ODD, 1 x 3.5" HDD & 1 x 2.5" SSD
- Išplėtimo lizdai: 4

1 pav.: priekis view of the Antec VSK2000-U3 case, highlighting the front panel I/O and optical drive bay.
3. Sąranka ir diegimas
Follow these steps to install your components into the Antec VSK2000-U3 case. Ensure all power is disconnected before handling internal components.
3.1. Bylos rengimas
- Pašalinti šonines plokštes: Carefully remove the side panels of the case to access the interior.
- Įdiekite įvesties / išvesties skydą: Įdėkite prie pagrindinės plokštės pridedamą įvesties / išvesties skydą į galinę korpuso angą.

2 pav.: šonas view of the Antec VSK2000-U3 case with the side panel removed, showing the internal layout.
3.2. Pagrindinės plokštės montavimas
- Align Motherboard: Carefully align your Micro-ATX motherboard with the standoffs inside the case.
- Saugi pagrindinė plokštė: Use the provided screws to secure the motherboard to the standoffs.
3.3. Maitinimo šaltinio įrengimas
- Maitinimo bloko padėtis: Install your TFX form factor power supply into its designated bay.
- Saugus maitinimo šaltinis: Pritvirtinkite maitinimo šaltinį varžtais nuo korpuso galo.
- Prijunkite maitinimo laidus: Route and connect the necessary power cables to your motherboard and other components.

3 pav.: galinis view of the Antec VSK2000-U3 case, showing the I/O shield area, expansion slots, and PSU mounting.
3.4. Drive Installation (ODD, HDD, SSD)
- Optical Drive (ODD): Install your 5.25" optical drive into the front bay. The case features a tool-less ODD housing system.
- Hard Disk Drive (HDD): Install your 3.5" HDD into the designated bay. The case features a tool-less HDD housing system.
- Solid State Drive (SSD): Install your 2.5" SSD into the designated bay.
- Connect Drives: Connect SATA data and power cables to all installed drives.
3.5. Išplėtimo plokštės diegimas
- Nuimkite lizdų dangtelius: Nuimkite reikiamus išplėtimo lizdų dangtelius nuo korpuso galo.
- Įdiekite kortelę: Insert your expansion card (e.g., graphics card) into the appropriate PCI-E slot on the motherboard.
- Saugi kortelė: Secure the expansion card with a screw.
3.6. Priekinio skydelio jungtys
Connect the front panel cables (USB 3.0, audio, power switch, reset switch, LED indicators) to the corresponding headers on your motherboard. Refer to your motherboard manual for specific header locations.
3.7. Kabelių valdymas
Route cables neatly to improve airflow and aesthetics. Use cable ties or the case's cable management features to secure cables away from moving parts and airflow paths.
3.8. Video Tutorials for Installation
Video 2: Detailed Installation Tutorial. This video demonstrates the step-by-step process of installing components into a computer case, including the motherboard, power supply, and drives.
Video 3: Micro ATX PC Case Installation. This video illustrates the assembly process for a Micro ATX PC case, covering component placement and cable routing.
4. Naudojimo instrukcijos
Once all components are securely installed and connected, replace the side panels. Connect your monitor, keyboard, mouse, and other peripherals to the appropriate ports on the rear I/O panel and front panel. Connect the power cable to the power supply and a wall outlet, then press the power button on the front of the case to start your system.
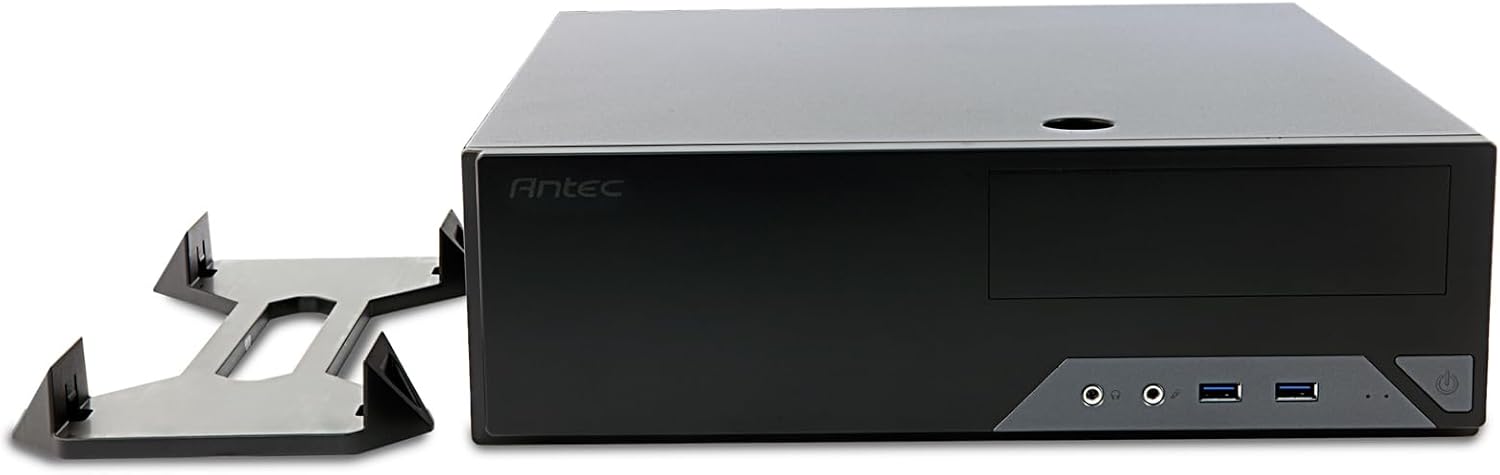
Figure 4: The Antec VSK2000-U3 case shown in a horizontal orientation with its included stand, demonstrating versatile placement options.
5. Priežiūra
Reguliarus techninis aptarnavimas padeda užtikrinti kompiuterio ilgaamžiškumą ir optimalų našumą.
- Dulkių valymas: Periodically clean dust from the case interior, fans, and air vents using compressed air or a soft brush. Ensure the system is powered off and unplugged before cleaning.
- Kabelių valdymas: Check cable routing periodically to ensure no cables are obstructing airflow or fan operation.
- Ventiliatoriaus patikrinimas: Ensure the included 92mm temperature-controlled fan and any other installed fans are operating correctly and free from obstructions.
6. Problemų sprendimas
Jei kyla problemų dėl kompiuterio surinkimo, atlikite šiuos įprastus trikčių šalinimo veiksmus:
- Nėra galios:
- Verify the power cable is securely connected to the PSU and wall outlet.
- Įsitikinkite, kad maitinimo šaltinio jungiklis yra „ĮJUNGTA“ padėtyje.
- Check all internal power connections (24-pin ATX, 8-pin CPU, GPU power, drive power).
- Confirm front panel power switch cable is correctly connected to the motherboard.
- Nėra ekrano:
- Ensure the monitor is connected to the correct graphics output (dedicated GPU or motherboard integrated graphics).
- Iš naujo įstatykite grafikos plokštę ir RAM modulius.
- Per didelis triukšmas:
- Identify the source of the noise (fan, HDD).
- Clean dust from fans.
- Ensure no cables are touching fan blades.
7. Specifikacijos
| Funkcija | Detalė |
|---|---|
| Prekės ženklas | Antec |
| Serija | VSK2000-U3 |
| Modelio pavadinimas | VSK2000-U3 |
| Pagrindinės plokštės suderinamumas | Mikro ATX |
| Atvejo tipas | Mid Tower (Slim Desktop) |
| Matmenys (IxPxH) | 18.6 x 15.9 x 7 colio |
| Prekės svoris | 5.28 svaro |
| Spalva | Juoda |
| Medžiaga | Painted/Coated Metal (Likely Steel Or Aluminum With Plastic Components) |
| Maitinimo šaltinio tvirtinimo tipas | Rear Mount (TFX form factor) |
| Aušinimo būdas | Air (1 x 92 mm temperature-controlled fan included) |
| Ventiliatoriaus dydis | 92 milimetrų |
| Drive Bays | 1 x 5.25” ODD, 1 x 3.5" HDD, 1 x 2.5" SSD |
| Išplėtimo lizdai | 4 |
8. Garantija ir palaikymas
The Antec VSK2000-U3 Micro-ATX Desktop Case comes with a 2 metų garantija. For technical support, warranty claims, or additional product information, please visit the official Antec websvetainėje arba susisiekite su jų klientų aptarnavimo skyriumi. Išsaugokite pirkimo įrodymą, kad galėtumėte patvirtinti garantiją.
Dėl papildomos pagalbos žr. Antec parduotuvė.


