1. Įvadas
This manual provides comprehensive instructions for the installation, operation, and maintenance of your UHPPOTE 4 Channel Color Quad System Video Splitter, Model UT-XYL-440. This device is designed to process and display video feeds from up to four CCTV cameras simultaneously on a single monitor, offering various display modes and control options for effective surveillance monitoring.
2. Saugos informacija
- Įsitikinkite, kad prietaisas pastatytas ant stabilaus, lygaus paviršiaus, kad išvengtumėte atsitiktinio kritimo.
- Naudokite prietaisą nurodytoje tūrio ribosetage range (DC 12V) using the provided power adapter.
- Avoid exposing the unit to moisture, rain, or extreme temperatures. This device is intended for indoor use only.
- Neatidarykite casing or attempt to repair the unit yourself. Refer all servicing to qualified personnel.
- Užtikrinkite tinkamą vėdinimą aplink įrenginį, kad jis neperkaistų.
3. Pakuotės turinys
Prašome patikrinti, ar pakuotėje yra visi reikalingi daiktai:
- UHPPOTE 4 Channel Color Quad System Video Splitter (UT-XYL-440)
- Infraraudonųjų spindulių nuotolinis valdymas
- BNC Adapters (7 pieces)
- Maitinimo adapteris (DC 12V)

Image 3.1: UHPPOTE 4 Channel Color Quad System Video Splitter, remote control, and BNC adapters.
4. Produktas baigtasview
Familiarize yourself with the components and controls of your video splitter.
4.1. Priekinis skydelis
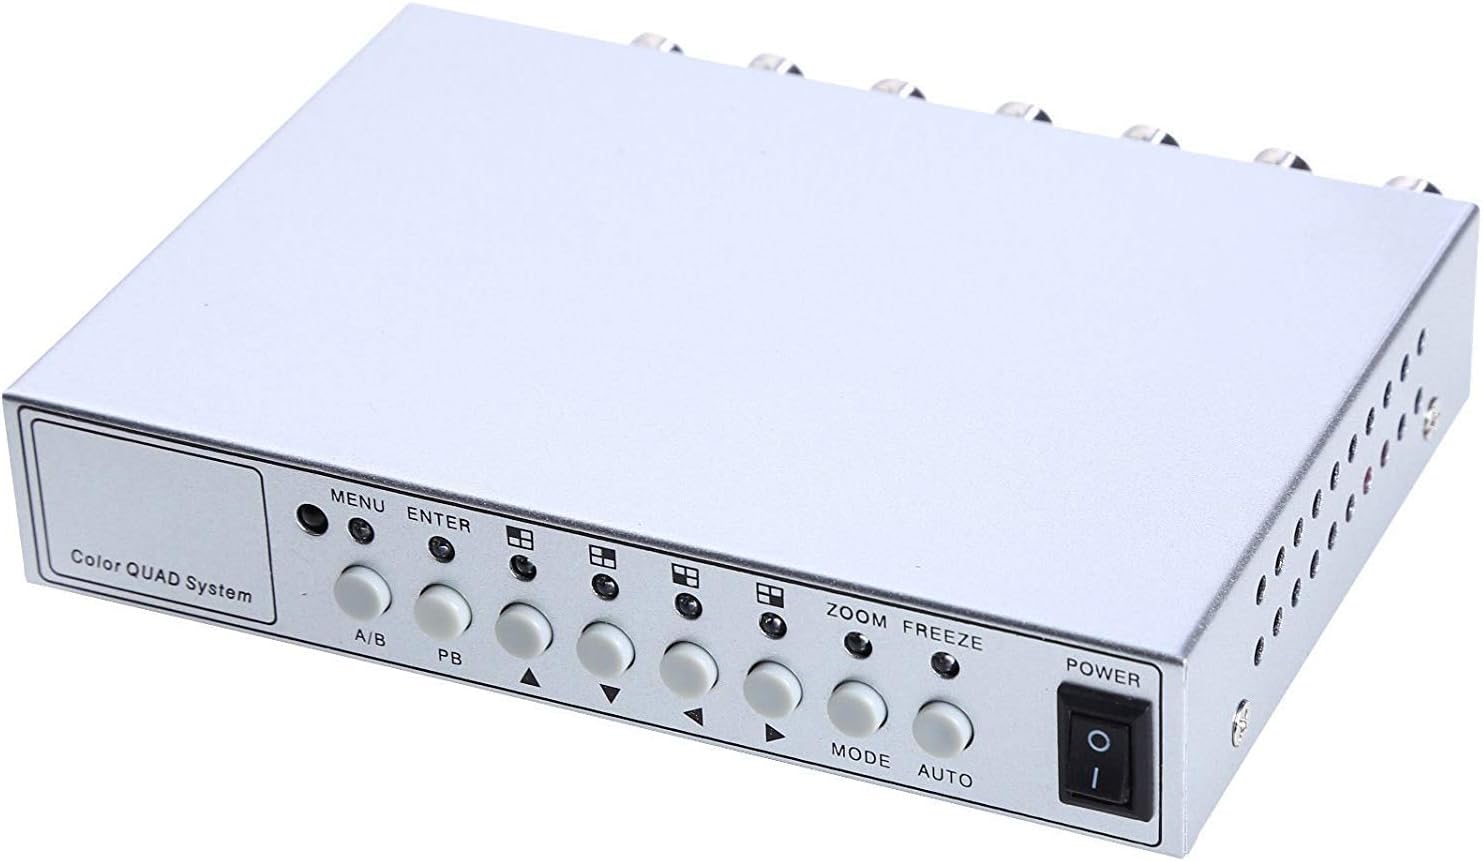
Image 4.1: Front panel controls and indicators.
- MENIU: Accesses the on-screen display (OSD) menu for settings adjustment.
- Įveskite: Confirms selections within the OSD menu.
- A/B: Switches between different display modes or channels.
- PB: Playback control (if connected to a VCR).
- Krypties rodyklės (aukštyn / žemyn / kairėn / dešinėn): Naršykite meniu parinktis ir koreguokite vertes.
- ZOOM: Activates the digital zoom function.
- ŠALDYTI: Freezes the current video frame.
- MODE: Cycles through various display modes (Quad, Full Screen, PIP, Dual Split).
- AUTOMATINIS: Activates the auto-sequence display mode.
- GALIA: On/Off switch for the unit.
4.2. Galinis skydelis

Image 4.2: Rear panel video input/output ports and power input.
- 1–4 VAIZDO ĮRAŠAS: BNC inputs for connecting up to four CCTV cameras.
- VCR IN: BNC input for connecting a VCR or other recording device.
- VCR OUT: BNC output for connecting to a VCR or other recording device.
- MONITORIUS: BNC output for connecting to a display monitor.
- 12 V nuolatinė srovė: Power input jack for the DC 12V power adapter.
4.3. Nuotolinio valdymo pultas

Image 4.3: Infrared remote control for convenient operation.
The remote control provides convenient access to all functions, mirroring the front panel controls and offering direct channel selection.
5. Sąranka
Follow these steps to set up your UHPPOTE Video Splitter:
- Prijungti kameras: Connect your CCTV cameras to the 1 VIDEO, 2 VIDEO, 3 VIDEO, ir 4 VIDEO BNC input ports on the rear panel. Ensure secure connections.
- Prijungti monitorių: Prijunkite monitorių prie MONITORIUS BNC output port on the rear panel.
- Connect VCR (Optional): If you wish to record video, connect the VCR IN ir VCR OUT BNC ports to your VCR or recording device.
- Prijunkite maitinimą: Insert the DC 12V power adapter into the DC 12V input jack on the rear panel, then plug the adapter into a standard electrical outlet.
- Maitinimas: Paspauskite GALIA mygtuką priekiniame skydelyje arba nuotolinio valdymo pulte, kad įjungtumėte įrenginį.
6. Naudojimo instrukcijos
6.1. Maitinimo įjungimas/išjungimas
Paspauskite GALIA button on the front panel or the remote control to switch the unit on or off.
6.2. Ekrano režimai
The unit supports various display configurations. Use the REŽIMAS button on the front panel or remote to cycle through them:
- QUAD Split Mode: Displays all four camera feeds simultaneously in a four-way split screen.
- Viso ekrano režimas: Displays a single camera feed in full screen. Use the directional arrows or number buttons (1-4) on the remote to select the desired camera.
- PIP (vaizdas vaizde) režimas: Displays one main camera feed with a smaller window of another camera feed. The position of the PIP window can often be adjusted via the menu.
- Dual Split Mode: Displays two camera feeds simultaneously (e.g., side-by-side or top-bottom).
- Auto Sequence Mode: Automatically cycles through full-screen views of each connected camera. Activate using the AUTO button on the front panel or remote.
6.3. Meniu naršymas ir nustatymai
To access and adjust system settings:
- Paspauskite MENIU button on the front panel or remote control. The On-Screen Display (OSD) menu will appear.
- Naudokite Aukštyn/Žemyn directional arrows to navigate between menu options.
- Paspauskite ENTER , kad pasirinktumėte parinktį arba atidarytumėte submeniu.
- Naudokite Kairė/dešinė directional arrows to adjust values (e.g., brightness, contrast) or change settings.
- Paspauskite MENIU dar kartą išeiti iš meniu.
Raktų nustatymai:
- Vaizdo įrašo koregavimai: Adjust Brightness, Contrast, Saturation, Hue, and Sharpness for optimal image quality.
- Sistemos formatas: Select between NTSC (for North America, Japan, etc.) or PAL (for Europe, Asia, etc.) based on your region's video standard. Incorrect selection can lead to distorted or black and white images.
- Overlay Information: Configure display of Camera Title, Real Time and Date, and Alarm/Loss/Motion messages.
- Event Report: Review event logs and configure buzzer/relay output settings.
6.4. Priartinimo funkcija
In full-screen mode, press the MODYTI button on the front panel or remote to activate digital zoom. Use the directional arrows to select the area to zoom in on.
6.5. Užšaldymo funkcija
Paspauskite UŽŠALDYTI (FRZ) button on the front panel or remote to pause the current video frame. Press it again to resume live video.
7. Priežiūra
- Valymas: Įrenginio išorę valykite minkšta, sausa šluoste. Nenaudokite skystų ar aerozolinių valiklių.
- Vėdinimas: Įsitikinkite, kad ventiliacijos angos nėra užblokuotos, kad išvengtumėte perkaitimo.
- Saugykla: Jei įrenginį ilgesnį laiką sandėliuosite, atjunkite jį nuo elektros tinklo ir laikykite vėsioje, sausoje vietoje.
8. Problemų sprendimas
| Problema | Galima priežastis | Sprendimas |
|---|---|---|
| Monitoriuje nėra vaizdo signalo |
|
|
| Distorted, black & white, or rolling image |
|
|
| Nuotolinio valdymo pultas neveikia |
|
|
| Constant buzzing sound |
|
|
9. Specifikacijos
| Funkcija | Detalė |
|---|---|
| Modelio numeris | UT-XYL-440 |
| Vaizdo įrašų įėjimai | 4 BNC (for cameras), 1 BNC (VCR In) |
| Vaizdo išvestys | 1 BNC (Monitor), 1 BNC (VCR Out) |
| Vaizdo raiška | 720x480 (NTSC 60Hz), 720x576 (PAL 50Hz) |
| Ekrano režimai | Quad Split, Full Screen, PIP, Dual Split, Auto Sequence |
| Vaizdo koregavimas | Ryškumas, kontrastas, sodrumas, atspalvis, ryškumas |
| Specialios funkcijos | Freeze Function, Zoom Function, Video Loss Detection, Motion Detection |
| Maitinimo šaltinis | DC 12V |
| Prekės svoris | 13.4 uncijos (apie 380 g) |
| Pakuotės matmenys | 8.54 x 6.06 x 2.4 colio (apytiksliai 21.7 x 15.4 x 6.1 cm) |
| Nuotolinis akumuliatorius | 1 x CR2 battery (required) |
10. Garantija ir palaikymas
UHPPOTE products are designed for reliability and performance. For warranty information, technical support, or service inquiries, please refer to the contact information provided with your purchase or visit the official UHPPOTE website. Please have your model number (UT-XYL-440) available when contacting support.


