1. Saugos informacija
Prieš montuodami ir naudodami atidžiai perskaitykite visas instrukcijas. Išsaugokite šį vadovą ateičiai.
- ĮSPĖJIMAS: Elektros smūgio pavojus. Prieš montuodami ar atlikdami techninę priežiūrą, atjunkite maitinimą nuo saugiklio arba grandinės pertraukiklio.
- Montavimą turėtų atlikti kvalifikuotas elektrikas arba asmuo, turintis elektros žinių.
- Užtikrinkite tiekimo tūrįtage is compatible with the light fixture (240 Volts as per specifications).
- Jokiu būdu nemodifikuokite armatūros.
- This product is not dimmable. Do not connect to a dimmer switch.
- Keep away from babies and children to avoid danger of suffocation from packaging materials.
2. Produktas baigtasview
The Lepro 8.7-inch 15W LED Flush Mount Ceiling Light is designed for various indoor applications, including bathrooms, kitchens, bedrooms, hallways, and laundry rooms. Its slim, waterproof, and dustproof design ensures durability and seamless integration into any interior style.
Pagrindinės funkcijos:
- IP54 Water Resistant and Dustproof: Sealed design protects against splashing water and dust, making it suitable for damp aplinka, pavyzdžiui, vonios kambarys.
- Plonas dizainas: Blends seamlessly with any interior, ideal for low or sloped ceilings.
- Ilgas tarnavimo laikas: Integrated LED lights are rated for over 20,000 hours of operation.
- Šiltai balta šviesa: Provides 3000 Kelvin soft warm white illumination.
- Didelis ryškumas ir energijos taupymas: 15 watts, 1500 lumens, equivalent to a 100-watt incandescent bulb, offering up to 88% energy savings.
- Aukštas spalvų perteikimo indeksas (CRI > 80): Ensures colors appear natural and vibrant.
- Wide Illumination Range: Effectively illuminates an area of 9 to 12 square meters (95-130 sq. ft).
- Nepritemdomas: This light fixture is not compatible with dimmer switches.
Specifikacijos:
| Prekės ženklas | Lepro |
| Modelio numeris | PR1500024-WW |
| Spalva | Šilta Balta |
| Medžiaga | Plastikiniai |
| Gaminio matmenys | 8.7 colio ilgio x 8.7 colio pločio x 1.97 colio aukščio (220 mm x 220 mm x 50 mm) |
| Prekės svoris | 1.21 svaro (0.55 kilogramo) |
| Maitinimo šaltinis | AC |
| ttage | 240 voltų |
| Vattage | 15 vatų |
| Ryškumas | 1500 liumenų |
| Spalvos temperatūra | 3000 kelvinų |
| Spalvų perteikimo indeksas (CRI) | >80 (typically 85) |
| Vidutinis gyvenimas | 20,000 valandų |
| Atsparumo vandeniui lygis | IP54 (atsparus vandeniui) |
| Diegimo tipas | Praplaukite kalną |
| Ypatinga funkcija | Nepritemdomas |
3. Pakuotės turinys
Prieš pradėdami montuoti, patikrinkite, ar visi komponentai yra ir nepažeisti.
- LED įleidžiamas lubų šviestuvas
- Mounting Bracket
- Tvirtinimo detalės (varžtai, sieniniai inkarai)
- Anti-scratch pads (3 pieces)
- Instrukcijų vadovas

Image: Contents of the product package, showing the light fixture and mounting hardware.
4. Montavimo instrukcijos
Follow these steps carefully to install your Lepro LED Flush Mount Ceiling Light. Ensure power is OFF before starting.
Vaizdo įrašų vadovas:
Video: Official installation guide for Lepro ceiling lights, demonstrating the step-by-step process.
- 1 veiksmas: atjunkite maitinimą
Before starting any electrical work, turn off the power at the circuit breaker or fuse box to prevent electric shock.
Image: A hand switching off a wall light switch, emphasizing the importance of cutting power before installation.
- Step 2: Remove the Mounting Bracket from the Fixture
Locate the bracket lock on the back of the light fixture. Press the bracket lock to detach the mounting bracket from the lamp kūno.
Image: Diagram illustrating the removal of the mounting bracket from the light fixture by pressing a lock mechanism.
- 3 veiksmas: sumontuokite tvirtinimo laikiklį
Measure the hole spacing on the mounting bracket. Depending on your ceiling type (wooden, cement, or junction box), use the appropriate screws and wall anchors to securely fix the mounting bracket to the ceiling. Ensure the bracket is flush against the ceiling.
Image: Diagram showing the mounting bracket installation process for various ceiling types, including drilling holes for cement ceilings and attaching to a junction box.
- Step 4: Apply Anti-scratch Pads
Paste the three provided anti-scratch pads to the back of the lamp body. These pads help protect the ceiling surface and ensure a snug fit.
Image: Diagram illustrating where to attach the anti-scratch pads on the rear of the light fixture.
- 5 veiksmas: prijunkite laidus
Open the waterproof wires compartment on the light fixture. Insert the live (L) and neutral (N) wires from your ceiling into the corresponding polarities on the wire connector. Ensure a secure connection. Close the compartment.
Image: Diagram showing the electrical wiring connection process, highlighting the live (L) and neutral (N) terminals.
- Step 6: Attach the Light Fixture
Align the light fixture with the installed mounting bracket. Push the lamp body firmly against the ceiling and twist it clockwise until it locks securely into place. Ensure the light is flush with the ceiling.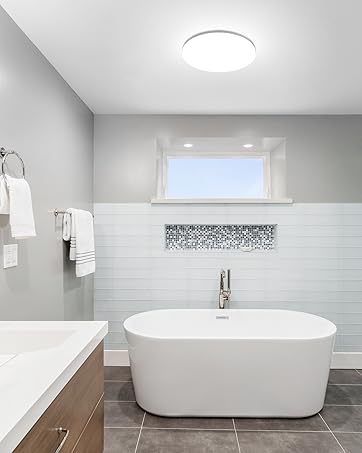
Image: Diagram showing the light fixture being attached to the mounting bracket on the ceiling.
- 7 veiksmas: atkurkite maitinimą
Once the light fixture is securely installed, restore power at the circuit breaker or fuse box. Test the light to ensure it functions correctly.
5. Operacija
This Lepro LED Flush Mount Ceiling Light is designed for simple operation. Once installed and powered, it functions as a standard on/off light fixture.
- Įjungimas / išjungimas: Norėdami įjungti arba išjungti šviestuvą, naudokite standartinį sieninį jungiklį.
- Nepritemdomas: This fixture provides a fixed brightness and cannot be dimmed. Do not use with dimmer switches.
6. Priežiūra
To ensure the longevity and optimal performance of your light fixture, follow these maintenance guidelines:
- Valymas: Prieš valydami atjunkite maitinimą. Nuvalykite įrenginį minkšta, sausa arba šiek tiek drėgna šluoste.amp audinys. Nenaudokite stiprių cheminių medžiagų ar abrazyvinių valiklių.
- Lemputės keitimas nereikalingas: This fixture uses integrated LED lights that are designed to last for 20,000 hours. There are no user-replaceable bulbs.
- Patikra: Reguliariai tikrinkite šviestuvą, ar nėra pažeidimų ar atsilaisvinusių jungčių. Jei aptinkama problemų, atjunkite maitinimą ir kreipkitės į kvalifikuotą elektriką.
7. Problemų sprendimas
If you encounter any issues with your light fixture, refer to the following troubleshooting steps:
| Problema | Galima priežastis | Sprendimas |
|---|---|---|
| Šviesa neįsijungia. | Nėra maitinimo. Atsipalaidavusi laidų jungtis. Sugedęs sieninis jungiklis. | Patikrinkite grandinės pertraukiklį / saugiklį. Ensure wires are securely connected (power off first). Išbandykite sieninį jungiklį su kitu įrenginiu. |
| Šviesos mirgėjimas. | Atsipalaidavusi laidų jungtis. Incompatible dimmer switch (if installed). | Patikrinkite laidų jungtis (pirmiausia išjunkite maitinimą). Ensure no dimmer switch is used, as this fixture is not dimmable. |
| Šviesa nėra pakankamai ryški. | Room size exceeds recommended illumination area. Dust accumulation on the diffuser. | Consider additional lighting for larger areas. Clean the diffuser (power off first). |
8. Garantija ir palaikymas
This Lepro LED Flush Mount Ceiling Light comes with a 3 metų garantija nuo pirkimo datos.
For warranty claims, technical support, or any questions regarding your product, please contact Lepro customer service through the retailer where you purchased the product or visit the official Lepro websvetainė kontaktinei informacijai.
Prašome išsaugoti pirkimo įrodymą garantijos galiojimui.


