1. Įvadas
This manual provides detailed instructions for the installation, operation, and maintenance of your Hunter 54-inch Contemporary Ceiling Fan. Please read all instructions carefully before beginning installation to ensure safe and proper operation. Retain this manual for future reference.

Figure 1.1: Hunter 54-inch Contemporary Ceiling Fan with remote control.

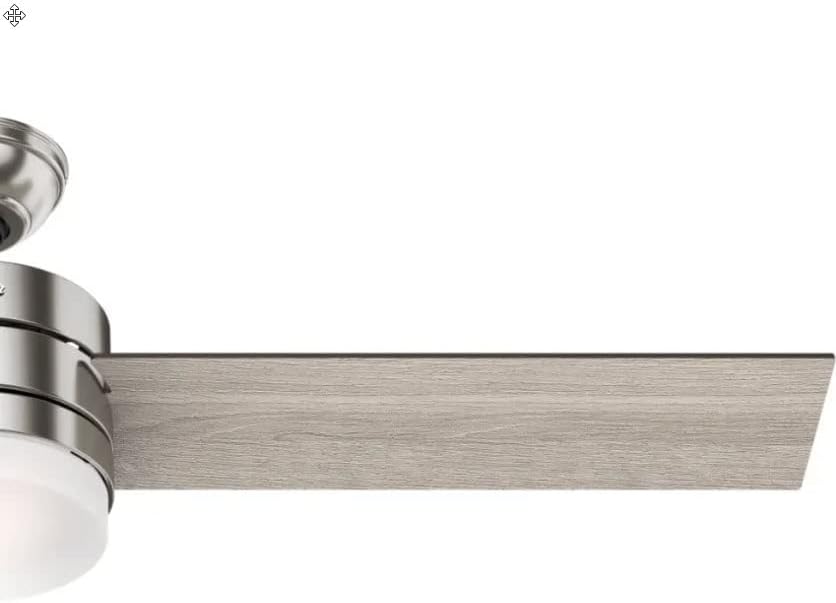
Figure 1.2: Key features of the Hunter 54-inch Contemporary Ceiling Fan.
2. Saugos informacija
Kad sumažintumėte elektros smūgio, gaisro ar kūno sužalojimo riziką, visada laikykitės šių pagrindinių saugos priemonių:
- Prieš montuodami ventiliatorių, perskaitykite visas instrukcijas.
- Visa instaliacija turi atitikti nacionalinius ir vietinius elektros kodeksus. Jei nesate susipažinę su instaliacija, pasitarkite su kvalifikuotu elektriku.
- Before installation, disconnect power by turning off the circuit breakers to the fan's electrical box.
- Ensure the outlet box is securely attached to the building structure and can support the fan's weight (approximately 18.1 lbs).
- Nenaudokite ventiliatoriaus su pažeistomis mentėmis. Jei viena iš jų pažeista, pakeiskite visas mentes.
- Venkite dėti daiktus ventiliatoriaus menčių kelyje.
- Šis ventiliatorius skirtas naudoti tik patalpose.
3. Pakuotės turinys
Patikrinkite, ar pakuotėje yra visi toliau išvardyti komponentai:
- 1 x Fan Motor Assembly
- 3 x Fan Blades (Reversible: Light Gray Oak / Greyed Walnut)
- 1 x Šviesų rinkinys
- 3 x LED Bulbs (E26 Medium Base)
- 1 x 4 colių žemyn nukreipiamasis strypas
- 1 x 2-inch Downrod (for standard profile montavimas)
- 1 x nešiojamas nuotolinio valdymo pultas
- 2 x AAA baterijos (nuotolinio valdymo pultui)
- Aparatūros paketas (varžtai, poveržlės, vielinės veržlės ir kt.)
4. Sąranka ir diegimas
Rekomenduojamas profesionalus montavimas. Prieš tęsdami įsitikinkite, kad maitinimas yra atjungtas nuo grandinės pertraukiklio.
4.1 Ventiliatoriaus montavimas
- Securely attach the mounting bracket to the ceiling outlet box. The outlet box must be listed for fan support.
- Select the appropriate downrod (4-inch or 2-inch) for your ceiling height. Insert the downrod through the canopy and connect it to the fan motor assembly.
- Atsargiai pakelkite ventiliatoriaus mazgą ir pakabinkite jį nuo tvirtinimo laikiklio.
4.2 Laidų jungtys
- Connect the fan's electrical wires to the household wiring according to local electrical codes. Typically, this involves connecting the black (hot) wire from the fan to the black (hot) wire from the ceiling, the white (neutral) wire from the fan to the white (neutral) wire from the ceiling, and the green (ground) wire from the fan to the bare copper (ground) wire from the ceiling.
- Įsitikinkite, kad visos laidų jungtys yra tvirtos, naudodami pridėtas vielines veržles.
- Tvarkingai įkiškite visus laidus į lizdo dėžutę.
4.3 Peilių ir šviesos rinkinio pritvirtinimas
- Attach the fan blades to the motor housing using the provided screws. Ensure the desired blade finish (Light Gray Oak or Greyed Walnut) is facing downwards.
- Install the light kit to the bottom of the fan motor assembly, following the specific instructions for your model.
- Screw the three E26 Medium Base LED bulbs into the light kit sockets.
- Attach the glass shade to the light kit.

Figure 4.1: Annotated view of fan components and features.

4.2 pav. Pvzample of the fan installed in a room.
5. Naudojimo instrukcijos
Your Hunter ceiling fan is operated using the included handheld remote control.
5.1 Nuotolinio valdymo pulto funkcijos

Figure 5.1: Handheld Remote Control.
- Fan On/Off & Speed Control: Use the fan speed buttons (up/down arrows) to cycle through the three available fan speeds (low, medium, high) or turn the fan off.
- Light On/Off & Dimming: Press the light bulb button to turn the light on or off. To dim the light, press and hold the light bulb button. Release when the desired brightness is reached.
- Ventiliatoriaus kryptis (grįžtamasis variklis): The remote control includes a button to reverse the fan's blade direction. This feature allows for seasonal use:
- Downward Airflow (Summer): Sukuria vėsinantį efektą.
- Upward Airflow (Winter): Cirkuliuoja šiltą orą, sulaikytą šalia lubų.
5.2 apverčiami peiliai
The fan features reversible blades with Light Gray Oak on one side and Greyed Walnut on the other. You can choose the finish that best complements your room's decor during installation.
5.2 pav. Pvzample of the Light Gray Oak blade finish.
6. Priežiūra
Reguliarus valymas užtikrina optimalų jūsų lubų ventiliatoriaus veikimą ir ilgaamžiškumą.
6.1 Valymas
- Always turn off the power to the fan before cleaning.
- Naudokite minkštą, damp cloth to clean the fan blades and motor housing. Avoid abrasive cleaners that may scratch the finish.
- Clean the glass shade with a mild glass cleaner.
6.2 Lemputės keitimas
The fan uses E26 Medium Base LED bulbs. When replacing, ensure the power is off and allow bulbs to cool before handling.
- Unscrew the glass shade.
- Carefully unscrew the old LED bulb(s) and screw in new ones.
- Vėl pritvirtinkite stiklinį gaubtą.
6.3 Peilių balansavimas
If the fan wobbles during operation, ensure all blade screws are tight. A balancing kit (often included with fans, though not explicitly listed here) can be used to correct persistent wobbling.
7. Problemų sprendimas
Dažniausiai pasitaikančias problemas ir jų sprendimus žr. toliau pateiktoje lentelėje.
| Problema | Galima priežastis | Sprendimas |
|---|---|---|
| Ventiliatorius neįsijungia | Ventiliatorius negauna maitinimo; Atsilaisvinusios laidų jungtys; Išsikrovusi nuotolinio valdymo pulto baterija. | Patikrinkite grandinės pertraukiklį; Įsitikinkite, kad visi laidai yra tvirtai sujungti; Pakeiskite nuotolinio valdymo pulto baterijas. |
| Šviesa neveikia | Loose wire connections; Faulty bulb(s); Light switch off. | Check wiring to light kit; Replace bulb(s); Ensure light is turned on via remote. |
| Ventiliatoriaus virpėjimas | Atsilaisvinę peilių varžtai; Nesubalansuoti peiliai; Atsilaisvinęs tvirtinimo laikiklis. | Priveržkite visus peilio varžtus; Naudokite peilio balansavimo rinkinį; Įsitikinkite, kad tvirtinimo laikiklis yra tvirtai pritvirtintas. |
| Nuotolinio valdymo pultas nereaguoja | Low or dead batteries; Remote not paired with fan. | Replace AAA batteries; Refer to remote pairing instructions (usually involves cycling power and pressing a button on the remote). |
8. Specifikacijos
| Funkcija | Detalė |
|---|---|
| Prekės ženklas | Medžiotojas |
| Modelio numeris | CC5C91C61 |
| Dydis | 54 colių |
| Baigti | Šlifuotas nikelis |
| Ašmenų medžiaga | Wood (Reversible: Light Gray Oak / Greyed Walnut) |
| Variklio tipas | AC Motor, Whisperwind |
| Šviesos šaltinis | Integrated Dimmable LED (3 bulbs) |
| Lemputės pagrindas | E26 Vidutinis |
| Spalvos temperatūra | 3000 kelvinų |
| Šviesos išvestis | 800 liumenų |
| Kontrolės metodas | Nuotolinio valdymo pultas |
| ttage | 120 voltų |
| Vattage | 44 watts (fan only) |
| Prekės svoris | 18.1 svaro |
| Gaminio matmenys | 54 colio ilgio x 54 colių pločio x 14.5 colio aukščio |
| Naudojimas viduje / lauke | Vidinis |
| Apskaičiuota metinė energijos kaina | $12 (based on 6.4 hours/day, 12 cents/kWh, excluding lights) |
| Oro srautas | 3,590 kubinės pėdos per minutę |
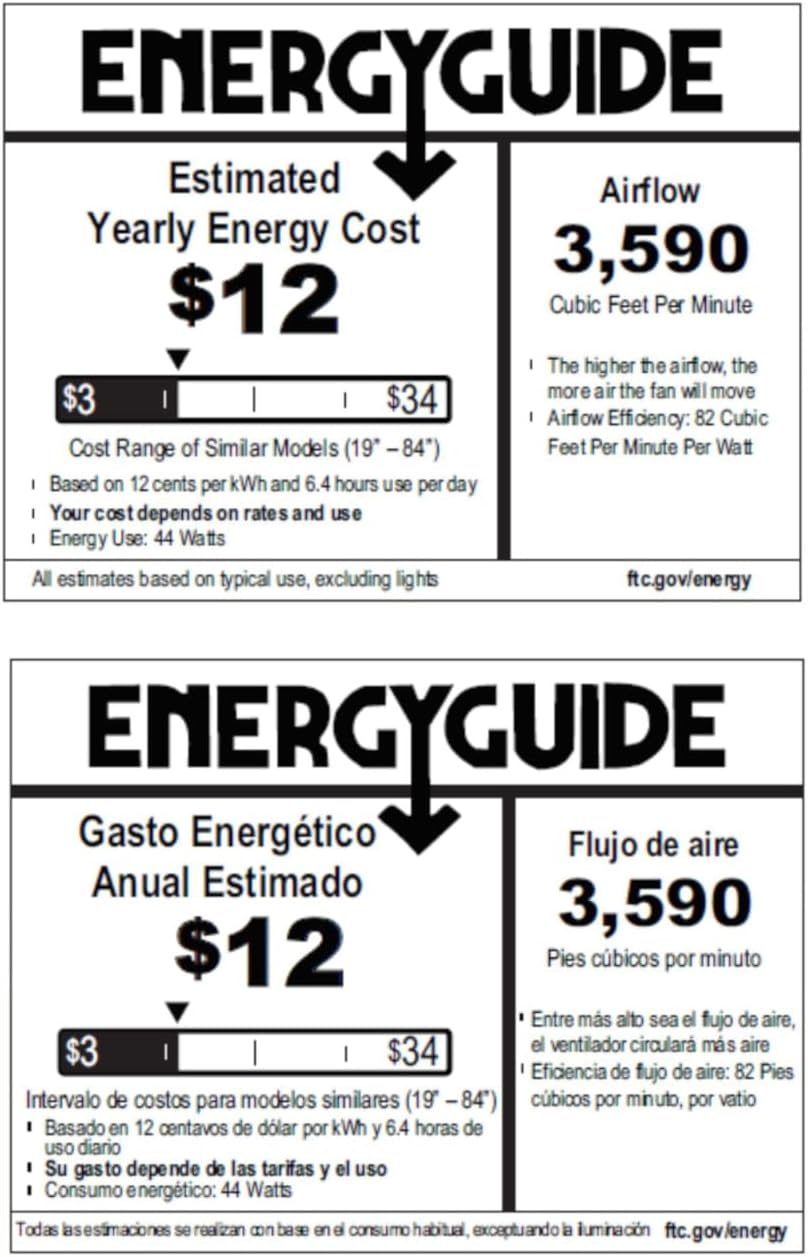
Figure 8.1: Energy Guide for the Hunter 54-inch Ceiling Fan.
9. Garantija ir palaikymas
For warranty information or technical support, please refer to the official Hunter websvetainėje arba susisiekite su jų klientų aptarnavimo tarnyba. Išsaugokite pirkimo kvitą kaip pirkimo įrodymą bet kokiems garantiniams reikalavimams.


