1. Įvadas
This manual provides essential information and instructions for the safe and efficient use of your Nokia 8 Sirocco TA-1005 smartphone. Please read this guide thoroughly before operating your device to ensure optimal performance and longevity. This device is designed for use with GSM, 3G, and 4G LTE networks. Compatibility with CDMA networks, including Verizon, Sprint, and US Cellular, is not supported. Verify network compatibility with your service provider prior to use.
2. Kas yra dėžutėje
Upon unboxing your Nokia 8 Sirocco TA-1005, verify that all components are present:
- Nokia 8 Sirocco TA-1005 Device
- C tipo USB kabelis
- Maitinimo adapteris
- Ausinės
- SIM išstūmimo įrankis
- Greitos pradžios vadovas
- Saugos ir garantijos informacija
3. Įrenginio išdėstymas
Familiarize yourself with the physical components of your Nokia 8 Sirocco TA-1005.
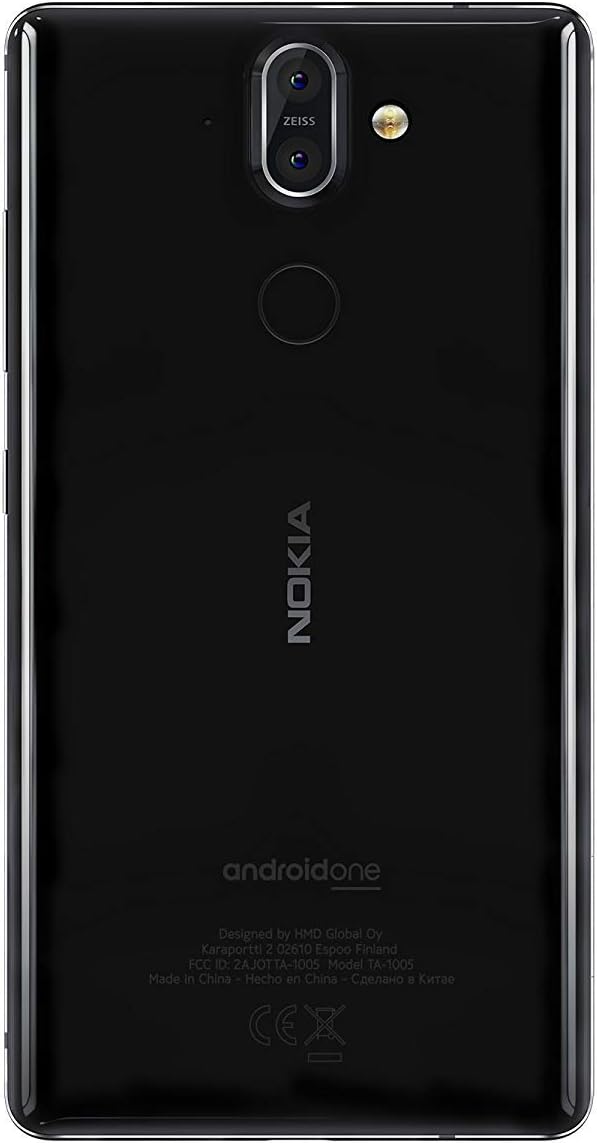
3.1 paveikslas: Galinis view of the Nokia 8 Sirocco TA-1005. This image displays the dual camera setup with ZEISS optics, the circular fingerprint sensor below the camera, and the Nokia logo centrally placed. The 'androidone' branding is visible towards the bottom.
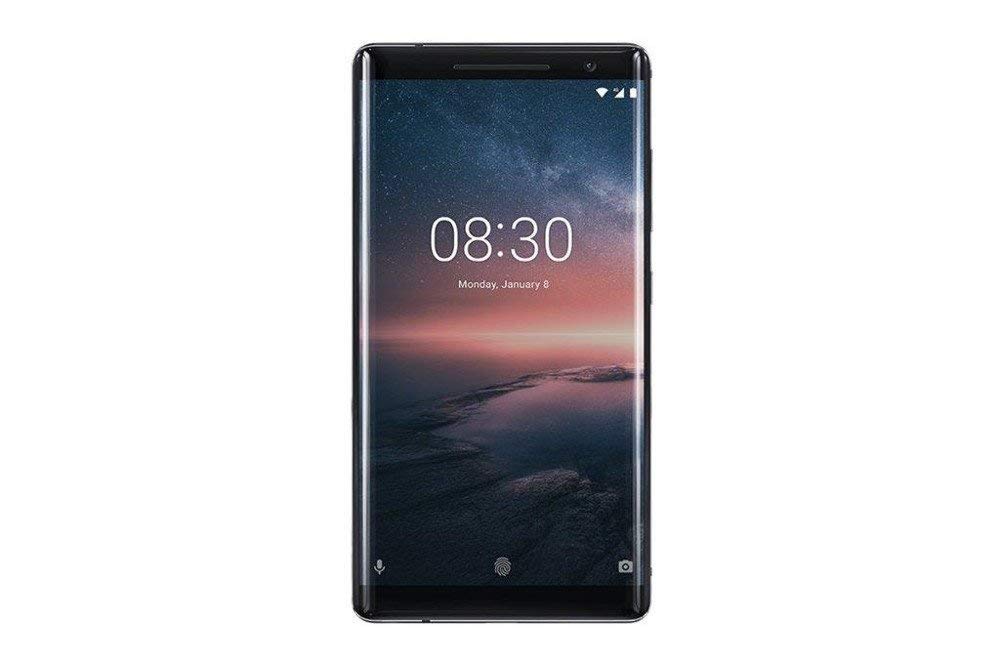
3.2 paveikslas: Priekyje view of the Nokia 8 Sirocco TA-1005. The image highlights the 5.5-inch P-OLED curved display, the front-facing camera at the top, and the on-screen navigation buttons. The device features minimal bezels.

3.3 paveikslas: Šoninė view of the Nokia 8 Sirocco TA-1005. This image illustrates the slim profile of the device, with the power button and volume rocker located on the right side for easy access.
Pagrindiniai komponentai:
- Priekinė kamera: Įsikūręs ekrano viršuje.
- Ausinė: For calls, located above the display.
- Ekranas: 5.5-inch P-OLED capacitive touchscreen.
- Garsumo mygtukai: On the right side, to adjust audio levels.
- Maitinimo / užrakinimo mygtukas: On the right side, to power on/off or lock/unlock the screen.
- C tipo USB prievadas: Apačioje, skirta įkrovimui ir duomenų perdavimui.
- Mikrofonas: Įsikūręs apačioje ir viršuje.
- Pranešėjas: Įsikūręs apačioje.
- SIM/Memory Card Tray: On the side, for inserting SIM cards.
- Galinės kameros: Dual cameras with ZEISS optics on the back.
- Flash: Dual-tone flash next to the rear cameras.
- Pirštų atspaudų jutiklis: On the back, below the rear cameras.
4. Sąranka
4.1. SIM kortelės įdėjimas
- Suraskite SIM kortelės dėklą savo įrenginio šone.
- Įkiškite SIM kortelės išstūmimo įrankį į mažą dėklo skylutę, kad jį atidarytumėte.
- Place your Nano-SIM card(s) into the designated slot(s) on the tray, ensuring the gold contacts face downwards.
- Atsargiai stumkite dėklą atgal į įrenginį, kol jis užsifiksuos.
Pastaba: This device does not support external memory cards.
4.2. Įjungimas ir išjungimas
- Norėdami įjungti: Press and hold the Power/Lock button until the Nokia logo appears.
- Norėdami išjungti: Press and hold the Power/Lock button until the power options menu appears, then select "Power off".
4.3. Pradinė sąranka
Upon first power-on, the device will guide you through the initial setup process. This includes selecting your language, connecting to a Wi-Fi network, setting up your Google account, and configuring security features like fingerprint unlock or a PIN/pattern.
5. Naudojimo instrukcijos
5.1. Skambinimas
- Open the "Phone" application.
- Įveskite telefono numerį naudodami numerio rinkiklį arba pasirinkite kontaktą iš savo adresų knygos.
- Norėdami pradėti skambutį, palieskite skambučio piktogramą.
5.2. Žinučių siuntimas
- Open the "Messages" application.
- Palieskite piktogramą „Pradėti pokalbį“ arba „Nauja žinutė“.
- Įveskite gavėjo numerį arba pasirinkite iš kontaktų.
- Įveskite savo pranešimą teksto lauke.
- Palieskite siuntimo piktogramą.
5.3. Fotoaparato naudojimas
- Atidarykite programą „Kamera“.
- Kadruokite objektą ekrane.
- Norėdami nufotografuoti, palieskite užrakto mygtuką.
- Switch between photo and video modes, or access advanced settings like portrait mode or panorama, as desired.
5.4. Interneto ryšys
- „Wi-Fi“: Eikite į Nustatymai > Tinklas ir internetas > „Wi-Fi“. Turn Wi-Fi on and select an available network. Enter the password if required.
- Mobilus duomenys: Eikite į Nustatymai > Tinklas ir internetas > Mobilusis tinklasĮsitikinkite, kad įjungta parinktis „Mobilieji duomenys“.
5.5. Apsaugos priemonės
Your Nokia 8 Sirocco TA-1005 offers various security options:
- Piršto atspaudo atrakinimas: Užregistruokite savo pirštų atspaudus per Settings > Security & Location > Fingerprint.
- Ekrano užraktas: Set a PIN, pattern, or password via Settings > Security & Location > Screen lock.
6. Priežiūra
6.1. Prietaiso valymas
Use a soft, lint-free cloth to clean your device. Avoid using harsh chemicals or abrasive materials, which can damage the screen or finish.
6.2. Akumuliatoriaus priežiūra
- Charge your device using only Nokia-approved chargers and cables.
- Stenkitės, kad prietaisas nepatektų į ekstremalias temperatūras.
- Neleiskite akumuliatoriui dažnai visiškai išsikrauti.
6.3. Programinės įrangos atnaujinimai
Reguliariai tikrinkite, ar yra programinės įrangos atnaujinimų, ir juos įdiekite, kad jūsų įrenginyje būtų naujausios funkcijos, saugos pataisymai ir našumo patobulinimai. Eikite į Nustatymai > Sistema > Sistemos naujinimas.
7. Problemų sprendimas
Jei kyla problemų dėl įrenginio, žr. šiuos įprastus sprendimus:
| Problema | Sprendimas |
|---|---|
| Įrenginys neįsijungia | Įsitikinkite, kad akumuliatorius įkrautas. Prijunkite prie įkroviklio bent 30 minučių. Jei nereaguoja, priverstinai paleiskite įrenginį iš naujo, 10–15 sekundžių palaikydami nuspaustą maitinimo mygtuką. |
| Prastas tinklo signalas | Check SIM card insertion. Move to an area with better network coverage. Restart the device. Verify network settings in Nustatymai > Tinklas ir internetas > Mobilusis tinklas. |
| Applications are crashing | Išvalykite programos talpyklą (Nustatymai > Programėlės ir pranešimai > [Programėlės pavadinimas] > Atmintis ir talpykla > Išvalyti talpyklą). Atnaujinkite programėlę iš „Google Play“ parduotuvės. Jei problema išlieka, pašalinkite programėlę ir įdiekite ją iš naujo. |
| Baterija greitai išsikrauna | Reduce screen brightness. Close unused background apps. Disable Wi-Fi, Bluetooth, and GPS when not in use. Check battery usage in Nustatymai> Baterija kad būtų galima nustatyti energiją eikvojančias programas. |
| Įrenginys nereaguoja | Perform a force restart by holding the Power button for 10-15 seconds. If the issue continues, consider a factory reset (Nustatymai > Sistema > Atstatyti parinktys > Ištrinti visus duomenis (atkurti gamyklinius)). Įspėjimas: Atkūrus gamyklinius duomenis, bus ištrinti visi jūsų įrenginyje esantys duomenys. Prieš tęsdami sukurkite svarbių duomenų atsarginę kopiją. |
8. Specifikacijos
Detailed technical specifications for the Nokia 8 Sirocco TA-1005:
| Funkcija | Detalė |
|---|---|
| Modelio pavadinimas | 8 Sirocco |
| Modelio numeris | TA-1005 |
| Operacinė sistema | „Android 8.0“ („Oreo“) |
| Procesorius | Qualcomm MSM8998 Snapdragon 835, Octa-core (4x2.5 GHz Kryo & 4x1.8 GHz Kryo) |
| GPU | Adreno 540 |
| RAM | 6 GB |
| Vidinė saugykla | 128 GB |
| Ekranas | 5.5 inches, P-OLED capacitive touchscreen, 1440 x 2560 pixels, Corning Gorilla Glass 5 |
| Galinė kamera | 12MP Wide (f/1.7) + 13 MP Tele (f/2.6), dual-tone flash |
| Priekinė kamera | 5 MP |
| Baterijos talpa | 3250 mAh |
| Įkrovimas | Greito įkrovimo palaikymas |
| Ryšys | Wi-Fi 802.11a/b/g/n, Bluetooth, USB Type-C |
| Matmenys | 43.36 x 43.17 x 0.75 cm |
| Svoris | 181 g |
| SIM tipas | Nano SIM |
| Tinklo palaikymas | 2G GSM, 3G, 4G LTE (Note: Not compatible with CDMA networks) |
9. Safety and Warranty Information
9.1. Saugos gairės
- Do not use the device in prohibited areas, such as aircraft or hospitals.
- Saugokite prietaisą nuo vandens ar per didelės drėgmės.
- Naudokite tik originalius arba patvirtintus priedus.
- Nebandykite patys išardyti ar taisyti įrenginio.
- Atsakingai utilizuokite įrenginį ir jo bateriją laikydamiesi vietinių taisyklių.
9.2. Informacija apie garantiją
Your Nokia 8 Sirocco TA-1005 is covered by a limited manufacturer's warranty. Please refer to the separate warranty document included in your product packaging or visit the official Nokia support webIšsamias sąlygas ir nuostatas rasite svetainėje. Išsaugokite pirkimo įrodymą garantiniams reikalavimams.


