1. Įvadas
This manual provides essential information for the installation, configuration, operation, and maintenance of the MOXA AWK-1137C-US-T 802.11n Wireless AP Client. This device is designed for industrial wireless applications, offering reliable 802.11n connectivity in challenging environments with a wide operating temperature range.
2. Saugos informacija
- Always disconnect power before cleaning or servicing the device.
- Užtikrinkite tinkamą įžeminimą, kad išvengtumėte elektros pavojaus.
- Naudokite įrenginį nurodytose temperatūros ir drėgmės ribose.
- Nelaikykite prietaiso nuo drėgmės ar ekstremalių temperatūrų.
- Montuoti ir prižiūrėti turėtų tik kvalifikuoti darbuotojai.
3. Pakuotės turinys
Patikrinkite, ar jūsų pakuotėje yra šie elementai:
- MOXA AWK-1137C-US-T Wireless AP Client unit
- Greito montavimo vadovas
- Documentation CD (or link to online resources)
- Mounting kit (if applicable)
- Power adapter or terminal block (if applicable)
Jei trūksta kokių nors prekių arba jos pažeistos, nedelsdami susisiekite su pardavėju.
4. Aparatūra baigtaview
The AWK-1137C-US-T features robust industrial design. Key components typically include:
- Ethernet prievadai: Laidinio tinklo jungtims.
- Antenos jungtys: For external antennas to optimize wireless signal.
- Maitinimo įvestis: Terminal block for DC power input.
- LED indikatoriai: Provide status information for power, WLAN, and Ethernet activity.
- Atkūrimo mygtukas: Gamyklinių nustatymų atkūrimui.
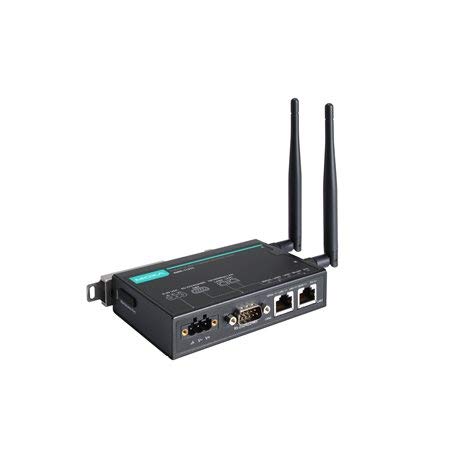
Figure 1: MOXA AWK-1137C-US-T Wireless AP Client. This image shows the compact industrial design of the device, typically featuring antenna ports, Ethernet connections, and power input.
5. Sąranka
5.1 Montavimas
The AWK-1137C-US-T supports DIN-rail mounting. Attach the DIN-rail kit to the device and snap it onto a standard DIN-rail. Ensure the device is securely fastened to prevent vibration or accidental dislodgement.
5.2 Maitinimo jungtis
- Connect a suitable DC power source (e.g., 12-48 VDC) to the device's power input terminal block.
- Ensure correct polarity (+ and -) as indicated on the device.
- Tighten the screws on the terminal block to secure the power wires.
5.3 Tinklo jungtis
- Connect an Ethernet cable from your network switch or router to the Ethernet port on the AWK-1137C-US-T.
- Attach appropriate antennas to the antenna connectors. Ensure they are securely tightened.
5.4 Pradinė konfigūracija
Norėdami pasiekti įrenginio web- pagrįsta valdymo sąsaja:
- Connect a computer directly to the device's Ethernet port or ensure it is on the same network segment.
- Configure your computer's IP address to be in the same subnet as the device's default IP address (refer to the Quick Installation Guide for the default IP).
- Atidarykite a web browser and enter the device's default IP address.
- Prisijunkite naudodami numatytąjį vartotojo vardą ir slaptažodį (žr. greitojo diegimo vadovą).
- Change the default password immediately for security.
6. Operacinis
6.1 Darbo režimai
The AWK-1137C-US-T can operate in various modes, including Access Point (AP) and Client mode. Select the appropriate mode based on your network requirements.
- Prieigos taško (AP) režimas: The device acts as a central hub for wireless clients to connect.
- Kliento režimas: The device connects to an existing Access Point, extending wired network connectivity wirelessly.
6.2 Belaidžio ryšio nustatymai
Configure the following wireless parameters via the web sąsaja:
- SSID: The name of your wireless network.
- Kanalas: Select an appropriate wireless channel to avoid interference.
- Grupė: Configure for 2.4 GHz or 5 GHz operation, depending on the model and environment.
- Perdavimo galia: Adjust the output power for optimal coverage and compliance.
6.3 Saugos nustatymai
Implement strong wireless security to protect your network:
- Šifravimas: Use WPA2/WPA3-PSK or Enterprise for robust security.
- Password/Passphrase: Choose a strong, unique password.
- MAC adresų filtravimas: Optionally restrict access to specific devices.
7. Priežiūra
7.1 Firmware atnaujinimai
Regularly check the MOXA website for the latest firmware updates. Firmware updates can provide new features, performance improvements, and security patches. Follow the instructions provided with the firmware package for a safe update process.
7.2 Valymas
Clean the device periodically with a soft, dry cloth. Do not use liquid or aerosol cleaners. Ensure the device is powered off before cleaning.
7.3 Aplinkosaugos aspektai
Ensure the operating environment remains within the specified temperature and humidity limits (-40 to 75°C). Avoid placing the device near heat sources or in direct sunlight.
8. Problemų sprendimas
8.1 Nėra galios
- Patikrinkite maitinimo laido jungtį ir įsitikinkite, kad maitinimo šaltinis yra aktyvus.
- Patikrinkite maitinimo šaltinio tūrįtage is within the device's specified range.
- Inspect the power input terminal block for loose connections.
8.2 Nėra tinklo ryšio
- Check Ethernet cable connections and ensure they are properly seated.
- Verify that the network switch or router is functioning correctly.
- For wireless connections, ensure the SSID, security settings, and channel match the connected AP/client.
- Check the LED indicators for network activity.
8.3 Mažas belaidis greitis
- Ensure antennas are properly connected and positioned for optimal signal.
- Check for sources of interference (e.g., other wireless devices, microwave ovens).
- Adjust the wireless channel to a less congested one.
- Verify that the device is operating in 802.11n mode and not a slower standard.
8.4 Gamyklinių nustatymų atkūrimas
If configuration issues persist, you may need to reset the device to its factory default settings. Locate the reset button (often recessed) and press and hold it for approximately 5-10 seconds while the device is powered on. The device will reboot with default settings.
9. Specifikacijos
| Funkcija | Specifikacija |
|---|---|
| Modelio numeris | AWK-1137C-US-T |
| bevielio ryšio standartas | 802.11n |
| Operacinė juosta | US Band |
| Darbinė temperatūra | -40 iki 75°C |
| Pakuotės matmenys | 7.87 x 6.57 x 1.97 colio |
| Prekės svoris | 1.15 svaro |
| Gamintojas | MOXA |
| Pasiekiama pirmoji data | 30 m. balandžio 2018 d |
10. Garantija ir palaikymas
10.1 Informacija apie garantiją
MOXA products typically come with a standard warranty. For detailed warranty terms and conditions, please refer to the official MOXA websvetainėje arba garantijos kortelėje, pridėtoje prie jūsų gaminio. Išsaugokite pirkimo įrodymą, jei prireiktų pateikti garantijos pretenzijas.
10.2 Techninė pagalba
For technical assistance, product documentation, or driver downloads, please visit the official MOXA support website. You can also contact MOXA's customer support team directly through the contact information provided on their websvetainę.


