1. Įvadas
Thank you for choosing the TechniSat VIOLA 2 Portable DAB/FM Radio. This compact and versatile radio allows you to enjoy high-quality digital DAB+ and traditional FM radio broadcasts wherever you are. This manual provides essential information for setting up, operating, and maintaining your device to ensure optimal performance and longevity.

Image 1.1: The TechniSat VIOLA 2 radio positioned on a wooden table in an outdoor setting, highlighting its portability.
2. Saugos informacija
Prieš naudodami prietaisą, atidžiai perskaitykite šias saugos instrukcijas ir išsaugokite jas ateičiai.
- Maitinimas: Naudokite tik pateiktą maitinimo adapterį. Įsitikinkite, kad įtampatage atitinka jūsų regiono reikalavimus.
- Baterijos: Use 4 x AA-LR6 batteries. Do not mix old and new batteries, or different types of batteries. Remove batteries if the device will not be used for an extended period.
- Vanduo ir drėgmė: Saugokite įrenginį nuo lietaus, drėgmės ar lašančių/taškančių skysčių. Nestatykite ant įrenginio daiktų, pripildytų skysčių, pavyzdžiui, vazų.
- Šiluma: Laikykite įrenginį atokiau nuo šilumos šaltinių, tokių kaip radiatoriai, šildytuvai, viryklės ar kiti prietaisai (įskaitant ampkeltuvai), kurie gamina šilumą.
- Vėdinimas: Užtikrinkite tinkamą vėdinimą. Neužblokuokite jokių ventiliacijos angų.
- Valymas: Prieš valydami atjunkite maitinimą. Naudokite minkštą, sausą šluostę. Nenaudokite skystų ar aerozolinių valiklių.
- Aptarnavimas: Nemėginkite patys aptarnauti šio gaminio. Visą techninę priežiūrą patikėkite kvalifikuotam aptarnavimo personalui.
3. Pakuotės turinys
Carefully unpack the box and ensure all items are present and in good condition:
- TechniSat VIOLA 2 Portable DAB/FM Radio
- Maitinimo adapteris (6V DC)
- Vartotojo vadovas (šis dokumentas)
Note: 4 x AA-LR6 batteries are required for portable use and are not included in the package.
4. Produktas baigtasview
Familiarize yourself with the various parts and controls of your VIOLA 2 radio.

4.1 vaizdas: priekis view of the TechniSat VIOLA 2, displaying the speaker grille, LCD screen, and control buttons.
4.1 Priekinio skydelio valdikliai
- Pranešėjas: Integruotas garsiakalbis garso išvesčiai.
- LCD ekranas: Two-line display showing station information, time, and menu options.
- Įjungimo/išjungimo mygtukas: Įjungia arba išjungia įrenginį.
- Volume/Enter Knob: Rotate to adjust volume, press to confirm selections.
- Derinimo +/- mygtukai: Used for manual tuning or navigating menus.
- DAB/FM mygtukas: Perjungia DAB+ ir FM radijo režimus.
- Informacijos / meniu mygtukas: Displays additional information or accesses the menu settings.

4.2 paveikslėlis: Išsamus view of the control buttons and rotary knob on the TechniSat VIOLA 2, illustrating its simple operation.
4.2 Galinio skydelio jungtys

Image 4.3: The rear panel of the radio, showing the headphone output and the DC 6V power input.
- Ausinių lizdas (3.5 mm): Privačiam pasiklausymui.
- DC 6V įvestis: Prijunkite pridedamą maitinimo adapterį čia.
- Baterijų skyrius: Įsikūręs gale, skirtas 4 x AA baterijoms.
- Teleskopinė antena: Ištieskite, kad radijo ryšys būtų optimalus.
5. Sąranka
5.1 Įrenginio maitinimas
The VIOLA 2 can be powered by the included mains adapter or by batteries for portable use.
5.1.1 Maitinimas iš tinklo
- Insert the small plug of the power adapter into the DC 6V input on the rear of the radio.
- Įjunkite maitinimo adapterį į standartinį sieninį lizdą.
5.1.2 Akumuliatoriaus galia
- Open the battery compartment cover on the rear of the radio.
- Insert 4 x AA-LR6 batteries, ensuring correct polarity (+/-).
- Saugiai uždarykite akumuliatoriaus skyriaus dangtelį.
5.2 Antenos reguliavimas
For optimal reception, fully extend the telescopic antenna. Adjust its position and angle to achieve the best signal quality, especially in FM mode or areas with weaker DAB+ signals.
6. Naudojimo instrukcijos
6.1 Įjungimas / išjungimas
Paspauskite Įjungta/Išjungta mygtuką, kad įjungtumėte arba išjungtumėte radiją.
6.2 Mode Selection (DAB/FM)
Paspauskite DAB / FM button to switch between DAB+ digital radio mode and FM analog radio mode.
6.3 Scanning for Stations
6.3.1 DAB+ Auto Scan
When you first turn on the radio in DAB+ mode, it will automatically perform a full scan for available stations. If you move to a new location or wish to refresh the station list:
- Ensure the radio is in DAB+ mode.
- Paspauskite ir palaikykite Informacija / meniu mygtuką, kad patektumėte į meniu.
- Pasukite Volume/Enter knob to select "Full Scan" and press the knob to confirm.
- The radio will scan and update the station list.
6.3.2 FM Auto Scan
FM režimu:
- Įsitikinkite, kad radijas veikia FM režimu.
- Paspauskite ir palaikykite Derinimas +/- buttons. The radio will scan for the next available station.
6.4 Garsumo valdymas
Pasukite Volume/Enter rankenėlę klausymo garsumui reguliuoti.
6.5 Ausinių naudojimas
Connect standard 3.5mm headphones to the headphone jack on the rear of the radio for private listening. The internal speaker will automatically mute when headphones are connected.
6.6 Rodyti informaciją

Image 6.1: A close-up of the radio's two-line LCD display, showing current station and program information.
The two-line LCD display provides various information depending on the mode:
- DAB+ režimas: Station name, program type, scrolling text (DLS), signal strength, time, date.
- FM režimas: Frequency, station name (if RDS available), program type (if RDS available), time, date.
Paspauskite Informacija / meniu button repeatedly to cycle through available display information.
7. Priežiūra
7.1 Valymas
Wipe the radio with a soft, dry, lint-free cloth. Do not use abrasive cleaners, waxes, or solvents as they may damage the finish.
7.2 Akumuliatoriaus keitimas
When the battery indicator on the display shows low power, replace all four AA batteries with new ones. Ensure the radio is turned off or connected to mains power before replacing batteries.
8. Problemų sprendimas
| Problema | Galima priežastis | Sprendimas |
|---|---|---|
| Nėra galios | Neprijungtas maitinimo adapteris; Baterijos išsikrovusios arba neteisingai įdėtos. | Check power adapter connection; Replace batteries or ensure correct polarity. |
| Nėra garso | Per mažas garsumas; Prijungtos ausinės; Įjungtas nutildymas. | Increase volume; Disconnect headphones; Check for mute function (if applicable). |
| Poor reception (DAB+/FM) | Antenna not extended or poorly positioned; Weak signal area. | Fully extend and adjust the telescopic antenna; Try moving the radio to a different location. Perform a full scan in DAB+ mode. |
| DAB+ stations missing | Not all stations scanned; Moved to a new area. | Perform a full scan (see Section 6.3.1). |
| Ekranas neveikia | Device off; Faulty unit. | Ensure device is on; If problem persists, contact customer support. |
9. Specifikacijos
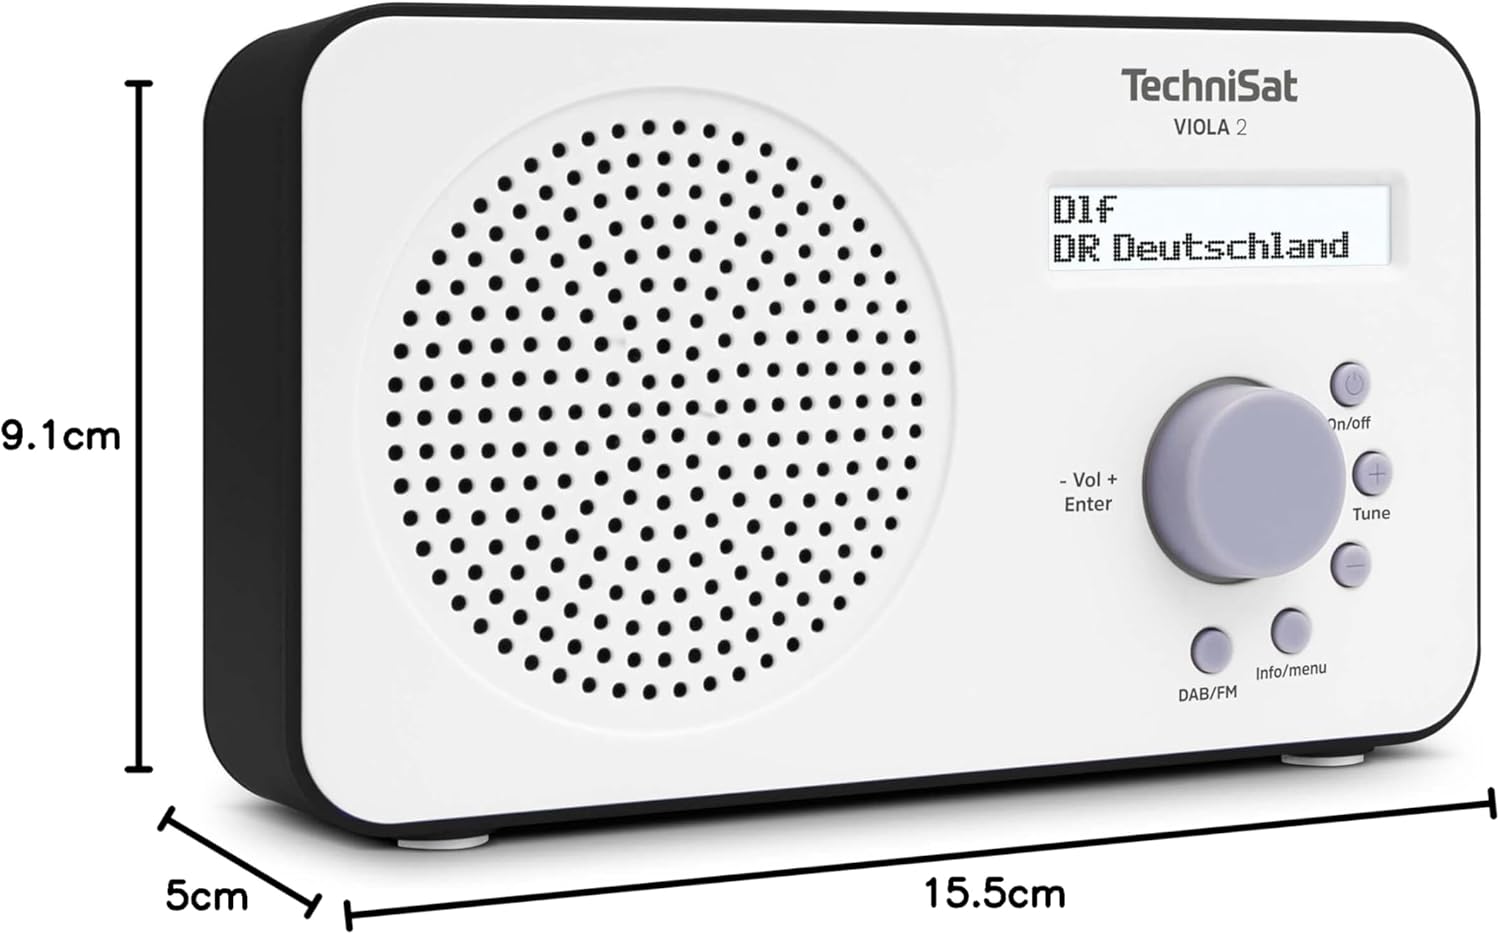
Image 9.1: The TechniSat VIOLA 2 radio with its physical dimensions indicated.
- Modelis: VIOLA 2
- Gamintojas: TechniSat
- Modelio numeris: 0000/3906
- Gaminio matmenys (P x G x A): 15.5 x 5 x 9.1 cm
- Svoris: 338 g
- Palaikomos radijo juostos: DAB+, FM (su RDS ir PLL)
- Tuner technologija: DAB / FM
- Garsiakalbio išvestis: 1 W RMS
- Ekranas: Two-line LCD with backlight
- Ryšys: 3.5mm Headphone Jack (AUX)
- Maitinimo šaltinis: Corded Electric (6V DC adapter) and Battery Powered
- Baterijos: 4 x AA-LR6 (not included)
- Ypatingos savybės: Automatic station search, electronic volume control
- Kilmės šalis: Kinija
10. Garantija ir palaikymas
TechniSat products are designed for reliability and performance. For warranty information, please refer to the warranty card included with your purchase or visit the official TechniSat website. If you encounter any issues not covered in this manual, please contact TechniSat customer support for assistance.
You can find contact details and further support resources on the official TechniSat websvetainė: www.technisat.com


