1. Produktas baigtasview
The SmartGen HGM6100N series automatic controller is an advanced unit designed for the automatic control and monitoring of gensets. It integrates digital, intelligent, and network techniques to provide comprehensive functionality including automatic start/stop, data measurement, alarm protection, and three remote functions: remote control, remote measurement, and remote communication.
This controller features an LCD display with multiple language options and user-friendly push-button operation. Its robust design, including an acrylic screen and silica-gel panel, ensures durability and adaptability to various temperatures. The HGM6100N series is suitable for a wide range of automatic control systems due to its compact structure, simple connections, and high reliability.
2. Pagrindinės savybės
- Automatic Start Module: Controls generator start/stop via remote signals.
- Mains/Generator Automatic Switching Control (AMF): Available in HGM6120N variants, suitable for systems with mains and genset.
- LCD Display: 132x64 pixel LCD with backlight, offering optional language interfaces (Chinese, English, Spanish, Russian, Portuguese, Turkish, Polish, French).
- Durable Construction: Features an acrylic screen for improved wear and scratch resistance, and a silica-gel panel and keys for temperature adaptability.
- Ryšio prievadai:
- RS485 Port: Enables "three remote" functions (remote control, measure, communication) via MODBUS protocol (HGM6110NC/6120NC models).
- CANBUS Port: Connects to electronic injection systems with J1939 (HGM6110CAN/6120CAN models).
- Parameter Configuration: All parameters can be configured from the front panel or via PC using a USB interface (or RS485 interface).
3. Gaminio variantai
The HGM6100N series includes several variants, each offering specific functionalities:
- HGM6110N / HGM6110NC / HGM6110CAN: These are Automatic Start Modules. They control the generator to start and stop based on a remote start signal.
- HGM6120N / HGM6120NC / HGM6120CAN: Building upon the HGM6110N variants, these models add mains AC monitoring and automatic mains/generator switching control (AMF). They are particularly suited for automation systems involving both mains power and a genset.
Pastaba: HGM6110NC/6120NC models include an RS485 port. HGM6110CAN/6120CAN models feature a CAN port. HGM6110N/6120N models do not include these specific communication ports.
4. Sąranka ir diegimas
Proper installation is crucial for the optimal performance and safety of your HGM6110N controller. While specific wiring diagrams are typically provided with the product, this section outlines general considerations.
4.1 Montavimas
Mount the controller in a secure, dry location, away from excessive vibration, heat, and direct sunlight. Ensure adequate ventilation around the unit. The compact design allows for panel mounting.
4.2 Laidų jungtys
Refer to the detailed wiring diagram supplied with your specific HGM6110N model for precise connections. Key connections typically include:
- DC Power Supply (12V/24V)
- Engine Start/Stop Outputs
- Generatorius Voltage ir srovės įėjimai
- Mains Voltage Inputs (for HGM6120N variants)
- Sensor Inputs (Oil Pressure, Water Temperature, Fuel Level, etc.)
- Signalizacijos išėjimai
- Communication Ports (RS485, CANBUS, USB - depending on model)
Ensure all connections are secure and correctly polarized. Use appropriate wire gauges for all circuits.
4.3 Pradinis įjungimas
Before applying power, double-check all wiring. Once confirmed, apply DC power to the controller. The LCD display should illuminate, and the controller will perform a self-test. Follow the on-screen prompts for initial setup, including language selection and basic parameter configuration.
5. Naudojimo instrukcijos
This section details the operation of the HGM6110N controller, including its display and control buttons.
5.1 Valdiklio išdėstymas
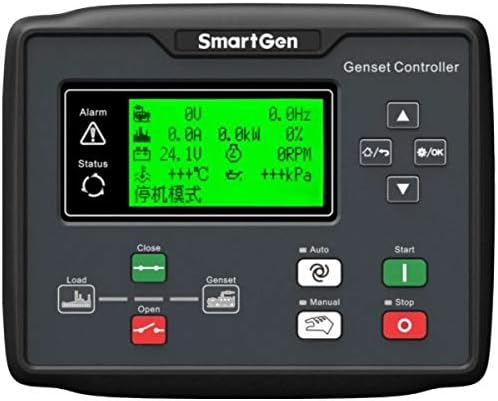
Figure 5.1: Front panel of the SmartGen HGM6110N Genset Controller. It features a central LCD screen displaying various parameters like voltage, current, power, frequency, temperature, and pressure. To the left of the screen are 'Alarm' and 'Status' indicators. Below the screen are controls for 'Load' (Open/Close) and 'Genset'. On the right, there are navigation buttons (Up, Down, Left/Right, OK) and mode selection buttons ('Auto', 'Manual') along with 'Start' (green) and 'Stop' (red) buttons.
5.2 Rodyti informaciją
The LCD display provides real-time operational data and status indicators. Common parameters displayed include:
- Generatorius Voltage (V)
- Generator Current (A)
- Generator Power (kW)
- Dažnis (Hz)
- Variklio RPM
- Baterijos tūristage (V)
- Engine Temperature (°C)
- Alyvos slėgis (kPa)
- Operating Mode (e.g., "停机模式" - Shutdown Mode)
- Alarm and Status indicators
5.3 Valdymo mygtukai
The controller features intuitive push-buttons for navigation and operation:
- Navigation Buttons (Up, Down, Left/Right, OK): Used to navigate through menus, adjust parameters, and confirm selections.
- Automatinio režimo mygtukas: Puts the controller into automatic operation mode, allowing the genset to start/stop based on configured signals (e.g., remote start, mains failure for HGM6120N).
- Rankinio režimo mygtukas: Allows for manual control of the genset.
- Pradžios mygtukas (žalias): Initiates the genset start sequence in Manual mode.
- Stop mygtukas (raudonas): Initiates the genset stop sequence.
- Load Control (Close/Open): Buttons to control the load switch, connecting or disconnecting the generator from the load.
5.4 Darbo režimai
The HGM6110N controller supports different operating modes:
- Rankinis režimas: In this mode, the user manually starts and stops the generator using the front panel buttons. This mode is typically used for testing or specific operational requirements.
- Automatinis režimas: This is the primary operational mode for unattended operation. The controller monitors predefined conditions (e.g., remote start signal, mains power status for AMF models) and automatically starts or stops the generator as required.
- Stabdymo režimas: The generator is stopped, and the controller is in a standby state, ready for a start command.
To switch between modes, press the corresponding mode button on the front panel.
6. Priežiūra
Regular maintenance ensures the longevity and reliable operation of your SmartGen HGM6110N controller. Always disconnect power before performing any maintenance.
- Valymas: Periodically clean the controller's exterior with a soft, dry cloth. Do not use abrasive cleaners or solvents. Ensure the display and buttons are free from dust and debris.
- Jungtys: Routinely check all wiring connections for tightness and signs of corrosion. Loose connections can lead to intermittent operation or damage.
- Firmware atnaujinimai: Patikrinkite gamintojo website for any available firmware updates. Updates can improve performance, add features, or resolve known issues. Follow the provided instructions carefully for any update procedures.
- Aplinkosaugos patikrinimas: Ensure the operating environment remains within the specified temperature and humidity ranges. Protect the controller from excessive moisture and direct sunlight.
7. Problemų sprendimas
This section provides general guidance for common issues. For complex problems, consult a qualified technician or SmartGen support.
| Problema | Galima priežastis | Sprendimas |
|---|---|---|
| Valdiklio ekranas tuščias. | No power supply; Loose power connection; Blown fuse. | Check DC power input; Verify power connections; Inspect and replace fuse if necessary. |
| Generator fails to start in Auto mode. | Remote start signal not active; Low battery voltage; Engine fault (e.g., low oil pressure, high temperature). | Verify remote start signal; Check genset battery; Inspect engine for fault codes on controller display. |
| Inaccurate readings on display. | Sensor malfunction; Incorrect parameter calibration; Loose sensor wiring. | Check sensor connections; Verify sensor functionality; Recalibrate parameters if needed (refer to advanced settings). |
| Communication issues (RS485/CAN). | Incorrect wiring; Wrong communication settings; Device incompatibility. | Verify communication wiring (A/B, termination resistors); Check baud rate and protocol settings; Ensure connected devices are compatible. |
Always refer to the specific alarm codes displayed on the controller for more precise troubleshooting steps.
8. Specifikacijos
| Atributas | Detalė |
|---|---|
| Gamintojas | SMARTGEN |
| Dalies numeris | HGM6110N |
| Prekės modelio numeris | HGM6110N |
| Prekės svoris | 11.3 uncijos (apie 320 gramų) |
| Gaminio matmenys | 8.23 x 6.54 x 1.73 colio (apytiksliai 20.9 x 16.6 x 4.4 cm) |
| Spalva | LCD (referring to the display type) |
| Stilius | Automatinis |
| Prekės pakuotės kiekis | 1 |
| Ypatingos savybės | Ergonomiškas dizainas |
| Suderinami įrenginiai | Generatorius |
| Ryšio technologija | USB (kompiuterio konfigūracijai) |
9. Garantija ir palaikymas
Specific warranty terms and conditions for the SmartGen HGM6110N controller are typically provided with the product packaging or can be obtained from the point of purchase or the official SmartGen websvetainėje. Prašome išsaugoti pirkimo įrodymą garantiniams reikalavimams.
For technical support, troubleshooting assistance beyond this manual, or spare parts inquiries, please contact SmartGen customer service or an authorized service center. Contact information can usually be found on the manufacturer's websvetainės ar gaminio dokumentacija.


