1. Įvadas
The BNT Dummy Fake Security Camera is designed to provide a realistic visual deterrent against potential intruders. Its appearance closely mimics that of a functional surveillance camera, aiming to reduce the likelihood of criminal activity by creating the impression of active monitoring. This manual provides essential information for the proper setup, operation, and maintenance of your dummy camera.

Image 1.1: Two BNT white dummy fake security cameras, showcasing jų realistinį dizainą.
2. Kas yra dėžutėje
Upon opening your package, you should find the following components:
- BNT Bullet Simulation Fake Camera (White) x 2
- Varžtai montavimui
- Vartotojo vadovas (šis dokumentas)
- Warning Security Alert Sticker Decal x 2

Image 2.1: Package contents showing two dummy cameras, warning stickers, and screws.
3. Savybės
- Realistiškas dizainas: Mimics the appearance of a real surveillance camera.
- Mirksi LED lemputė: Features a built-in red LED light that illuminates at night, simulating active recording.
- Fotoelektrinis jutiklis: Automatically activates the red LED light in low-light conditions.
- Patvari konstrukcija: Made from Acrylonitrile Butadiene Styrene (ABS) for indoor and outdoor use.
- Atsparus oro sąlygoms: IP65 International Protection Rating ensures resistance to water.
- Lengvas montavimas: No wiring required, mounts easily to ceilings or walls.
- Reguliuojamas kampas: Features 2-axis rotation for flexible positioning (360-degree rotation, 90-degree tilt).
- Maitinimo šaltinis: Operates on 2 AA batteries (not included).
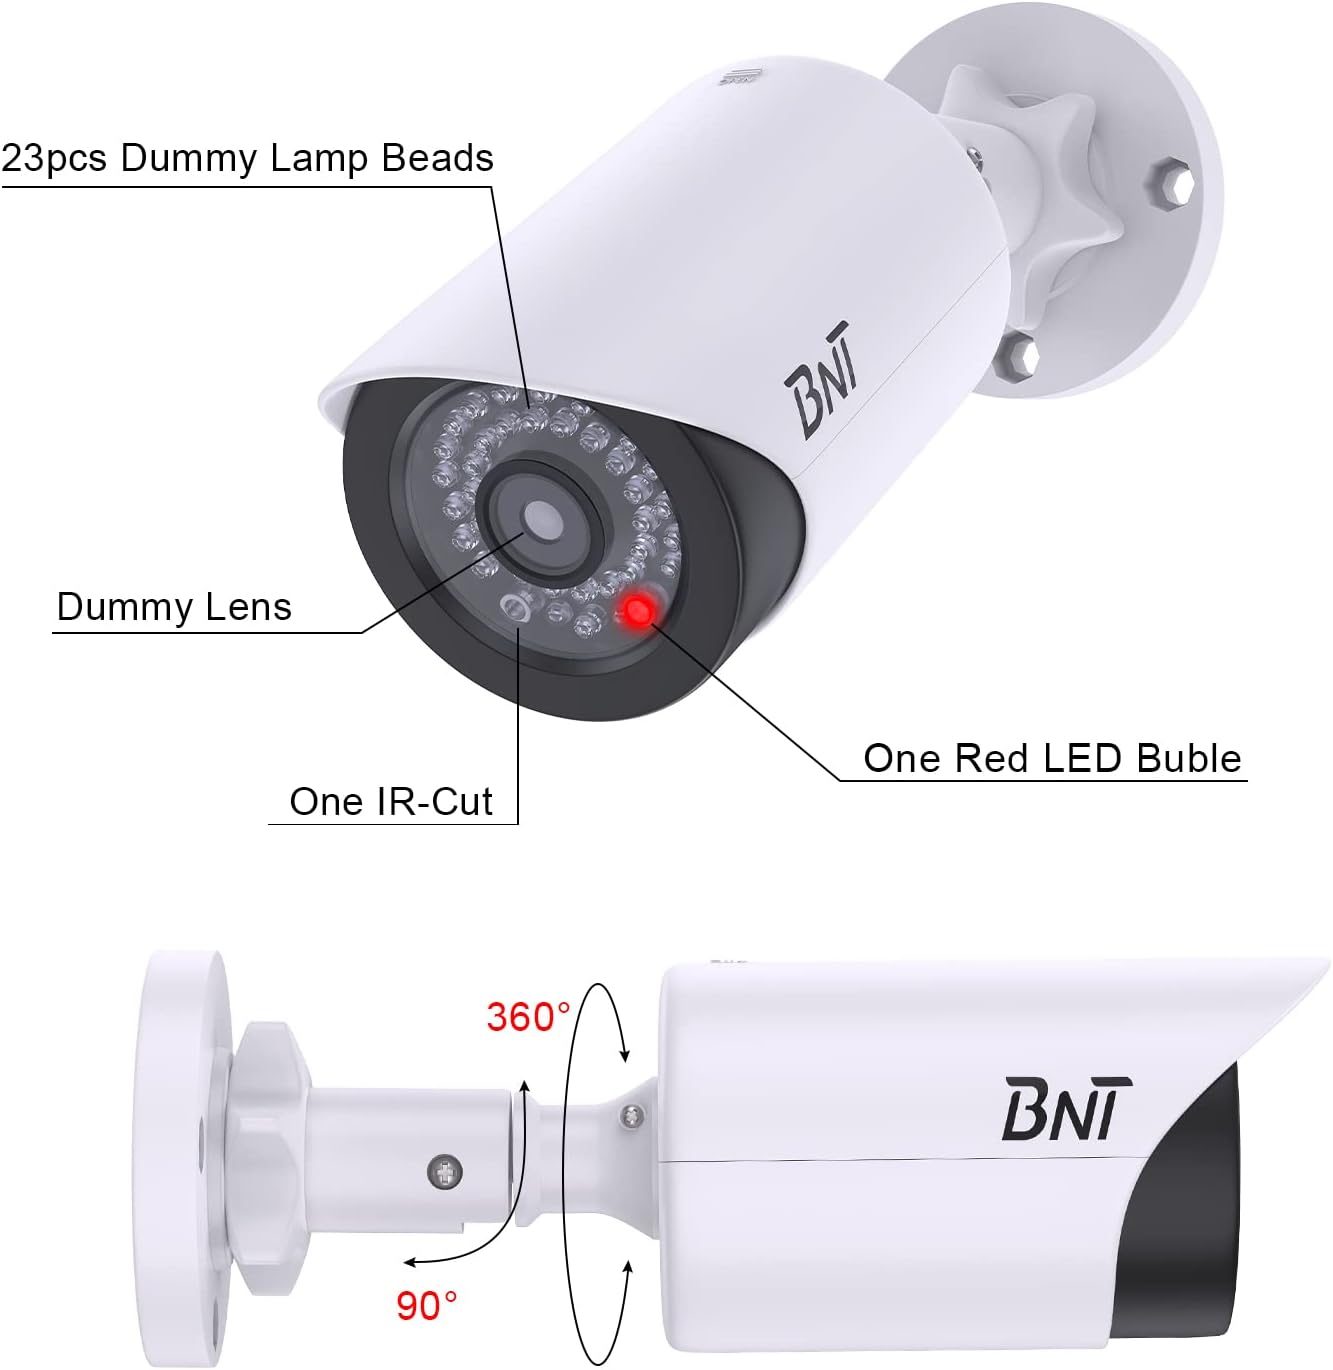
Image 3.1: Close-up of the dummy camera's front, showing the dummy lens, red LED, and rotation capabilities.
4. Sąranka ir diegimas
4.1. Akumuliatoriaus įdėjimas
- Locate the battery compartment on the camera. This is typically found by sliding open the back cover.
- Įdėkite 2 AA baterijas (nepridedamos) į skyrių, užtikrindami teisingą poliškumą (+/-).
- Saugiai uždarykite akumuliatoriaus skyrių.

Image 4.1: Illustration of battery insertion into the dummy camera.
4.2. Kameros montavimas
The camera can be easily installed on a ceiling or wall using the provided screws. No complex wiring is necessary.
- Choose a suitable location for installation, considering visibility and desired deterrent effect.
- Position the mounting base against the surface and mark the screw holes.
- Drill pilot holes if necessary, then secure the mounting base with the provided screws.
- Pritvirtinkite kamerą prie pritvirtinto pagrindo.
- Adjust the camera's angle using its 2-axis rotation feature to achieve the desired coverage.
Video: BNT Dummy Fake Security Camera Overview
4.2.1 vaizdo įrašas: šiame vaizdo įraše pateikiama bendra informacijaview of the BNT Dummy Fake Security Camera, highlighting its features and realistic appearance.
Video: Protecting Property with Fake Cameras
Video 4.2.2: This video demonstrates how fake cameras can be used to enhance property security and deter potential threats.
5. Naudojimo instrukcijos
The BNT Dummy Fake Security Camera is designed for simple, autonomous operation:
- Once batteries are installed, the built-in photoelectric sensor will detect ambient light levels.
- During daylight hours, the red LED light will remain off.
- As darkness falls, the photoelectric sensor will automatically activate the red LED light, causing it to illuminate. This simulates the operation of a real security camera's night vision or recording indicator.
- The camera provides 24/7 visual deterrence without any manual intervention after initial setup.

Image 5.1: The dummy camera's red LED light is active at night, providing a visual deterrent.
6. Priežiūra
- Baterijos keitimas: When the red LED light dims or stops illuminating, it is time to replace the batteries. Ensure to use high-quality AA batteries to prevent leakage and damage to the battery case.
- Aplinkos apsauga: When replacing batteries, take care to avoid exposing the internal components to rain or moisture to maintain the lifespan of the battery case.
- Šalinimas: Please dispose of used batteries properly according to local regulations to protect the environment.
- Valymas: Periodically wipe the camera's exterior with a soft, damp šluoste dulkėms ir šiukšlėms pašalinti. Venkite naudoti stiprias chemines medžiagas.
7. Problemų sprendimas
7.1. LED Light Not Illuminating at Night
- Patikrinkite baterijas: Ensure that 2 AA batteries are correctly installed and are not depleted. Replace if necessary.
- Test Photoelectric Sensor: In a dark environment, cover the LED light with your hand. If the red LED light turns on, the product is functioning correctly. If it does not, check battery installation again.
- Aplinkos veiksniai: Ensure the camera is not installed in an area with ambient light at night (e.g., streetlights, porch lights) that might prevent the photoelectric sensor from detecting sufficient darkness to activate the LED.
8. Specifikacijos
| Funkcija | Detalė |
|---|---|
| Modelio pavadinimas | BNT Dummy (Model BNT-K8FaCam-2PW) |
| Naudojimas viduje / lauke | Viduje, Lauke |
| Maitinimo šaltinis | Maitinamas baterijomis (2 AA baterijos, nepridedamos) |
| Medžiaga | Akrilnitrilo butadieno stirenas (ABS) |
| Montavimo tipas | Lubos, Siena |
| Viewing kampas | 120 laipsnių |
| Tarptautinis apsaugos įvertinimas | IP65 (atsparus vandeniui) |
| Prekės matmenys (I x P x A) | 7.6 x 5.4 x 2.9 colio |
| Prekės svoris | 5.2 uncijos (148 gramų) |
| Ypatinga funkcija | Powered by 2 AA batteries (not included) |
9. Garantija ir palaikymas
BNT provides reliable 24-month after-sales service for this product. If you have any questions, concerns, or require assistance with your BNT Dummy Fake Security Camera, please contact our dedicated customer service team. We are committed to ensuring your satisfaction.


