1. Įvadas
This manual provides essential information for the setup, operation, maintenance, and troubleshooting of your Artillery Sidewinder X1 3D Printer. Please read this manual thoroughly before operating the device to ensure proper use and to prevent damage.

Figure 1.1: The Artillery Sidewinder X1 3D Printer, showcasindėl jo dizaino irampspaudinys.
2. Pagrindinės savybės
- Ultra-Quiet Stepper Driver: Designed for reduced heat dissipation and higher torque, contributing to quieter operation.
- Synchronized Dual Z System: Ensures consistent and parallel movement of the X-carriage relative to the build plate, even if one Z-stepper encounters an issue.
- Direct Drive Extruder: Enhances reliability, particularly when printing with flexible filaments.
- AC Heating Platform: Provides rapid heating of the build plate. The lattice glass surface offers excellent adhesion when heated and allows for easy removal of prints once cooled.
- Apsauga nuo maitinimo gedimo: Enables the printer to resume printing from the last recorded position after a power interruption.
- Kaitinimo siūlelio išbėgimo jutiklis: Automatically pauses printing and prompts for filament feeding when the material runs out.
- Visas jutiklinis ekranas: Provides clear instructions and intuitive control.

Figure 2.1: Visual representation of the Artillery Sidewinder X1's key features, including quiet operation, heated bed, and various sensors.
3. Kas yra dėžutėje
Upon unboxing, verify that all components listed below are present and undamaged:
- 1 x Artillery Sidewinder X1 3D Printer
- 1 x surinkimo įrankių rinkinys
- 1 x Surinkimo instrukcija
- 1 x Assembly Guide (likely a quick start guide or visual aid)

3.1 pav. Išsamus view of the included assembly tool kit, showing various tools and spare parts.
4. Sąranka ir surinkimas
The Artillery Sidewinder X1 comes 95% pre-assembled. Follow the included Assembly Instruction Manual for detailed steps. Key assembly points include:
- Išpakavimas: Atsargiai išimkite visus komponentus iš pakuotės.
- Portalo įrengimas: Secure the gantry to the base unit. Ensure all connections are firm.
- Filamento laikiklis: Attach the filament spool holder to the top of the gantry.
- Kabelių jungtys: Connect all necessary cables, paying attention to proper routing to avoid interference with moving parts.
- Maitinimo jungtis: Connect the power supply unit. Ensure the correct voltage (110V) is selected if applicable.
4.1 Pradinis niveliavimas
Accurate bed leveling is crucial for successful prints. The Sidewinder X1 features large leveling knobs for easier adjustment.
- Heat the build plate to your typical printing temperature (e.g., 60°C for PLA) before leveling.
- Use the touch screen to move the nozzle to each corner and the center of the build plate.
- Adjust the leveling knobs until a piece of paper can slide with slight friction between the nozzle and the build plate.

Figure 4.1: Components facilitating setup and operation, including the direct drive extruder, large leveling knob, synchronized dual Z system, and inductive endstop sensors.
5. Naudojimo instrukcijos
5.1 Kaitinimo siūlelio įdėjimas
To load filament, gently press the extruder arm and insert the filament into the direct drive extruder until it catches. Use the touch screen controls to extrude a small amount of filament to ensure it is flowing correctly through the nozzle.
5.2 Printing from SD Card/USB Stick
The Sidewinder X1 supports printing directly from a TF Card or USB Stick.
- Prepare your 3D model using a slicing software (e.g., Cura, PrusaSlicer, Simplify3D) and save the G-code file to your TF Card or USB Stick.
- Insert the storage device into the designated slot on the printer.
- Navigate the full touch screen interface to select your desired G-code file and initiate the print.
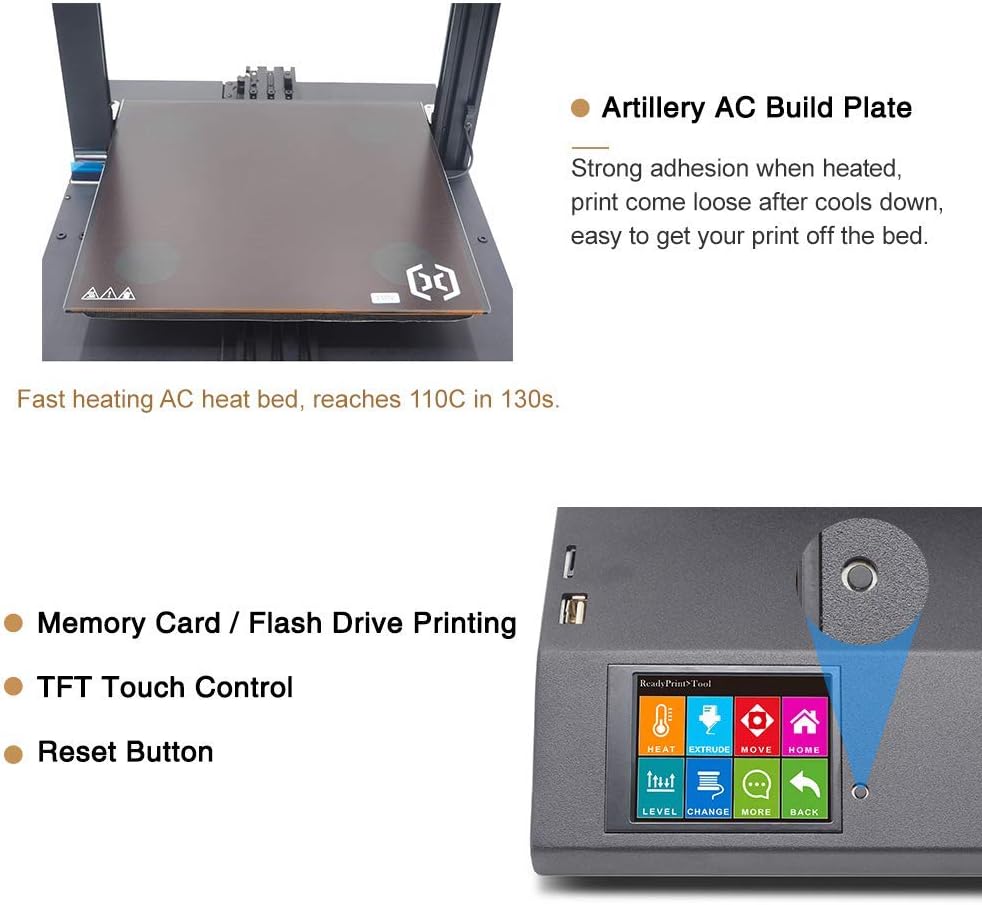
Figure 5.1: The Artillery AC Build Plate, known for its strong adhesion when heated, and the intuitive TFT Touch Control screen with a reset button for easy operation.
6. Priežiūra
Reguliarus 3D spausdintuvo aptarnavimas užtikrina optimalų našumą ir ilgaamžiškumą.
- Nuvalykite kūrimo plokštę: After each print, allow the build plate to cool completely before removing the print. Clean the surface with isopropyl alcohol to remove any residue.
- Purkštukų valymas: Periodically check the nozzle for clogs. Use the included needle or a brass brush to clean any filament buildup.
- Tepimas: Apply a small amount of lubricant to the Z-axis lead screws and smooth rods every few months or as needed.
- Diržo įtempimas: Įsitikinkite, kad X ir Y ašių diržai yra tinkamai įtempti. Jie turi būti įtempti, bet ne per daug.
- Firmware atnaujinimai: Check the official Artillery websvetainėje, kurioje rasite visus galimus programinės įrangos atnaujinimus, skirtus našumui pagerinti arba naujoms funkcijoms pridėti.
7. Problemų sprendimas
Šiame skyriuje aptariamos dažniausiai pasitaikančios problemos, su kuriomis galite susidurti.
7.1 Dažnos spausdinimo problemos
- Prastas pirmojo sluoksnio sukibimas:
- Ensure the build plate is properly leveled.
- Verify the correct bed temperature for your filament type.
- Clean the build plate surface thoroughly.
- Neišspaudžiamas siūlas:
- Check for a clogged nozzle.
- Įsitikinkite, kad kaitinimo siūlelis yra tinkamai įdėtas ir ekstruderio krumpliaratis jį suima.
- Verify the hotend temperature is appropriate for the filament.
- Sluoksnio perkėlimas:
- Check belt tension on X and Y axes.
- Ensure the printer is on a stable surface.
- Reduce print speed if necessary.
7.2 Elektros energijos tiekimo sutrikimų atkūrimas
The Sidewinder X1 features power failure recovery. If power is interrupted during a print, the printer will attempt to resume from the last position once power is restored.

Figure 7.1: The printer's power failure detection system, which allows it to resume printing after a power outage, preventing print job ruin.
8. Techninės specifikacijos
| Parametras | Vertė |
|---|---|
| Sluoksnio raiška | 0.1 mm |
| Rėmas | Aliuminio ekstruzija |
| XYZ Positioning Accuracy | 0.05 mm, 0.05 mm, 0.1 mm |
| Spausdinimo siūlas | PLA, ABS, TPU, lanksčios medžiagos |
| Filamento skersmuo | 1.75 mm |
| Purkštuko skersmuo | 0.4 mm |
| Maksimalus spausdinimo greitis | 150 mm/s |
| Maksimalus kelionės greitis | 250 mm/s |
| Sukurti tūrį | 300x300x400 mm |
| Ekstruderio tipas | Tiesioginės pavaros ekstruderis |
| Maximum Build Plate Temperature | 130°C |
| Galios reikalavimas | 110 V |
| Ryšys | USB, TF Card, USB Stick |
| Kontrolės valdyba | MKS Gen L |
| Purkštuko tipas | Vulkanas |
| Mašinos matmenys | 550x405x640 mm (550x405x870 mm with spool holder) |
| Prekės svoris | 17.3 kilogramų (38.1 svarai) |
| Palaikoma File Formatas | slicer, prusaslicer, cura, kisslicer, ideamaker, slic3r, simplify3d |

Figure 8.1: A visual summary of the Artillery Sidewinder X1's technical specifications and dimensions.
9. Palaikymas ir garantija
For any assistance, questions, or warranty inquiries, please contact Artillery customer support. You can typically find contact information on the official Artillery websvetainėje arba per pardavėją, iš kurio įsigijote produktą.
As per the product description, for help or questions, contact "Rxlife" (the seller) by clicking "Ask a question" behind "sold by".


