1. Įvadas
This manual provides comprehensive instructions for the installation, operation, and maintenance of the Chacon DI-O 54515 Universal Dimmer White. This device allows you to wirelessly control your lighting, integrating seamlessly with existing light switches and the DiO 1.0 ecosystem.
The DI-O 54515 micro-module is designed to be installed behind your existing light switch, enabling wireless ON-OFF control of your lights. It supports control via the physical switch, a remote control, or automatically through compatible motion or opening sensors. When connected to a LiteBox or DiO Home+ hub, it offers smartphone app control, timers, and scenario programming, including voice control via Amazon Echo or Google Home.
2. Saugos informacija
Prieš montuodami ir naudodami atidžiai perskaitykite visas saugos instrukcijas. Nesilaikant šių instrukcijų, gali kilti elektros smūgis, gaisras ar kiti pavojai.
- Montavimą turi atlikti kvalifikuotas elektrikas arba jis turi laikytis vietinių elektros kodeksų.
- Prieš montuodami arba atlikdami įrenginio techninę priežiūrą, visada atjunkite maitinimą grandinės pertraukikliu.
- Neviršykite techninėse specifikacijose nurodytų maksimalių apkrovų.
- Šis prietaisas skirtas naudoti tik patalpose.
- Saugokite įrenginį nuo vandens, drėgmės ir ekstremalių temperatūrų.
- Įsitikinkite, kad visos jungtys yra saugios ir tinkamai izoliuotos.
3. Pakuotės turinys
Pakuotėje turi būti šie elementai:
- Chacon DI-O 54515 Universal Dimmer White Module
- Instrukcijų vadovas (šis dokumentas)

Image 1: The Chacon DI-O 54515 Universal Dimmer White module, showing its compact design and wiring terminals.
4. Produkto ypatybės
- Belaidis valdymas: Enables wireless ON-OFF control of lights when installed behind an existing switch.
- Daugiafunkcinio valdymo parinktys: Compatible with existing physical switches, DiO 1.0 remote controls, wireless switches, motion sensors, and opening sensors.
- Išmaniųjų namų integracija: Connects to LiteBox or DiO Home+ for smartphone app control, timers, and scenario programming.
- Valdymas balsu: Supports voice commands via Amazon Echo or Google Home when integrated with DiO Home+.
- Lengvas montavimas: Designed for simple connection behind an existing light switch, requiring no neutral wire.
- Kompaktiškas dizainas: Dimensions (L x W x H): 41 x 42 x 13 mm, allowing it to fit into standard electrical boxes.
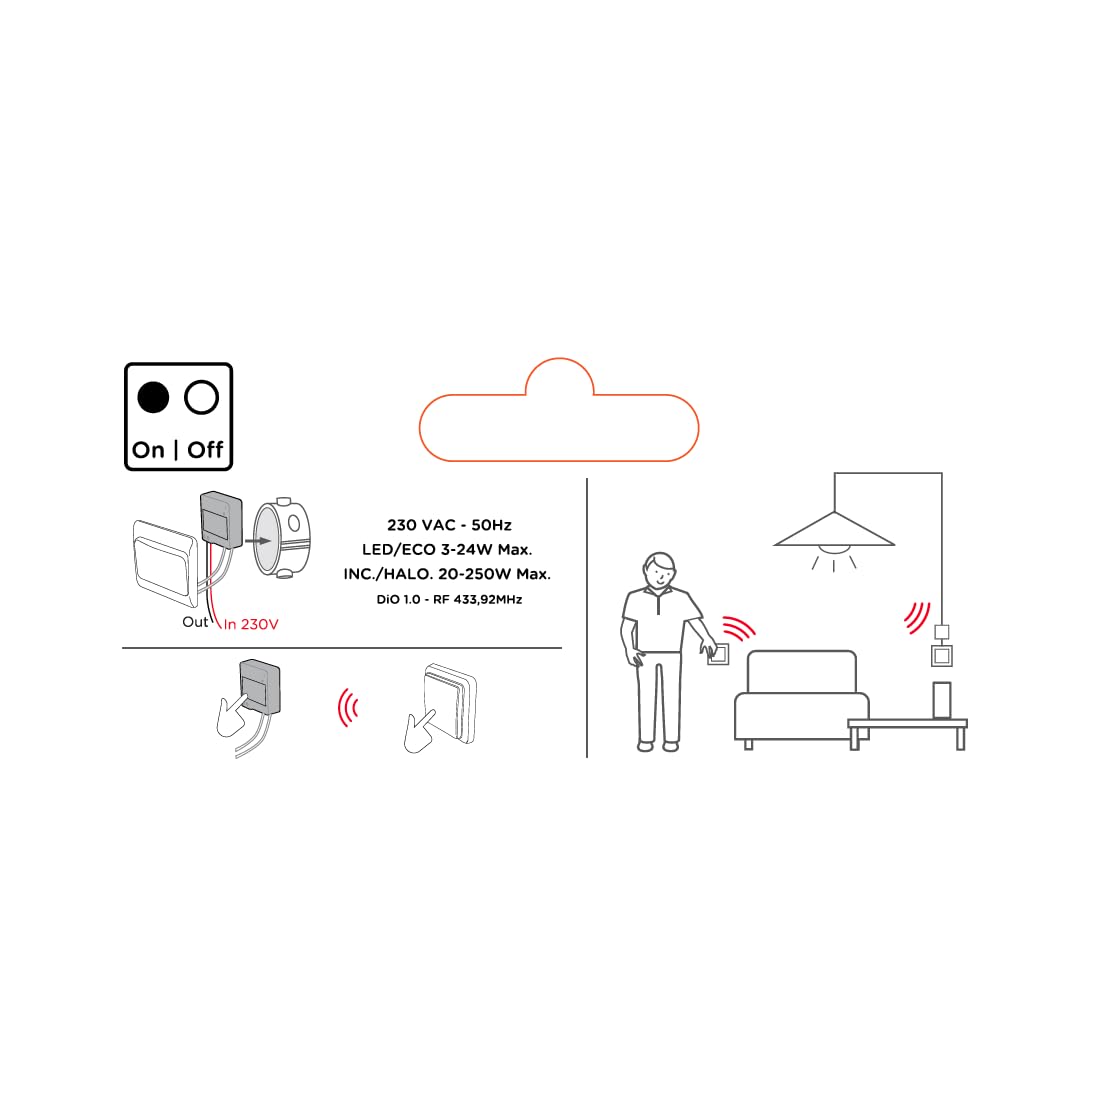
Image 2: An illustrative diagram detailing the wireless control capabilities and key electrical specifications of the module.
5. Sąranka ir diegimas
The installation of the Chacon DI-O 54515 module is designed to be straightforward. However, if you are unsure, consult a qualified electrician.
5.1 Laidų prijungimo instrukcijos
- Atjunkite maitinimą: Before starting any electrical work, ensure the power supply to the circuit is turned off at the main circuit breaker.
- Prieigos jungiklio dėžutė: Carefully remove your existing light switch from the wall box.
- Prijungimo modulis:
- Connect the Live (L) wire from your electrical supply to the 'L' terminal on the DiO module.
- Connect the wire going to your light fixture to the output terminal (often marked with a wave symbol or 'OUT') on the DiO module.
- Connect the two wires from your existing light switch to the designated switch input terminals on the DiO module. This module does not require a neutral wire for operation.
- Position Module: Carefully place the DiO module into the wall box behind your existing light switch. Ensure wires are not pinched.
- Iš naujo įdiekite jungiklį: Reattach your existing light switch to the wall box.
- Atkurti maitinimą: Prie grandinės pertraukiklio vėl įjunkite maitinimą.

Image 3: A visual representation of the DiO module being installed within a standard electrical wall box, positioned behind an existing light switch.

4 paveikslėlis: Išsamus view of the Chacon DI-O 54515 module, highlighting its wiring terminals for proper connection.
5.2 Pairing with DiO 1.0 Controls
To enable wireless control, you need to pair the module with a compatible DiO 1.0 remote control, wireless switch, or sensor.
- Įjunkite susiejimo režimą: Refer to the specific instructions for your DiO 1.0 control device to put it into pairing mode. Typically, this involves pressing a pairing button on the module or performing a specific sequence with the existing switch.
- Activate Control: Once the module is in pairing mode, activate your DiO 1.0 control (e.g., press the 'ON' button on a remote or wireless switch).
- Patvirtinimas: The light connected to the module should flash or turn on/off to confirm successful pairing.
- Repeat for Multiple Controls: You can pair multiple DiO 1.0 controls to the same module if desired.
6. Naudojimo instrukcijos
Once installed and paired, the Chacon DI-O 54515 module offers several ways to control your lighting:
- Existing Light Switch: You can continue to use your traditional wall switch to turn the lights on and off.
- DiO 1.0 Remote Control/Wireless Switch: Use any paired DiO 1.0 remote control or wireless switch to toggle the lights.
- DiO 1.0 Sensors: If paired with a DiO motion or opening sensor, the lights can be triggered automatically based on detected activity.
- Smartphone App (via DiO Home+ / LiteBox):
- Connect your DiO module to a DiO Home+ or LiteBox hub (sold separately).
- Download the free DiO smartphone app.
- Follow the app's instructions to add and configure your module.
- From the app, you can turn lights on/off, set timers, and create custom scenarios.
- Voice Control (via DiO Home+ and Smart Speaker):
- Ensure your DiO Home+ hub is integrated with Amazon Echo or Google Home.
- Naudokite balso komandas, pvz., „Alexa, įjunk šviesą svetainėje“ arba „Ei, Google, išjunk šviesą virtuvėje“.
7. Priežiūra
The Chacon DI-O 54515 module requires minimal maintenance. Follow these guidelines to ensure optimal performance:
- Valymas: Jei reikia, švelniai nuvalykite modulį sausa, minkšta šluoste. Nenaudokite skystų valiklių ar tirpiklių.
- Patikra: Periodically check the wiring connections to ensure they remain secure. Always disconnect power before inspection.
- Firmware atnaujinimai: If using with a DiO Home+ or LiteBox, ensure your hub's firmware and the smartphone app are kept up to date for the best performance and security.
8. Problemų sprendimas
| Problema | Galima priežastis | Sprendimas |
|---|---|---|
| Šviesa neįsijungia/neišsijungia. | No power to the module, incorrect wiring, module not paired, faulty bulb. | Check circuit breaker. Verify wiring according to Section 5.1. Re-pair the module with the control device (Section 5.2). Test with a known working bulb. |
| Belaidis valdymas neveikia. | Module not paired, control device out of range, battery low in remote/sensor. | Ensure module is correctly paired (Section 5.2). Move control device closer to the module. Replace batteries in remote/sensor. |
| Module indicator light flashing red. | Overload or short circuit detected. | Immediately disconnect power. Check the connected load does not exceed specifications. Inspect wiring for any short circuits. Consult a qualified electrician if the problem persists. |
| Balso valdymas nereaguoja. | DiO Home+ hub not connected, incorrect voice command, smart speaker issue. | Ensure DiO Home+ is online and linked to your smart speaker account. Verify the correct device name is used in commands. Check smart speaker's internet connection. |
9. Specifikacijos
| Funkcija | Detalė |
|---|---|
| Modelio numeris | 54515 |
| Prekės ženklas | Dio |
| Veikimo režimas | ĮJUNGTI IŠJUNGTI |
| Dabartinis reitingas | 10 Amps |
| Jungiklio tipas | Dimmer jungiklis |
| Montavimo tipas | Sieninis laikiklis |
| Pavaros tipas | Nuotolinio valdymo pultas |
| Tarptautinis apsaugos įvertinimas | IP44 |
| Valdiklio tipas | Amazon Alexa |
| Kontrolės metodas | Nuotolinis |
| Spalva | Baltas |
| Matmenys (I x P x A) | 41 x 42 x 13 mm |
| Garantija | 2 metai |
Note on Dimming Functionality: While the product title includes "Dimmer" and "Switch Type" is listed as "Dimmer Switch", the official specifications list "Operation mode: ON-OFF". Some user reviews also indicate that newer versions of this module function as a simple ON/OFF switch rather than a dimmer. Please verify the specific functionality of your module upon receipt.
10. Garantija ir palaikymas
This Chacon DI-O 54515 Universal Dimmer White module comes with a 2 metų garantija nuo įsigijimo datos, apimanti gamybos defektus.
For technical support, troubleshooting assistance, or warranty claims, please contact your retailer or visit the official Dio website for contact information. Please have your proof of purchase and model number (54515) ready when contacting support.