1. Įvadas
Welcome to the TMEZON Wireless Security Camera System user manual. This guide provides detailed instructions for the setup, operation, and maintenance of your MZ-WF8430W system. Please read this manual thoroughly before installation and use to ensure proper functionality and safety. This system features 3-megapixel cameras, an 8-channel Network Video Recorder (NVR), and IP66 waterproof cameras suitable for both indoor and outdoor surveillance.
2. Pakuotės turinys
Patikrinkite pakuotę, ar joje yra šie daiktai:
- 1 x 8-Channel Wireless NVR
- 4 x 3MP belaidės IP kameros
- 1 x NVR maitinimo adapteris
- 4 x kameros maitinimo adapteriai
- 1 x USB pelė
- 1 x tinklo kabelis
- 1 x Vartotojo vadovas
- Tvirtinimo varžtų rinkiniai

Vaizdas: Viršview of the TMEZON Wireless Security Camera System components, including the NVR and four cameras.
3. Sąrankos vadovas
3.1 Pradinis NVR prijungimas
Follow these steps to set up your NVR:
- Prijunkite NVR prie monitoriaus naudodami HDMI arba VGA kabelį.
- Prijunkite USB pelę prie NVR USB prievado.
- Connect the NVR to your router using the provided network cable for internet access and remote viewing.
- Connect the NVR power adapter and plug it into an electrical outlet. The NVR will power on automatically.

Image: Diagram illustrating the connections for the NVR, including power, monitor, and network cable to a router.
3.2 Fotoaparato diegimas
The cameras are IP66 waterproof, making them suitable for both indoor and outdoor use. Ensure cameras are within the NVR's wireless range.
- Choose suitable locations for your cameras, considering coverage area and power outlet proximity.
- Mount the cameras securely using the provided screw kits.
- Connect each camera to its respective power adapter and plug into an electrical outlet.
- The cameras will automatically pair with the NVR. If not, refer to the troubleshooting section for manual pairing.
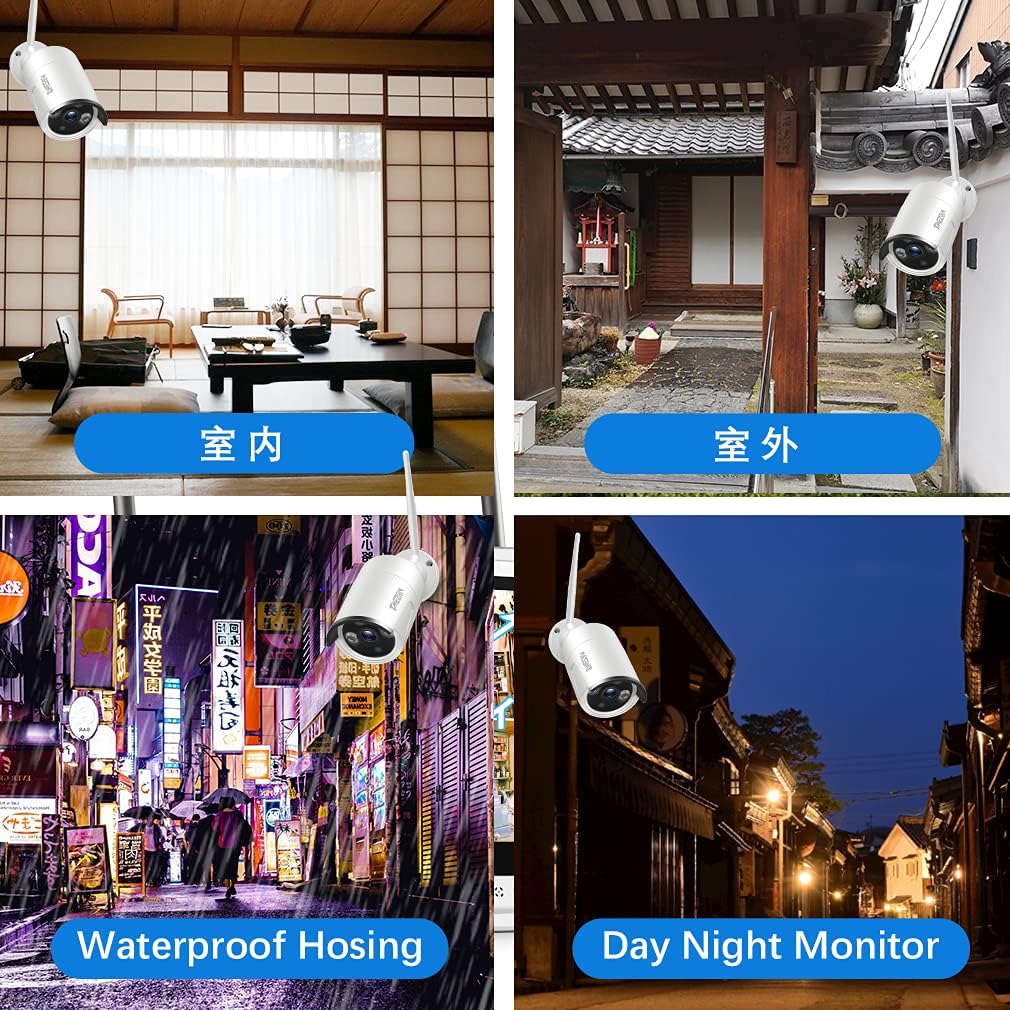
Vaizdas: pvzamples of camera placement for both indoor and outdoor environments.
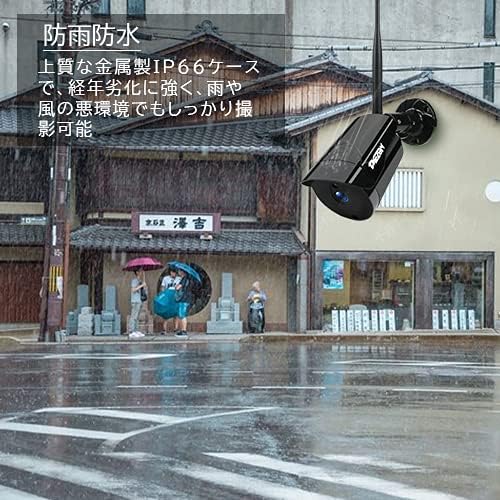
Image: A camera mounted outdoors, demonstrating its IP66 waterproof capability in a rainy setting.
3.3 Remote Access Setup (Mobile App)
Į view your cameras remotely on a smartphone or PC, follow these steps:
- Download the 'IP PRO' app from the App Store (iOS) or Google Play Store (Android).
- Register a new account within the app.
- Nuskaitykite QR kodą savo NVR įrenginyje arba rankiniu būdu įveskite įrenginio ID, kad pridėtumėte savo sistemą prie programėlės.
- Pridėjus, galite view live feeds, playback recordings, and manage settings from your mobile device.

Image: Demonstrates remote access to the camera system from various devices including tablets, laptops, and smartphones.

Image: A visual guide showing the steps for easy remote access setup via the mobile application.
Vaizdo įrašas: Bendra informacijaview of the system's features and setup process.
4. Naudojimo instrukcijos
4.1 Tiesiogiai View ir Įrašymas
After initial setup, the NVR will display live feeds from all connected cameras. You can navigate the interface using the USB mouse. The system is configured for continuous recording by default. You can adjust recording schedules and modes (e.g., motion-triggered) in the NVR settings.
4.2 Atkūrimas
Norėdami iš naujoview įrašytas footage:
- Right-click on the NVR interface to access the main menu.
- Pasirinkite „Atkurti“.
- Choose the desired camera, date, and time to view įrašų.
4.3 Judesio aptikimas
The system supports motion detection, which can trigger recording and alerts. To configure:
- Access the NVR's main menu and go to 'Alarm' or 'Motion Detect' settings.
- Enable motion detection for specific cameras.
- Adjust sensitivity and define detection areas as needed.

Image: Highlights key features such as WiFi wireless connectivity, motion detection, night vision mode, IP66 waterproof rating, remote monitoring, and email alerts.
4.4 Naktinis matymas
The cameras are equipped with infrared (IR) LEDs for automatic night vision, providing clear black and white video footage esant prastam apšvietimui arba visai be apšvietimo.
4.5 Email Alerts
You can configure the system to send email notifications when motion is detected:
- In the NVR settings, navigate to 'Network' then 'Email'.
- Enter your email server details and recipient email addresses.
- Enable email alerts for motion detection events.

Image: A smartphone screen displaying an instant email notification triggered by an alarm event, showing a person attempting to break in.
Video: Demonstrates various operational aspects of the security camera system.
5. Priežiūra
Reguliarus aptarnavimas užtikrina optimalų jūsų apsaugos sistemos veikimą ir ilgaamžiškumą:
- Švarios kameros: Periodiškai nuvalykite fotoaparato objektyvus minkšta šluosteamp šluoste dulkėms ir nešvarumams pašalinti, užtikrinant aiškią vaizdo kokybę.
- Patikrinkite jungtis: Ensure all power and network cables are securely connected to prevent signal loss.
- Firmware atnaujinimai: Check the TMEZON official website for any available firmware updates for your NVR and cameras to enhance features and security.
- Kietojo disko sveikata: If your NVR has a hard drive, regularly check its status in the system settings to prevent recording failures.
6. Problemų sprendimas
Čia pateikiami dažniausiai pasitaikančių problemų, su kuriomis galite susidurti, sprendimai:
6.1 No Video Display on Monitor
- Patikrinkite galią: Ensure the NVR and monitor are powered on and connected correctly.
- Kabelio jungtis: Verify the HDMI/VGA cable is securely connected between the NVR and monitor.
- Įvesties šaltinis: Confirm the monitor's input source is set to the correct HDMI/VGA port.
6.2 Cameras Not Showing on NVR
- Kameros galia: Ensure all cameras are powered on.
- Belaidis diapazonas: Check if cameras are within the NVR's wireless range. Obstacles like thick walls can reduce signal strength.
- Rankinis poravimas: If cameras do not automatically connect, you may need to manually pair them. Access the NVR's 'IPC Channel Config' or 'Wireless Add' menu and follow the on-screen instructions to add cameras.
6.3 Nuotolinė prieiga neveikia
- NVR Internet Connection: Ensure the NVR is connected to your router and has internet access. Check the network status in NVR settings.
- Prisijungimas prie programėlės: Verify you are logged into the correct account on the mobile app.
- Įrenginys pridėtas: Confirm the NVR device has been successfully added to your app account.
- Maršrutizatoriaus nustatymai: Ensure your router is not blocking the NVR's internet access.
6.4 Prasta vaizdo kokybė
- Švarus objektyvas: Clean the camera lens as described in the maintenance section.
- Rezoliucijos nustatymai: Check the camera's resolution settings in the NVR. Ensure it's set to 3MP (2048*1536P) for optimal clarity.
- Apšvietimas: Ensure adequate lighting for color images during the day. Night vision will be black and white.
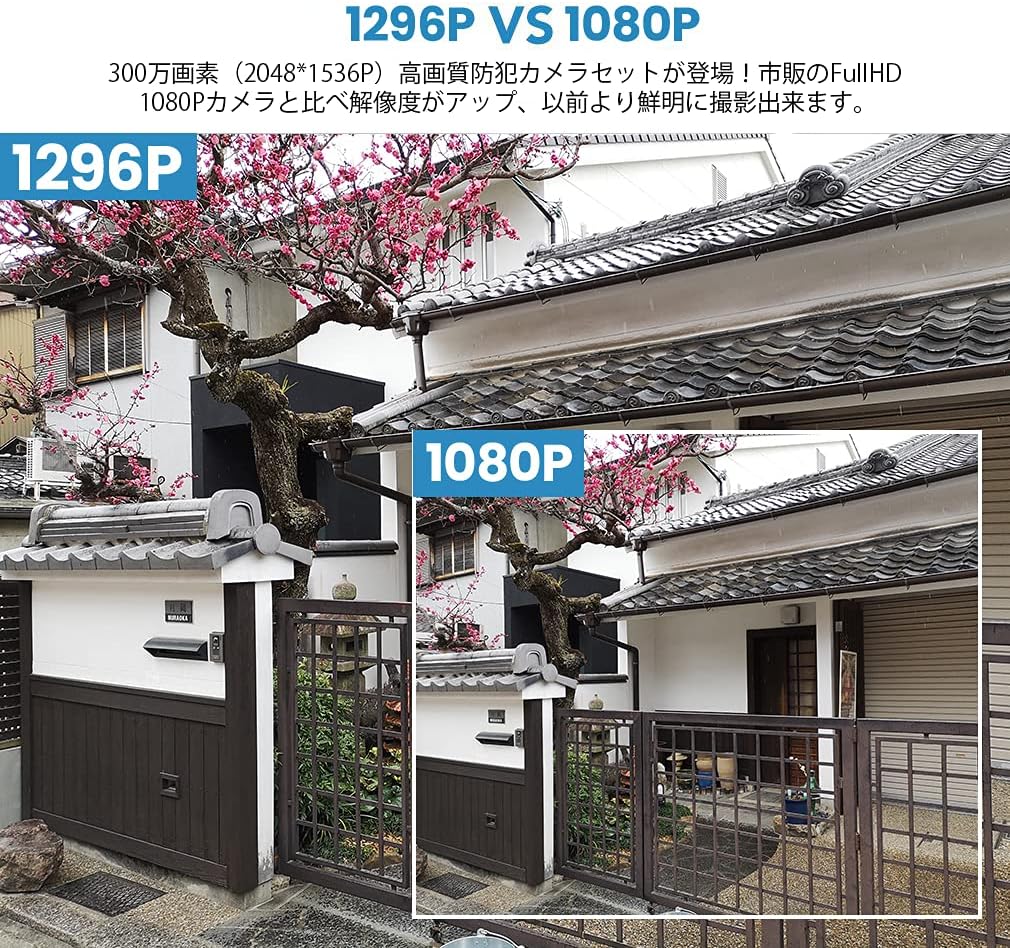
Image: A visual comparison demonstrating the improved clarity and detail of 1296P resolution compared to 1080P.

Image: A comparison showing the difference in image quality between 1080P and 720P resolutions, highlighting the superior detail of 1080P.
7. Specifikacijos
| Funkcija | Specifikacija |
|---|---|
| Prekės ženklas | TMEZONAS |
| Modelio numeris | MZ-WF8430W |
| Ryšio technologija | Bevielis |
| Vaizdo įrašymo raiška | 1944p (3 Megapixels) |
| Ypatingos savybės | Neperšlampamas (IP66) |
| Kanalų skaičius | 8 |
| Pakuotės matmenys | 32 x 31.1 x 18.3 cm |
| Pakuotės svoris | 3.64 kilogramo |
| Reikalingos baterijos | Nr |
8. Garantija ir palaikymas
TMEZON provides customer support for its products. For warranty information, technical assistance, or any questions not covered in this manual, please contact TMEZON customer service through their official website or the contact information provided with your purchase. Please have your model number (MZ-WF8430W) and purchase details ready when contacting support.


