1. Įvadas
Ačiū, kad pirkoteasing the UHAPPY U18 Portable Mini HD LED Projector. This manual provides essential information for the safe and efficient operation of your device. Please read it thoroughly before use and retain it for future reference.
Saugos priemonės
- Nežiūrėkite tiesiai į projektoriaus objektyvą, kai lamp yra įjungtas.
- Užtikrinkite tinkamą vėdinimą aplink projektorių, kad išvengtumėte perkaitimo.
- Saugokite projektorių nuo lietaus ar drėgmės.
- Naudokite tik prie projektorijaus pridėtą maitinimo adapterį.
- Nebandykite patys atidaryti ar taisyti projektoriaus. Visus techninės priežiūros darbus patikėkite kvalifikuotiems specialistams.
2. Produktas baigtasview
Familiarize yourself with the components and ports of your UHAPPY U18 projector.
Pakuotės turinys
The following items are included in your projector package:

Image: Contents of the UHAPPY U18 projector package, including the projector, power adapter, AV cable, remote control, and user manual.
- UHAPPY U18 Mini LED Projector
- Maitinimo adapteris
- AV kabelis
- Nuotolinio valdymo pultas
- Vartotojo vadovas (šis dokumentas)
Projector Components and Ports

Image: Angled top-down view of the UHAPPY U18 projector, highlighting the lens, focus adjustment, and control panel.

Vaizdas: Viršus view of the UHAPPY U18 projector, showing the integrated control buttons.

Vaizdas: priekis view of the UHAPPY U18 projector, focusing on the projection lens.
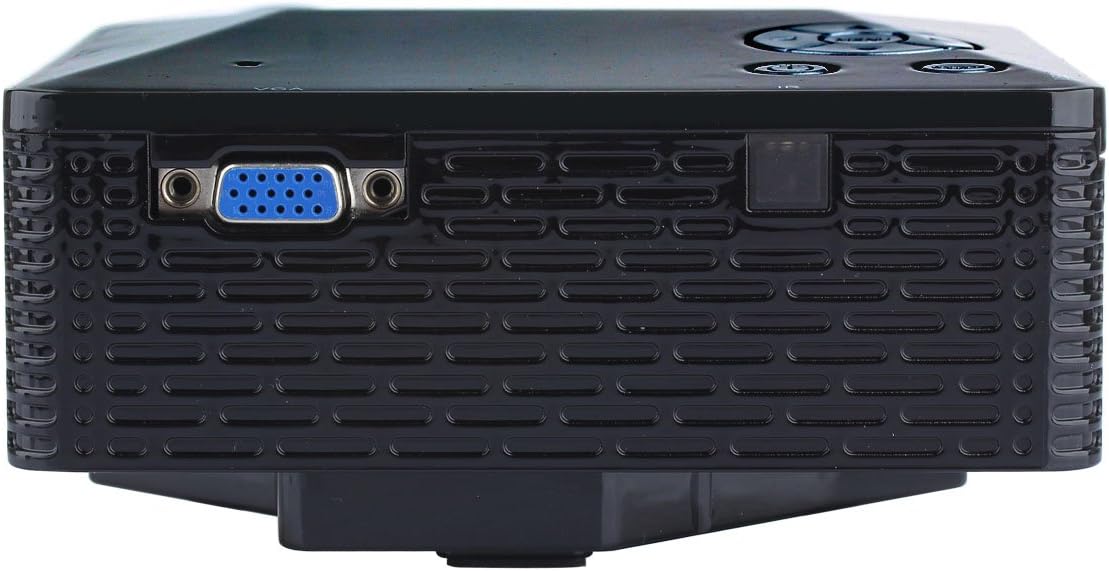
Vaizdas: Šoninė view of the UHAPPY U18 projector, illustrating the VGA input port.
The projector features various input ports for connectivity:
- HDMI įvestis: For connecting devices like laptops, gaming consoles, or media players.
- USB prievadas: For connecting USB storage devices to play media directly.
- SD kortelės lizdas: For inserting SD memory cards to play media directly.
- AV įvestis: Skirta senesniems įrenginiams prijungti naudojant pridedamą AV kabelį.
- VGA įvestis: For connecting computers or laptops with a VGA output.
- DC-IN: Maitinimo įvesties prievadas.
- Ausinių išvestis: Skirta išoriniams garso įrenginiams arba ausinėms prijungti.
- Fokusavimo rankenėlė: Located near the lens for adjusting image clarity.
3. Sąranka
3.1 Įdėjimas
Place the projector on a stable, flat surface. Ensure there is adequate space around the projector for ventilation. The ideal projection distance is between 1 to 4 meters, yielding an image size of 20 to 80 inches.
3.2 Maitinimo jungtis
- Connect the power adapter to the DC-IN port on the projector.
- Įkiškite maitinimo adapterį į tinkamą elektros lizdą.
3.3 Įvesties įrenginių prijungimas
Choose the appropriate cable and port based on your source device:
- HDMI: Connect an HDMI cable from your device (e.g., laptop, DVD player) to the projector's HDMI port.
- VGA: Prijunkite VGA kabelį iš kompiuterio į projektoriaus VGA prievadą.
- APIE: Use the provided AV cable to connect devices with AV output (e.g., older DVD players, set-top boxes) to the projector's AV port.
- USB/SD kortelė: Įkiškite USB atmintinę į USB prievadą arba SD kortelę į SD kortelės lizdą.
4. Naudojimo instrukcijos
4.1 Įjungimas / išjungimas
- Norėdami įjungti: Press the power button on the projector or the remote control. The LED indicator will light up.
- Norėdami išjungti: Press the power button again. It is recommended to allow the projector to cool down for a few minutes before unplugging it.
4.2 Šaltinio pasirinkimas
After powering on, you may need to select the input source:
- Press the 'Source' button on the projector or the remote control.
- Use the navigation buttons to select the desired input (HDMI, VGA, AV, USB, SD) and press 'OK' or 'Enter'.
4.3 Fokuso reguliavimas
If the projected image appears blurry:
- Rotate the focus knob located near the projector lens until the image becomes clear and sharp.
4.4 Meniu naršymas
Use the 'Menu' button on the projector or remote to access settings. Use the navigation arrows to move through options and 'OK' or 'Enter' to confirm selections. The projector supports multiple languages including English, Czech, Slovak, Danish, German, Spanish, French, Croatian, Italian, Hungarian, Dutch, Norwegian, Polish, Portuguese, Romanian, Slovene, Serbian, Finnish, Swedish, Bulgarian, Greek, Russian, and Chinese.
4.5 Palaikomi medijos formatai
When playing media directly from USB or SD card, the projector supports the following formats:
- Vaizdas: BMP, JPEG, PNG
- Vaizdo įrašas: MPEG1, MPEG2, MPEG4, RM, RMVB, AVI, FLV, WMV
5. Priežiūra
5.1 Objektyvo valymas
Use a soft, lint-free cloth specifically designed for optical lenses to gently wipe the projector lens. Avoid using abrasive materials or harsh chemicals.
5.2 Bendras valymas
Wipe the projector's exterior with a soft, dry cloth. Do not use liquid cleaners directly on the device. Ensure ventilation openings are free from dust and obstructions.
5.3 Saugykla
When not in use, store the projector in a cool, dry place, away from direct sunlight and extreme temperatures. It is advisable to cover the lens to protect it from dust.
6. Problemų sprendimas
Jei kyla problemų dėl projektoriaus, žr. šias dažniausiai pasitaikančias problemas ir sprendimus:
| Problema | Galima priežastis | Sprendimas |
|---|---|---|
| Ekrane nėra vaizdo | Pasirinktas netinkamas įvesties šaltinis Laisva kabelio jungtis Šaltinio įrenginys neįjungtas | Pasirinkite tinkamą įvesties šaltinį. Patikrinkite visas kabelių jungtis. Įsitikinkite, kad šaltinio įrenginys įjungtas ir skleidžia signalą. |
| Vaizdas neryškus | Fokusas nepakoreguotas | Rotate the focus knob until the image is clear. |
| Nėra garso | Garsas per mažas External audio device not connected Source device audio settings | Increase projector volume. Connect external speakers/headphones to the audio output. Patikrinkite garso nustatymus savo šaltinio įrenginyje. |
| Projektorius perkaito ir išsijungia | Užblokuota ventiliacija Ilgalaikis naudojimas karštoje aplinkoje | Įsitikinkite, kad ventiliacijos angos yra laisvos. Allow the projector to cool down. Operate in a well-ventilated area. |
7. Specifikacijos
Technical specifications for the UHAPPY U18 Portable Mini HD LED Projector:
- Vaizdo sistema: LCD
- Vietinė skiriamoji geba: 320x240
- Lamp: LED
- LED tarnavimo laikas: 20,000 valandos
- Ryškumas: 60 LM
- Kontrastas: 300:1
- Objektyvas: F = 125
- Vaizdo dydis: 20-80 colių
- Projekcijos atstumas: 1-4 metrai
- Projekcijos režimas: Priekinė projekcija
- Veikimo režimas: Rankinis/nuotolinis valdymas
- Įvesties gnybtai: AV, VGA, USB, SD, HDMI
- Išvestis: Ausinės
- Galia: 24W
- Spalva: 16.77 milijono spalvų
- Pranešėjas: 1.0W*2
- Darbinė temperatūra: 10-35°C
- Matmenys: 135 x 132 x 52 mm
- Svoris: 0.44 kg
8. Garantija ir palaikymas
This product is manufactured by Generic. For warranty information and technical support, please refer to the documentation provided at the time of purchase or contact your retailer. Keep your purchase receipt as proof of purchase.