1. Įvadas
This manual provides comprehensive instructions for the safe and effective use of the JRready ST2060-AS2G M22520/2-01 Indent Crimper Kit. This professional tool is designed for precision crimping of miniature and sub-miniature connector contacts commonly found in electronic systems, including MIL standard, Harting, Wain, and TE connectors. It delivers a Mil-Standard 8-impression crimp, ensuring high tensile strength for wire sizes ranging from 20 to 32 AWG (0.52-0.032mm²).

1.1 vaizdas: Baigtaview of the JRready ST2060-AS2G Indent Crimper Kit, including the crimping tool, various positioners, and a G125 Go-NoGo gauge.
2. Saugos informacija
Naudodami užspaudimo įrankį, visada laikykitės šių saugos priemonių:
- Dėvėkite tinkamas asmenines apsaugos priemones, tokias kaip apsauginiai akiniai, kad apsisaugotumėte nuo skraidančių šiukšlių.
- Užtikrinkite, kad darbo vieta būtų švari, gerai apšviesta ir be kliūčių.
- Do not use the tool for purposes other than its intended crimping function.
- Keep hands and fingers clear of the crimping jaws during operation to prevent injury.
- Inspect the tool and positioners for any damage before each use. Do not use damaged tools.
- Įrankį laikykite sausoje, saugioje, vaikams nepasiekiamoje vietoje.
3. Pakuotės turinys
The JRready ST2060-AS2G M22520/2-01 Indent Crimper Kit includes the following items:
- 1 x NEW-AS2G Indent Crimper (M22520/2-01 equivalent)
- 7 x K-series Positioners: K1, M22520/2-06, M22520/2-07, M22520/2-08, M22520/2-09, M22520/2-10, M22520/2-37
- 1 x Universal Adjustment Positioner
- 1 x G125 Go-NoGo Gauge
4. Produktas baigtasview
The JRready ST2060-AS2G crimper is a precision tool designed for consistent and reliable crimps. Key features include:
- 4-Indent 8-Impression Crimp Style: Ensures a secure and high-strength connection.
- Reketinis mechanizmas: Provides a full crimp cycle, preventing partial crimps and ensuring consistent quality.
- Adjustable Selector Knob: Allows for precise adjustment of crimp depth for various wire and contact sizes.
- Interchangeable Positioners: Specific positioners guide the contact into the correct crimping position.
- G125 Go-NoGo Gauge: Used to verify the accuracy of the crimp tool's indenter settings.

Image 4.1: The JRready ST2060-AS2G crimper highlighting its 4-indent 8-impression style and key specifications.
5. Sąranka
5.1. Selecting the Correct Positioner
Each contact type and size requires a specific positioner to ensure proper alignment during crimping. Refer to the contact manufacturer's specifications or the provided positioner chart to select the appropriate K-series positioner.
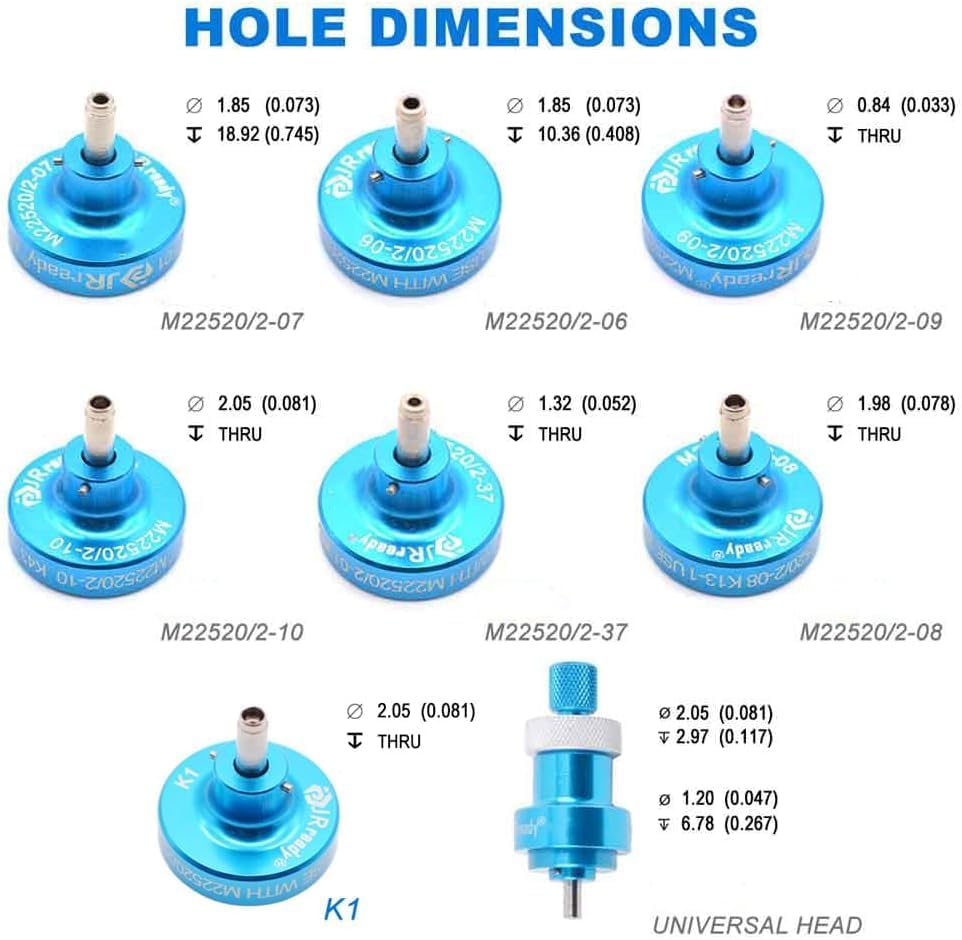
Image 5.1: Detailed hole dimensions for various M22520/2-XX positioners and the K1 positioner, aiding in selection.
5.2. Installing a Positioner
- Įsitikinkite, kad gofravimo rankenos yra visiškai atidarytos.
- Align the selected positioner with the mounting hole on the crimper head.
- Push the positioner firmly into place until it clicks or is securely seated.
- Verify that the positioner is stable and does not wobble.
5.3. Adjusting the Selector Knob
The selector knob on the crimper adjusts the depth of the indenter, which corresponds to different wire gauges.
- Locate the selector knob on the side of the crimper.
- Push the knob inwards and rotate it to the desired setting (1-8). The appropriate setting for your wire gauge and contact type should be specified by the contact manufacturer or in relevant technical documentation.
- Release the knob to lock it into position.

Image 5.2: Illustration of the crimper's selector knob and its corresponding indenter working diameters for various settings (1-8).
6. Naudojimo instrukcijos
6.1. Preparing the Wire and Contact
- Strip the insulation from the wire to the length specified by the contact manufacturer. Ensure the stripped wire is clean and free of frayed strands.
- Ensure the contact is clean and undamaged.
6.2. Crimping Procedure
- With the correct positioner installed and the selector knob set, fully open the crimper handles.
- Insert the contact into the positioner. Ensure the contact is fully seated and properly oriented.
- Insert the stripped wire into the contact's wire barrel. Ensure the wire insulation is flush with the back of the contact barrel and no bare wire is exposed beyond the crimp area.
- Slowly close the crimper handles until the ratchet mechanism completes its cycle and automatically releases. Do not force the handles open before the cycle is complete.
- Remove the crimped contact from the positioner.
- Inspect the crimp for proper formation, ensuring the wire is securely held and the crimp is uniform.
7. Testing and Calibration with G125 Go-NoGo Gauge
The G125 Go-NoGo gauge is essential for verifying the accuracy of the crimper's indenter settings. This ensures that the tool consistently produces crimps within specified tolerances.
7.1. Go-NoGo Gauge Procedure
- Set the crimper to the desired selector knob setting (e.g., SEL #8 for G125 gauge).
- Close the crimper handles completely until the ratchet releases.
- Insert the "GO" end (green) of the G125 gauge into the crimper's indenter opening. The "GO" end should pass freely through the indenter.
- Insert the "NO-GO" end (red) of the G125 gauge into the crimper's indenter opening. The "NO-GO" end should ne pass completely through the indenter.

Image 7.1: Demonstrates the correct use of the G125 Go-NoGo gauge to verify crimper calibration. The 'GO' end should pass, and the 'NO-GO' end should not.
7.2. Rezultatų interpretavimas
- If the "GO" end passes freely and the "NO-GO" end does not pass, the tool is properly calibrated for that setting.
- If the "GO" end does not pass, or the "NO-GO" end passes completely, the tool is not qualified for that setting and should not be used until recalibrated or replaced.

Image 7.2: Table detailing the "GO" and "NO-GO" inspection gauge limits (in mm/in) for each selector setting (1-8).
8. Priežiūra
- Valymas: Regularly clean the crimper jaws and positioners with a soft, lint-free cloth to remove any debris or residue. Avoid using harsh chemicals that could damage the tool's finish or components.
- Tepimas: Apply a small amount of light machine oil to the pivot points and ratchet mechanism periodically to ensure smooth operation.
- Saugykla: Store the crimper and its accessories in the provided case or a clean, dry environment to prevent corrosion and damage.
- Patikra: Before each use, inspect the tool for any signs of wear, damage, or misalignment. Pay close attention to the crimping jaws, positioner, and ratchet mechanism.
9. Problemų sprendimas
| Problema | Galima priežastis | Sprendimas |
|---|---|---|
| Poor crimp quality (loose wire, deformed contact) | Incorrect selector setting; wrong positioner; damaged contact/wire; incomplete crimp cycle. | Verify selector setting and positioner match contact/wire. Ensure wire is properly stripped. Allow ratchet to complete full cycle. Inspect contact/wire for damage. |
| Crimper handles stick or do not release | Debris in ratchet mechanism; lack of lubrication; damaged ratchet. | Clean the ratchet mechanism. Apply light machine oil. If problem persists, tool may require professional service. |
| Positioner does not fit or is loose | Incorrect positioner for the tool; debris in mounting hole; damaged positioner. | Ensure correct positioner is selected. Clean mounting hole. Replace damaged positioner. |
| G125 gauge fails "GO" or "NO-GO" test | Incorrect selector setting; tool misalignment or wear. | Re-check selector setting. If still failing, the tool may be out of calibration or worn. Contact JRready support. |
10. Specifikacijos
| Funkcija | Detalė |
|---|---|
| Modelis | ST2060-AS2G (YJQ-W1A equivalent) |
| Crimp Style | 4-indent 8-impression |
| Vielos diapazonas | 20–32 AWG (0.52–0.032 mm²) |
| Taikomos jungtys | MIL standard, Harting, Wain, TE connectors (round contacts) |
| Dizaino standartas | MIL-C-22520/2-01 |
| Prekės svoris | 225 gramų (7.9 uncijos) |
| Medžiaga | Lydinys |
| Rankenos medžiaga | Daugiaspalvis |
| Rankenos tipas | Tekstūruotas |
| UPC | 743829092640 |
11. Garantija ir palaikymas
For warranty information, technical support, or service inquiries regarding your JRready ST2060-AS2G M22520/2-01 Indent Crimper Kit, please contact JRready customer service. Refer to the product packaging or the official JRready websvetainę, kurioje rasite naujausią kontaktinę informaciją.
Gamintojas: JRREADY

