1. Įvadas
This manual provides detailed instructions for the installation, operation, and maintenance of your Lorex D841A82B Series 8 Channel 4K HD Digital Video Recorder (DVR). This DVR is designed to provide high-resolution surveillance with advanced features such as 4K recording, person/vehicle detection, and smart home integration. Please read this manual thoroughly before using the product to ensure proper setup and functionality.
2. Pakuotės turinys
Verify that all items listed below are included in your product packaging. If any items are missing or damaged, please contact Lorex customer support.
- Lorex D841A82B Series DVR
- HDMI kabelis
- Maitinimo adapteris
- Ethernet kabelis
- USB pelė
- Greitos pradžios vadovas (šis vadovas)
3. Produktas baigtasview

Figure 3.1: Front Panel of the Lorex D841A82B DVR. This image displays the front of the DVR unit, featuring the "4K Ultra HD DVR" label, a central circular button, and a USB port for connecting a mouse or other peripherals.

Figure 3.2: Side Panel with Ventilation. This image shows the side of the DVR, highlighting the ventilation grilles designed for heat dissipation, crucial for continuous operation.
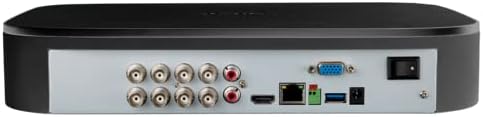
3.3 pav.: Galinio skydelio jungtys. This image illustrates the rear panel of the DVR, displaying various input/output ports including BNC connectors for cameras, audio inputs/outputs, HDMI, VGA, Ethernet, USB ports, and the power input with an on/off switch.
4. Pagrindinės savybės
- 4K itin aukštos raiškos įrašymas: Capable of recording up to 4K (8MP) resolution on all channels, providing detailed video footage.
- Išplėstinis judesio aptikimas: Reduces false alarms with intelligent person and vehicle detection, sending push notifications when relevant motion is detected (available on up to 4 channels).
- Išmaniųjų namų suderinamumas: Integrates with Amazon Alexa and Google Assistant for hands-free voice control, and Chromecast for viewing live or recorded video on your TV.
- Lorex Home Mobile Application: Leidžia nuotoliniu būdu viewing and control of active deterrence features from a smartphone or tablet.
- Vietinė saugykla: Equipped with a pre-installed 2TB security-grade hard drive, ensuring secure local storage without monthly cloud fees. Expandable up to 10TB.
- Išmanioji paieška: Filter motion events to quickly review footage.
- Panikos mygtukas: Located on the DVR, activates lights and sirens on connected cameras for immediate response.
- 24/7 Stebėjimas: Designed for continuous operation and reliable surveillance.
5. Sąrankos vadovas
5.1 Pradiniai ryšiai
- Prijungti kameras: Connect your analog HD security cameras to the BNC video input ports on the rear of the DVR. Ensure connections are secure.
- Prijungimas prie monitoriaus: Use the provided HDMI cable to connect the DVR's HDMI output port to an HDMI input on your TV or monitor. Alternatively, use a VGA cable for VGA monitors.
- Prijunkite USB pelę: Plug the included USB mouse into one of the USB ports on the DVR (front or rear).
- Prisijungimas prie tinklo (nebūtina, bet rekomenduojama): Nuotoliniam viewing and smart features, connect the DVR to your router using the supplied Ethernet cable.
- Prijunkite maitinimą: Connect the power adapter to the DVR's power input and then plug it into a power outlet. Turn on the DVR using the power switch on the rear panel.
5.2 Pirmojo nustatymo vedlys
Upon first power-up, the DVR will guide you through a setup wizard. Follow the on-screen prompts to:
- Sukurkite saugų slaptažodį.
- Konfigūruokite datos ir laiko nustatymus.
- Set up network parameters (if not automatically detected).
- Adjust recording preferences.
It is crucial to complete these steps to ensure your system is secure and functioning correctly.
6. Naudojimo instrukcijos
6.1 Tiesiogiai View
Po pradinio nustatymo DVR rodys tiesioginį vaizdą view from all connected cameras on your monitor.
- Viena kamera View: Double-click on any camera feed to view it in full screen. Double-click again to return to multi-camera view.
- Skaitmeninis priartinimas: Viso ekrano režimu view, use the digital zoom function to magnify specific areas of interest.
6.2 Įrašymas ir atkūrimas
The DVR is configured for continuous recording by default. You can adjust recording schedules and motion detection settings via the main menu.
- Access Playback: Dešiniuoju pelės mygtuku spustelėkite tiesioginę transliaciją view screen and select "Playback" from the menu.
- Search Footage: Use the date and time filters to locate specific recordings. The Smart Search feature allows filtering by motion events.
- Export Footage: Connect a USB flash drive to a USB port on the DVR to export selected video clips.
6.3 Lorex Home Mobile Application
Download the Lorex Home app from your smartphone's app store.
- Susikurkite paskyrą ir prisijunkite.
- Add your DVR by scanning the QR code displayed on the DVR's monitor (found in the network settings) or by manually entering the device ID.
- Prisijungę galite view live feeds, play back recordings, receive push notifications, and control active deterrence features remotely.
6.4 Išmaniųjų namų integracija
The Lorex D841A82B DVR supports integration with Amazon Alexa, Google Assistant, and Chromecast.
- Valdymas balsu: Enable the Lorex skill/action in your smart home app (Alexa or Google Home). Use voice commands to view camera feeds on compatible smart displays or TVs (e.g., "Alexa, show me the front door camera").
- Chromecast: Link your Lorex account to Google Home and cast live or recorded video directly to a Chromecast-enabled display.
7. Priežiūra
7.1 Kietojo disko valdymas
The DVR's hard drive is designed for continuous operation. When the hard drive is full, the system will automatically overwrite the oldest recordings.
- Reguliariai kurkite svarbių duomenų atsargines kopijastagį išorinį atminties įrenginį.
- Periodiškai tikrinkite standžiojo disko būseną per DVR sistemos nustatymus, kad užtikrintumėte optimalų veikimą.
7.2 Valymas
To maintain the DVR's performance and longevity:
- Wipe the exterior of the DVR with a soft, dry cloth.
- Ensure ventilation openings are clear of dust and debris to prevent overheating. Do not use liquid cleaners or aerosol sprays directly on the unit.
7.3 Firmware atnaujinimai
Lorex periodically releases firmware updates to improve performance and add new features. Check the Lorex support website for the latest firmware for your model and follow the provided instructions for updating.
8. Problemų sprendimas
If you encounter issues with your Lorex D841A82B DVR, refer to the following common troubleshooting steps.
| Problema | Galima priežastis | Sprendimas |
|---|---|---|
| Monitoriuje nėra vaizdo išvesties. | Atsilaisvinęs HDMI/VGA kabelis, neteisinga monitoriaus įvestis, neįjungtas vaizdo registratorius. | Check cable connections. Ensure monitor is set to the correct input source. Verify DVR power. |
| Nėra kameros vaizdo. | Loose BNC cable, camera power issue, camera malfunction. | Check BNC connections. Ensure cameras are receiving power. Test camera with another channel or DVR if possible. |
| Cannot connect to Lorex Home app. | No network connection, incorrect device ID, firewall settings. | Verify DVR is connected to the internet. Double-check device ID. Ensure router/firewall allows DVR access. |
| Judesio aptikimo įspėjimai skamba per dažnai arba neveikia. | Sensitivity settings, detection zone configuration. | Adjust motion detection sensitivity and detection zones in the DVR settings. Ensure person/vehicle detection is enabled for relevant channels. |
For further assistance, please contact Lorex customer support.
9. Specifikacijos
| Funkcija | Detalė |
|---|---|
| Modelio numeris | D841A82B |
| Vaizdo kanalai | 8 kanalas |
| Įrašymo raiška | Up to 4K (8MP) Ultra HD |
| Kietojo disko dydis | 2 TB (iš anksto įdiegta), galima išplėsti iki 10 TB |
| Ryšio technologija | Ethernet, HDMI |
| Suderinami įrenginiai | Cameras, Smartphone, Tablet, Television |
| Gaminio matmenys | 13.25 x 16 x 5.5 colio |
| Prekės svoris | 6.41 svaro |
10. Compatible Cameras
The D841B series DVR is compatible with a wide range of Lorex cameras. Below is a list of compatible camera models:
- LW2287, LW2297, LW4211B
- C841CA, LAB243
- LBV1511, LBV1521B, LBV2521, LBV2531, LBV2561U, LBV2711, LBV2723, LBV4711, LBV8531B, LBV8451XB, LBV8721AB
- LEV2750AB, LEV4712
- LZV2722, LZV2925
- C241XC-E, C241DA-E, C581CB, C581CD, C581DA, C861CF, C861CH, C861XC-E, C881DA, C882DA
11. Palaikymas ir garantija
For technical support, product registration, and warranty information, please visit the official Lorex website or contact Lorex customer service directly. Keeping your product registered helps ensure you receive timely updates and support.
Loreksas Websvetainė: www.lorex.com


