Įvadas
The Blue Ox BX7380 Alpha II Tow Bar is designed for flat towing vehicles behind a motorhome. This manual provides essential information for the safe and effective installation, operation, maintenance, and storage of your tow bar. Please read all instructions carefully before use.
Pagrindinės savybės
- Rated for vehicles up to 6,500 pounds Gross Vehicle Weight Rating (GVWR).
- Easy foldaway design for convenient storage on the back of the RV.
- Self-aligning arms for simplified connection.
- Quick disconnect hookup pins.
- Non-binding latch mechanisms for easier connection and disconnection on uneven ground.
- Constructed with solid steel for durability.
- Premium powder coat over e-coat for enhanced protection.
- Includes safety cables.
- Trijų metų ribota garantija.
Sąranka ir diegimas
Proper installation is crucial for safe towing. Ensure your towed vehicle is equipped with a compatible Blue Ox base plate (sold separately) before proceeding.
Žingsnis po žingsnio vadovas
- Measure Hitch Height: Measure the height of your motorhome's receiver tube and the attachment tabs on your towed vehicle's base plate. The height difference should ideally be within 3 inches. If the difference exceeds 3 inches, a drop receiver or rise receiver may be necessary (sold separately).
- Insert Hitch Connector: Slide the tow bar's hitch connector into the receiver tube of your motorhome's hitch. Secure it with the provided pin and clip.
- Position Towed Vehicle: Position the towed vehicle on a level surface directly behind the motorhome. Engage the parking brake on the towed vehicle.
- Extend Tow Bar Legs: Partially extend one leg of the tow bar by pulling on the leg and releasing its latch.
- Attach Triple Lugs: Place the triple lug of the extended tow bar leg between the attachment tabs on the towed vehicle's base plate. Secure it with the provided pin and clip. Repeat for the other leg.
- Connect Safety Cables: Attach the safety cables. One end should be secured to a solid part of the chassis on the towed vehicle, or to the convenience links of the base plate, in a crossing pattern. Ensure the safety snaps click back against the hook to prevent disconnection. Adjust any slack if necessary.
- Connect Electrical and Braking Systems: Connect your towed vehicle's electrical umbilical cord and breakaway cable (if applicable) to the motorhome. Ensure all connections are secure and functional.
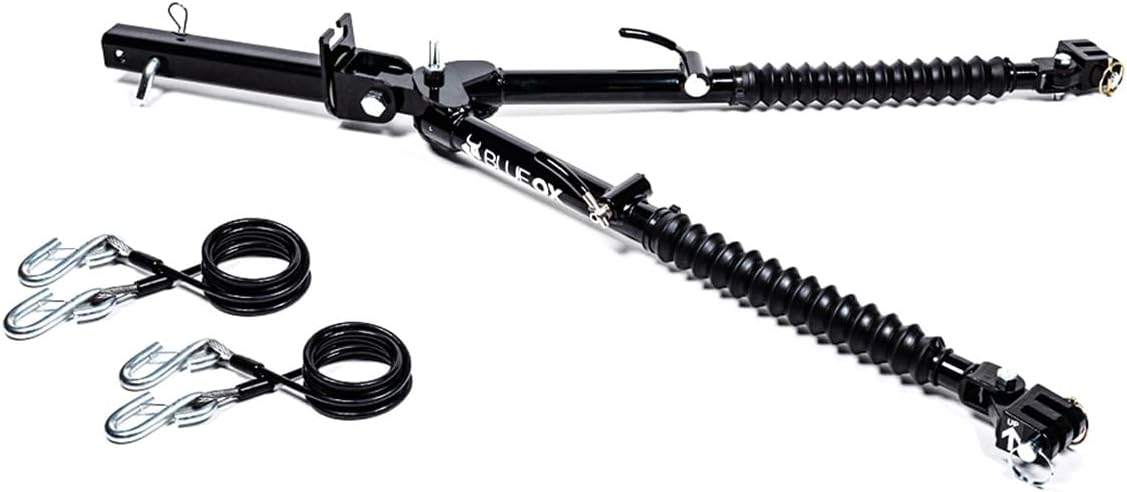
Image: Blue Ox BX7380 Alpha II Tow Bar with included safety cables.
Operacija
Once the tow bar is fully connected and all safety measures are in place, you are ready to begin towing.
- Engage Locking Handles: Slowly pull forward with the motorhome until one or both of the tow bar's locking handles are engaged and locked. This ensures the tow bar arms are fully extended and secure.
- Patikrinkite ryšius: Before driving, perform a final visual inspection of all connections: tow bar legs, pins, clips, safety cables, electrical umbilical cord, and breakaway cable.
- Test Lights and Brakes: With the motorhome's lights and brakes activated, verify that the towed vehicle's corresponding lights and brakes are functioning correctly.

Image: Blue Ox Alpha II Tow Bar demonstrating its self-aligning and 3-axis swivel design for easy connection.
Išmontavimas ir sandėliavimas
To disconnect the towed vehicle and store the tow bar:
- Parkavimas lygioje vietoje: Park both vehicles on level ground and engage the parking brake on the motorhome.
- Disconnect Electrical and Braking Systems: Disconnect the electrical umbilical cord and breakaway cable from both vehicles.
- Remove Safety Cables: Unhook the safety cables from both the motorhome and the towed vehicle.
- Release Triple Lugs: Remove the pins and clips securing the triple lugs to the towed vehicle's base plate. Return the pins and clips into the triple lugs for safe storage.
- Disengage Leg Latches: Disengage the tow bar leg latches by pushing down on the locking handles.
- Compress Legs: Compress both tow bar legs completely until they lock into place.
- Sulenkite ir saugokite: Fold the legs together and place the tow bar into its upright storage position on the motorhome's hitch receiver. Secure it with the receiver pin and clip.

Image: Rubber boots protect the tow bar legs from dirt and debris.
Priežiūra
Regular maintenance ensures the longevity and safe operation of your Blue Ox BX7380 Alpha II Tow Bar.
- Reguliariai valykite: Clean the tow bar regularly with mild soap and water to remove dirt, grime, and road salt.
- Patikrinkite, ar nėra nusidėvėjimo: Periodically inspect all moving parts, pins, clips, and safety cables for signs of wear, corrosion, or damage. Pay close attention to the powder coat finish for any flaking that could expose metal to rust.
- Sutepkite judančias dalis: Lubricate all pivot points and moving components with a suitable lubricant as recommended by the manufacturer to ensure smooth operation.
- Patikrinkite tvirtinimo detales: Įsitikinkite, kad visi varžtai ir tvirtinimo detalės yra priveržti pagal gamintojo specifikacijas.
- Tinkamai laikykite: When not in use, store the tow bar in its folded position, ideally covered, to protect it from the elements.
Trikčių šalinimas
Štai keletas dažniausiai pasitaikančių problemų ir galimų jų sprendimų:
- Difficulty Connecting/Disconnecting on Uneven Ground: The non-binding latch mechanisms are designed to assist with this. Ensure the towed vehicle is as level as possible. Gently rock the towed vehicle or motorhome slightly to relieve tension on the tow bar arms, allowing the latches to release or engage more easily.
- Pins are Stuck/Hard to Remove: If there is tension on the pins, it can make them difficult to remove. Gently move the towed vehicle slightly forward or backward to relieve pressure on the pins. This should allow for easier removal.
- Tow Bar Arms Not Locking: Ensure the motorhome has pulled forward enough for the arms to fully extend and engage the locking mechanism. Check for any obstructions preventing full extension.
- Excessive Play or Noise During Towing: Verify all connections are tight and secure. Inspect for any worn components or loose bolts. Refer to the maintenance section for proper inspection procedures.
Specifikacijos
| Funkcija | Detalė |
|---|---|
| Prekės ženklas | Mėlynasis jautis |
| Modelis | BX7380 Alpha II |
| Max. Capacity (GVWR) | 6,500 svaro |
| Imtuvo dydis | 2 inches (Class III) |
| Statybinė medžiaga | Tvirtas plienas |
| Baigti | Premium Powder Coat over E-coat |
| Prekės svoris | 41 svaro |
| Garantija | Trijų metų ribota garantija |
Informacija apie garantiją
The Blue Ox BX7380 Alpha II Tow Bar comes with a three-year limited warranty. For specific terms, conditions, and claim procedures, please refer to the warranty documentation included with your product or visit the official Blue Ox websvetainę.
Pagalba klientams
For further assistance, technical support, or inquiries regarding your Blue Ox BX7380 Alpha II Tow Bar, please contact Blue Ox customer service directly. Contact information can typically be found on the product packaging or the official Blue Ox websvetainę.


