1. Įvadas
The EPEVER Tracer1210AN MPPT Solar Charge Controller is designed to efficiently manage power from your solar panels to charge batteries. It features advanced Maximum Power Point Tracking (MPPT) technology, ensuring high tracking efficiency of over 99.5%. This controller supports 12V and 24V battery systems automatically and can handle a maximum PV input voltage of 100V. It is compatible with various battery types, including sealed lead-acid, gel, flooded, and lithium batteries. The built-in LCD screen displays key charging parameters, and multiple connectivity options allow for personalized settings and monitoring via remote meter, mobile app, or PC software.
2. Produkto ypatybės
The Tracer1210AN controller integrates several features for optimal performance and user interaction.

- LCD ekranas: Shows real-time operating data and fault information.
- Pasirinkite mygtuką: Used to navigate through different display interfaces.
- Įvesties mygtukas: Used to confirm selections or enter settings menus.
- Montavimo skylės: For secure installation of the controller.
- Temperatūros jutiklio prievadas: Connects the Remote Temperature Sensor (RTS) for accurate battery temperature compensation.
- Saulės baterijų terminalai: Jungiamasi prie saulės baterijų masyvo.
- Baterijos gnybtai: Jungiasi prie akumuliatoriaus banko.
- Apkrovos terminalai: Jungiamas prie nuolatinės srovės apkrovų.
- COM Port (RS485): For communication with accessories like the MT50 remote meter, PC software, or mobile app.

3. Sąranka ir diegimas
Proper installation is crucial for the safe and efficient operation of your solar charge controller. Follow these steps carefully.
3.1 Išpakavimas ir komponentai
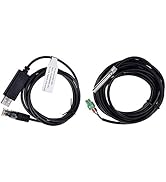
Before installation, ensure all components are present and undamaged. The package typically includes the Tracer1210AN controller, an MT50 remote meter, a Remote Temperature Sensor (RTS), and an RS485 PC communication cable.

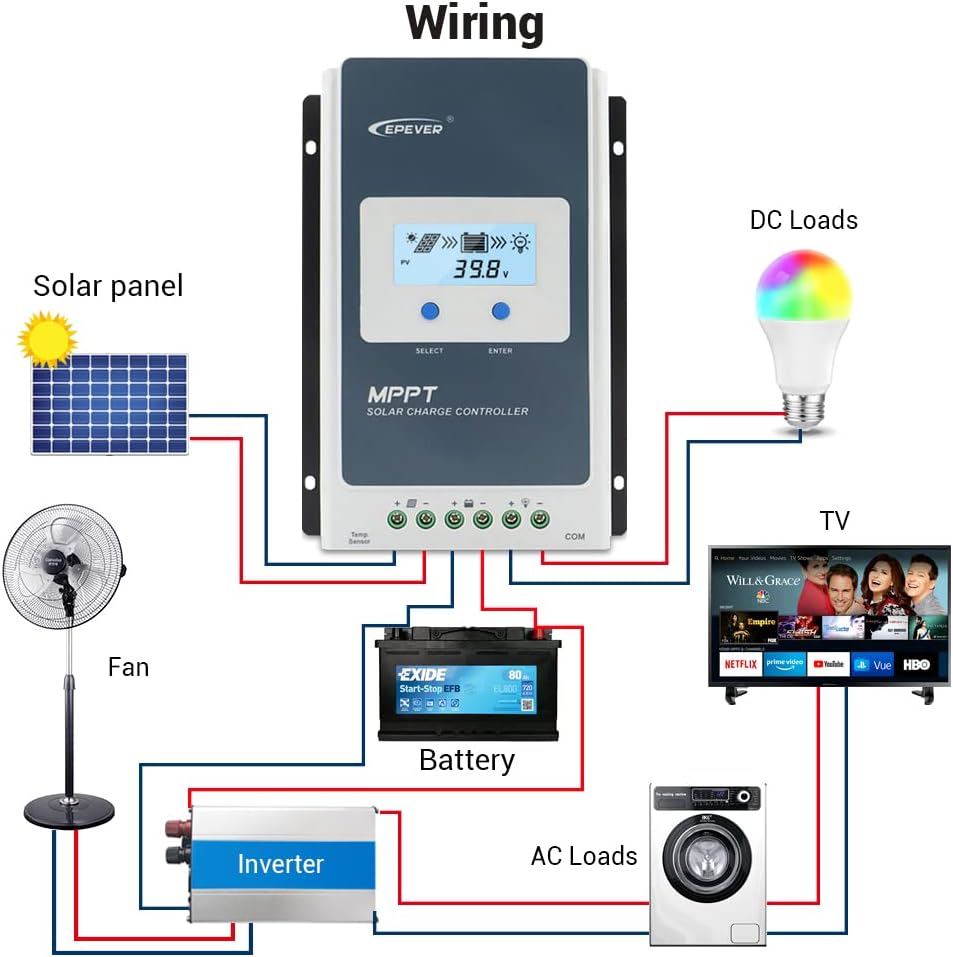
3.2 Sujungimo schema
Connect the components in the specified order to prevent damage. The connection order is: Baterija → Saulės baterija → Apkrova. The disassembly order is the reverse: Load → Solar Panel → Battery.
3.3 Communication Ports and Accessories
The controller features various ports for enhanced monitoring and control.

- Remote Temperature Sensor (RTS): Connect the RTS300R47K3.81A to the designated port for accurate battery temperature compensation. The standard cable length is 3m.
- RS485 ryšio prievadas: This RJ45 port allows connection to various accessories for monitoring and parameter setting.
3.4 diegimo žingsniai
- Mount the controller securely using the provided mounting holes.
- Prijunkite bateriją prie valdiklio baterijos gnybtų. Įsitikinkite, kad poliškumas yra teisingas.
- Prijunkite saulės bateriją prie valdiklio saulės baterijos gnybtų. Įsitikinkite, kad poliškumas yra teisingas.
- Connect the DC loads to the controller's load terminals. Ensure correct polarity.
- Connect the temperature sensor probe to the controller.
3.5 Video: Unboxing and Installation
Watch this video for a visual guide on unboxing and installing the EPEVER Tracer-AN controller and its accessories.
4. Naudojimo instrukcijos
This section covers basic operation and how to configure essential settings on your controller.
4.1 Manual Control Mode
The controller supports manual control of the load. Press the 'ENTER' button to toggle the load on or off.
4.2 Setting the Battery Type
It is essential to set the correct battery type for optimal charging and battery longevity. The controller supports various battery types including Sealed (default), Gel, Flooded, and different Lithium battery configurations.

Norėdami nustatyti akumuliatoriaus tipą:
- Press and hold the 'ENTER' button for 5 seconds when the battery voltage interface is displayed.
- Press the 'SELECT' button when the battery type interface is flashing to cycle through available battery types.
- Press the 'ENTER' button to confirm your selection.
4.3 Setting the Load Mode
The load working mode determines how the connected DC loads operate. Options include Light ON/OFF, various timer settings, test mode, and manual mode.
To set the load mode:
- Press and hold the 'ENTER' button for 5 seconds when the load mode interface is displayed.
- Press the 'SELECT' button when the load mode interface is flashing to cycle through available modes.
- Press the 'ENTER' button to confirm your selection.
5. Specifikacijos
Below are the technical specifications for the Tracer1210AN MPPT Solar Charge Controller.
| Parametras | Value (Tracer1210AN) |
|---|---|
| Sistemos vardinis ttage | 12 / 24VDC automatinis |
| Nominali įkrovimo srovė | 10A |
| Nominali iškrovimo srovė | 10A |
| Baterijos tūristage Diapazonas | 8~32V |
| Maks. PV atviros grandinės ttage | 100V (esant 25°C aplinkos temperatūrai) |
| MPP ttage Diapazonas | Baterijos tūristage +2V ~ 72V |
| Maks. PV įvesties galia | 130W/12V, 260W/24V |
| Savarankiškas vartojimas | ≤12mA |
| Iškrovos grandinės ttage lašas | ≤0.23V |
| Temperature Compensate | -3mV/°C/2V (numatytasis) |
| Įžeminimas | Bendras neigiamas |
| RS485 sąsaja | 5VDC / 100mA |
| LCD foninio apšvietimo laikas | 60S (numatytasis) |
6. Priedai
The EPEVER Tracer1210AN controller is often bundled with or compatible with several accessories to enhance its functionality.
- MT50 nuotolinis skaitiklis: This remote meter can display various operating data and fault information. It features easy-to-operate buttons and a clear numeric display. It is used for monitoring and setting controller parameters.
- Nuotolinis temperatūros jutiklis (RTS300R47K3.81A): Acquires battery temperature for accurate temperature compensation of control parameters. The standard length of the cable is 3m.
- USB–RS485 kabelis (CC-USB-RS485-150U): Used to connect the controller to a PC for monitoring and setting parameters via Solar Station PC software. The cable length is 1.5m.
- OTG Cable (OTG-12CM): Used to connect a mobile communication cable to achieve real-time monitoring and parameter modification via a mobile APP.
- „WiFi“ nuoseklusis adapteris („eBox-WiFi-01“): Allows monitoring and setting parameters via mobile APP software through WiFi signals.
- RS485 į „Bluetooth“ adapteris („eBox-BLE-01“): Enables monitoring and setting parameters via mobile APP software through Bluetooth signals.
- Registratorius (eLOG01): Records the operating status of the controller for later review.

7. Problemų sprendimas
If you encounter issues with your EPEVER Tracer1210AN controller, refer to the following common troubleshooting tips:
- LCD ekrane nėra ekrano: Patikrinkite akumuliatoriaus jungtis ir įsitikinkite, kad akumuliatoriaus įtampatage yra veikimo diapazone.
- Nėra įkrovimo: Verify solar panel connections and ensure sufficient sunlight. Check for any shading on the solar panels. Confirm the battery type setting is correct.
- Įkrovimas neveikia: Check load connections and ensure the load mode is set correctly (e.g., Manual ON, Light ON/OFF). Verify that the battery voltage yra virš mažo tūriotagatjungimo slenkstis.
- Netikslus temperatūros rodmuo: Ensure the Remote Temperature Sensor (RTS) is properly connected and positioned near the battery.
- Komunikacijos problemos: Check the RS485 cable connections to the remote meter, PC, or adapter. Ensure drivers are installed for PC communication.
For more detailed troubleshooting, consult the full product manual or contact EPEVER customer support.
8. Priežiūra
Regular maintenance helps ensure the longevity and optimal performance of your solar charge controller.
- Švara: Valiklį laikykite švarų, be dulkių ir šiukšlių. Valymui naudokite sausą šluostę.
- Jungtys: Periodiškai tikrinkite visas laidų jungtis, ar jos nėra sandarios ir ar nėra korozijos. Atsilaisvinusios jungtys gali perkaisti ir sukelti gedimus.
- Vėdinimas: Ensure adequate airflow around the controller to facilitate heat dissipation. Do not block the heat sink fins.
- Baterijos būklė: Monitoriaus akumuliatoriaus talpatage and health regularly. Ensure the battery type setting on the controller matches your battery.
- Firmware atnaujinimai: Patikrinkite gamintojo websvetainėje, kurioje rasite visus galimus programinės įrangos atnaujinimus, skirtus našumui pagerinti arba naujoms funkcijoms pridėti.
9. Garantija ir palaikymas
EPEVER produktai sukurti patikimumui ir našumui užtikrinti. Dėl garantijos informacijos ir techninės pagalbos kreipkitės į oficialią EPEVER svetainę. websvetainėje arba susisiekite su vietiniu platintoju.
You can also visit the official iSunergy store on Amazon for product information and support: iSunergy Amazon Store.


