1. Įvadas
Ačiū, kad pirkoteasing the Optoma X309ST projector. This manual provides essential information for safely installing, operating, and maintaining your device. Please read this manual thoroughly before using the projector to ensure optimal performance and longevity.
Kas yra dėžutėje
- Optoma X309ST Projector
- Maitinimo laidas
- Nuotolinio valdymo pultas (su baterijomis)
- VGA laidas
- Vartotojo vadovas (šis dokumentas)
- Garantijos kortelė
2. Saugos informacija
ĮSPĖJIMAS: Kad išvengtumėte gaisro ar elektros smūgio, nelaikykite šio prietaiso lietuje ar drėgmėje.
- Neužblokuokite ventiliacijos angų. Užtikrinkite pakankamai vietos aplink projektorių tinkamam oro cirkuliavimui.
- Nežiūrėkite tiesiai į projektoriaus objektyvą, kai lamp įjungtas. Ryški šviesa gali pažeisti akis.
- Naudokite tik prie projektoriaus pridėtą maitinimo laidą.
- Nemėginkite patys aptarnauti šio gaminio. Visą techninę priežiūrą patikėkite kvalifikuotam aptarnavimo personalui.
- Projektorių saugokite nuo vandens ar drėgmės.
- Nestatykite projektoriaus ant nestabilių paviršių.
3. Produktas baigtasview
Projektoriaus komponentai

3.1 paveikslas: Į viršų view of the Optoma X309ST projector. This image displays the control panel with buttons for power, menu navigation, and source selection, along with the focus and zoom adjustment rings located near the lens.

3.2 paveikslas: Priekyje view of the Optoma X309ST projector. The main projection lens is visible, flanked by ventilation grilles on either side, designed for efficient heat dissipation.
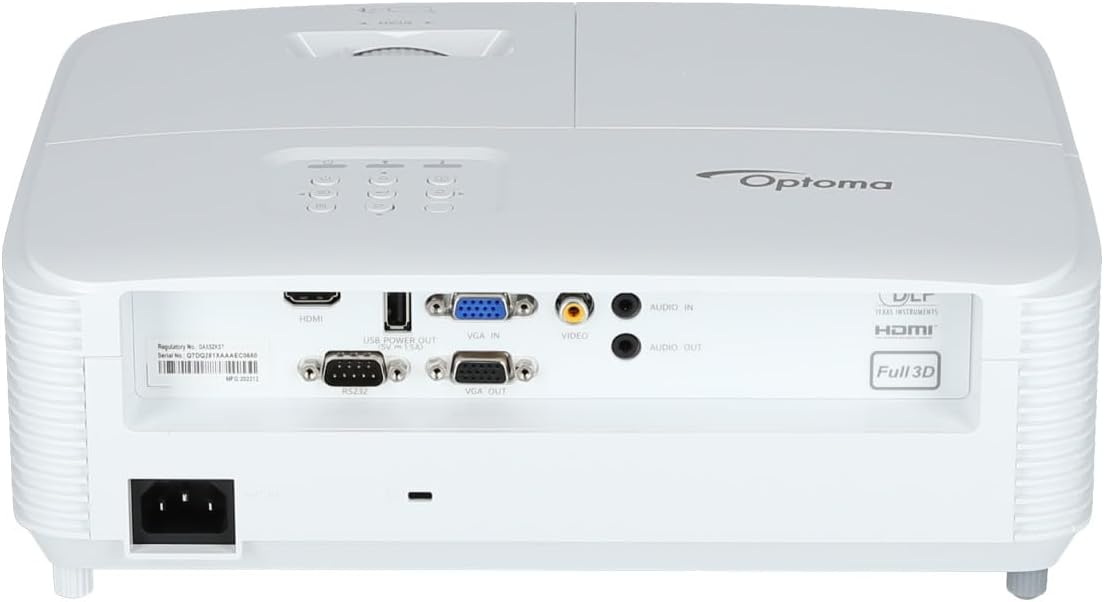
3.3 paveikslas: Galinis view of the Optoma X309ST projector. This image highlights the various connectivity ports including HDMI, VGA In, VGA Out, USB Power Out, Audio In, Audio Out, Video (RCA Composite), and the RS-232 control port, along with the power input.
Valdymo skydelis
The control panel on the top of the projector allows for basic operation without the remote control. It includes buttons for:
- Galia: Įjungia arba išjungia projektorių.
- Meniu: Atidaro ekrano meniu (OSD).
- Naršymo rodyklės: Used to navigate through menu options and adjust settings.
- Šaltinis: Pasirenka įvesties šaltinį (HDMI, VGA ir kt.).
- Iš naujo sinchronizuoti: Optimizes the image for analog sources.
4. Sąranka
4.1 Projektoriaus išdėstymas
The Optoma X309ST is a short-throw projector, designed to project large images from a short distance. Place the projector on a stable, flat surface or mount it securely. Ensure the projection surface (screen or wall) is flat and clear of obstructions.
- For optimal image quality, position the projector perpendicular to the screen.
- Maintain adequate ventilation space around the projector (at least 30 cm / 12 inches).
4.2 Maitinimo prijungimas
- Connect the power cord to the AC inlet on the rear of the projector.
- Kitą maitinimo laido galą įkiškite į įžemintą elektros lizdą.
- The power LED on the projector will illuminate, indicating standby mode.
4.3 Įvesties šaltinių prijungimas
The projector supports various input sources. Choose the appropriate cable for your device.
- HDMI: For digital video and audio. Connect an HDMI cable from your source device (e.g., laptop, Blu-ray player) to the HDMI port on the projector.
- VGA: For analog video. Connect a VGA cable from your computer to the VGA IN port on the projector. For audio, connect a 3.5mm audio cable from your computer's audio output to the AUDIO IN port.
- RCA Composite Video: For standard definition analog video. Connect an RCA composite video cable (yellow connector) to the VIDEO port. For audio, connect RCA audio cables (red/white) to the AUDIO IN ports.
- USB maitinimo išvestis: This port provides 5V power for external devices like streaming sticks, but does not transmit data.
5. Projektoriaus valdymas
5.1 Įjungimas / išjungimas
- Norėdami įjungti: Press the Power button on the control panel or remote control. The power LED will change from red (standby) to blue (on).
- Norėdami išjungti: Press the Power button twice. The first press will display a confirmation message; press again to confirm shutdown. The power LED will return to red.
Pastaba: Allow the projector to cool down for a few minutes after powering off before unplugging it or moving it.
5.2 Selecting an Input Source
Paspauskite Šaltinis button on the control panel or remote control repeatedly to cycle through available input sources (HDMI, VGA, Video). Alternatively, use the dedicated input buttons on the remote control.
5.3 Vaizdo reguliavimas
- Fokusas: Sukite fokusavimo žiedą ant objektyvo, kol vaizdas taps ryškus ir aiškus.
- Mastelio keitimas: Rotate the zoom ring on the lens to adjust the image size without moving the projector.
- Keystone korekcija: If the image appears trapezoidal, use the Keystone Correction function in the OSD menu to square the image. Access via the Meniu mygtuką.
5.4 Ekrano meniu (OSD)
Paspauskite Meniu button to access the OSD. Use the navigation arrows to browse categories and options. Press Įeikite or the right arrow to select an option, and the left arrow or Meniu again to go back or exit.
Įprasti OSD nustatymai:
- Vaizdo nustatymai: Brightness, Contrast, Color, Aspect Ratio, Picture Mode.
- Ekrano nustatymai: Keystone, Overscan, Wall Color.
- Setup Settings: Language, Auto Power Off, High Altitude Mode.
- Lamp Nustatymai: Lamp Hours, Lamp Mode (Bright, Eco).
6. Priežiūra
Reguliarus techninis aptarnavimas užtikrina optimalų veikimą ir pailgina projektoriaus tarnavimo laiką.
6.1 Projektoriaus valymas
- Išorė: Naudokite minkštą, nepūkuotą audinį dampened with a mild, non-abrasive cleaner. Do not spray cleaner directly onto the projector.
- Objektyvas: Use a lens cleaning cloth or lens paper with a specialized lens cleaning solution. Avoid touching the lens surface with your fingers.
- Vėdinimo grotelės: Use a soft brush or a vacuum cleaner with a brush attachment to remove dust from the ventilation grilles. Ensure the projector is powered off and unplugged before cleaning.
6.2 Lamp Pakeitimas
WARNING: Projector lamps operate at high temperatures and pressures. Allow the projector to cool completely before attempting lamp replacement. Refer to the full service manual for detailed lamp replacement instructions or contact qualified service personnel.
Lamp life can vary depending on usage and lamp mode. A warning message will appear on screen when the lamp is nearing the end of its life. Only use genuine Optoma replacement lamps.
6.3 Oro filtro valymas / keitimas
The Optoma X309ST projector is designed with a sealed optical engine, which typically means it does not have user-serviceable air filters that require regular cleaning or replacement. However, ensure the ventilation grilles remain clear of dust and debris as described in section 6.1.
7. Problemų sprendimas
Jei kyla problemų dėl projektoriaus, žr. šias dažniausiai pasitaikančias problemas ir sprendimus:
| Problema | Galima priežastis | Sprendimas |
|---|---|---|
| Ekrane nėra vaizdo. |
|
|
| Vaizdas neryškus. |
|
|
| Vaizdas yra trapecijos formos. |
|
|
| Projektorius perkaista arba išsijungia. |
|
|
If the problem persists after trying these solutions, please contact Optoma customer support.
8. Specifikacijos
| Funkcija | Detalė |
|---|---|
| Modelio numeris | E9PD7DQ01EZ1 |
| Ryškumas | 3700 ANSI liumenai |
| Gimtoji raiška | XGA (1024 x 768) |
| Metimo santykis | 0.617:1 Short Throw |
| Ryšio technologija | HDMI, USB, VGA |
| Įėjimai | HDMI, VGA, RCA Composite Video, Analog Audio (3.5mm) |
| Išėjimai | VGA Out (Loop-Through), Analog Audio (3.5mm) |
| Ypatingos savybės | USB Power Output, Built-In 10-Watt Speaker, RS-232 Controllable, IR Remote Control Included, Full 3D content support |
| Prekės svoris | 6.61 svaro (apie 3 kg) |
| Gaminio matmenys (I x P x A) | 15.42 x 10.35 x 13.52 colio (apytiksliai 39.17 x 26.29 x 34.34 cm) |
| Rekomenduojami naudojimo būdai | Business presentations, Education, Multimedia, Full 3D content |
9. Garantija ir palaikymas
9.1 Informacija apie garantiją
Your Optoma X309ST projector comes with a standard manufacturer's warranty. Please refer to the warranty card included in your product packaging for specific terms, conditions, and duration. Keep your proof of purchase for warranty claims.
The product includes 1 year technical support as part of the purchase.
9.2 Pagalba klientams
For technical assistance, troubleshooting beyond this manual, or warranty inquiries, please contact Optoma customer support. Visit the official Optoma website for the most up-to-date contact information, FAQs, and driver downloads.
Daugiau informacijos ir palaikymo išteklių galite rasti adresu „Optoma“ parduotuvė „Amazon“ platformoje or the official Optoma websvetainę.


