1. Įvadas
Thank you for choosing the Abask J05 Dual 1080P Dash Cam. This device is designed to provide reliable video evidence of your journeys, both from the front of your vehicle and inside the cabin. It features advanced functionalities such as night vision, G-sensor, loop recording, and parking monitoring to enhance your driving safety and peace of mind.
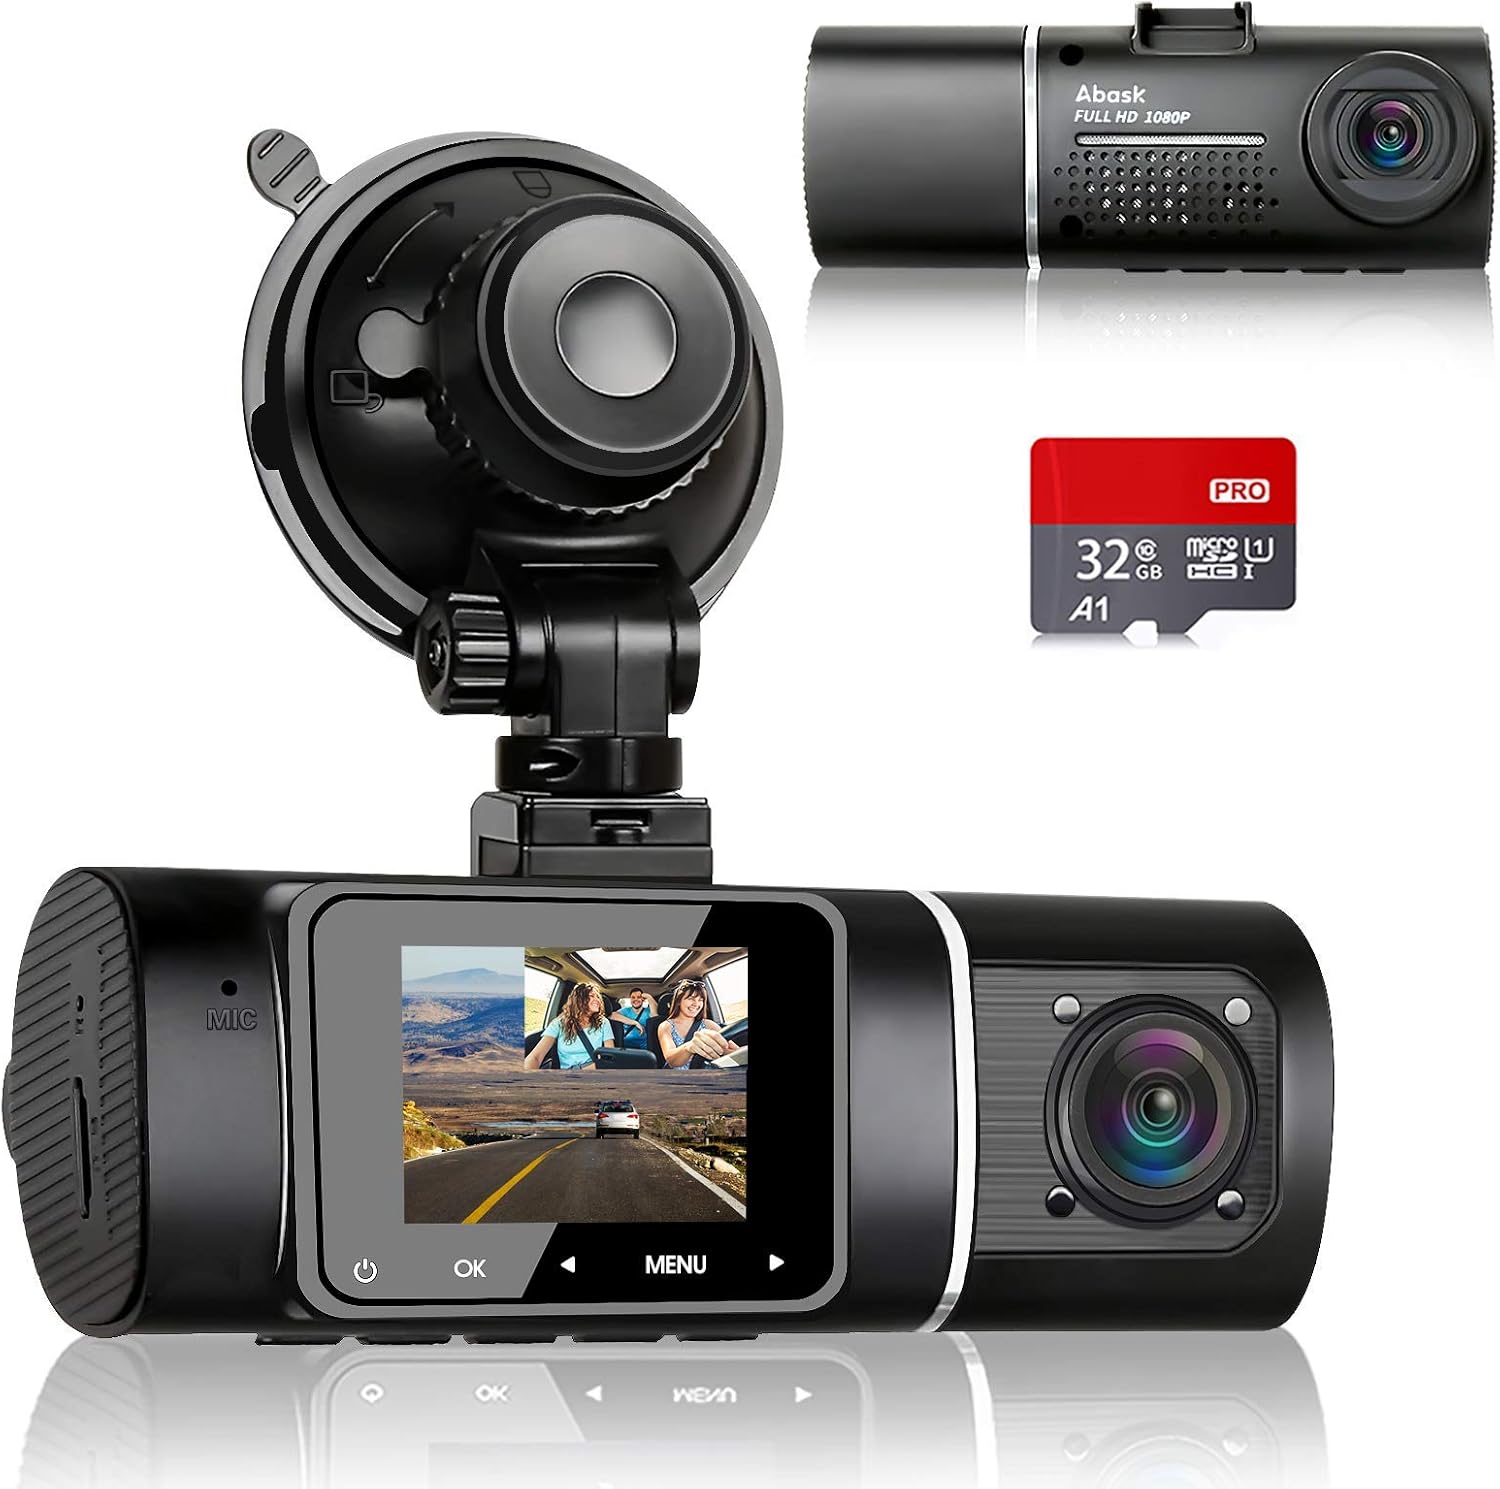
Image 1.1: The Abask J05 Dual Dash Cam, showing the front and interior cameras, the suction cup mount, and an included 32GB Micro SD card.
2. Pakuotės turinys
Patikrinkite pakuotę, ar joje yra šie daiktai:
- 1x Abask J05 Dashcam
- 1x 32GB Micro SD Card
- 1 x automobilinis įkroviklis (3.5 m)
- 1x USB Cable (0.5m)
- 1x vartotojo vadovas
- 1x siurbtuko laikiklis
- 1x Crowbar (for cable routing)
- 4x kabelių spaustukai
3. Produkto ypatybės
3.1 Dual 1080P FHD Recording
The dash cam simultaneously records the road ahead and the vehicle's interior in 1080P Full HD resolution with clear audio. This provides comprehensive video evidence in case of incidents or disputes.

Image 3.1: Illustration of dual 1080p HD video recording, capturing both the road ahead and the vehicle's interior.
3.2 Wide-Angle Field of View
The front camera offers a 170-degree wide-angle view, while the interior camera provides a 140-degree view, ensuring a total 310-degree coverage. This captures a broad perspective of the road and the entire cabin.

Image 3.2: Visual representation of the 170-degree front and 140-degree interior wide-angle views.
3.3 Super Night Vision with IR Lights
Equipped with 4 discreet infrared (IR) lights, the interior camera captures clear video even in complete darkness. Combined with 1080P recording and HDR technology, both front and interior footage remain clear and detailed at night.

Image 3.3: Night vision capabilities of the dash cam, highlighting the IR lights for cabin recording.
3.4 G jutiklis ir ciklinis įrašymas
The G-Sensor automatically detects sudden impacts or collisions, locking and saving the current video segment as evidence to prevent it from being overwritten. Loop recording ensures continuous recording by overwriting the oldest filekai atminties kortelė pilna, išskyrus užrakintus avarinius files.

Image 3.4: Explanation of G-sensor and loop recording, illustrating how important files yra saugomi.
3.5 Parking Monitor & Motion Detection
When enabled, the dash cam will automatically power on and begin recording if it detects a shock or motion while your car is parked. This provides 24-hour surveillance for your vehicle. Pastaba: For continuous parking mode functionality, a hardwire kit (sold separately) is required to connect the dash cam directly to your car's fuse box.
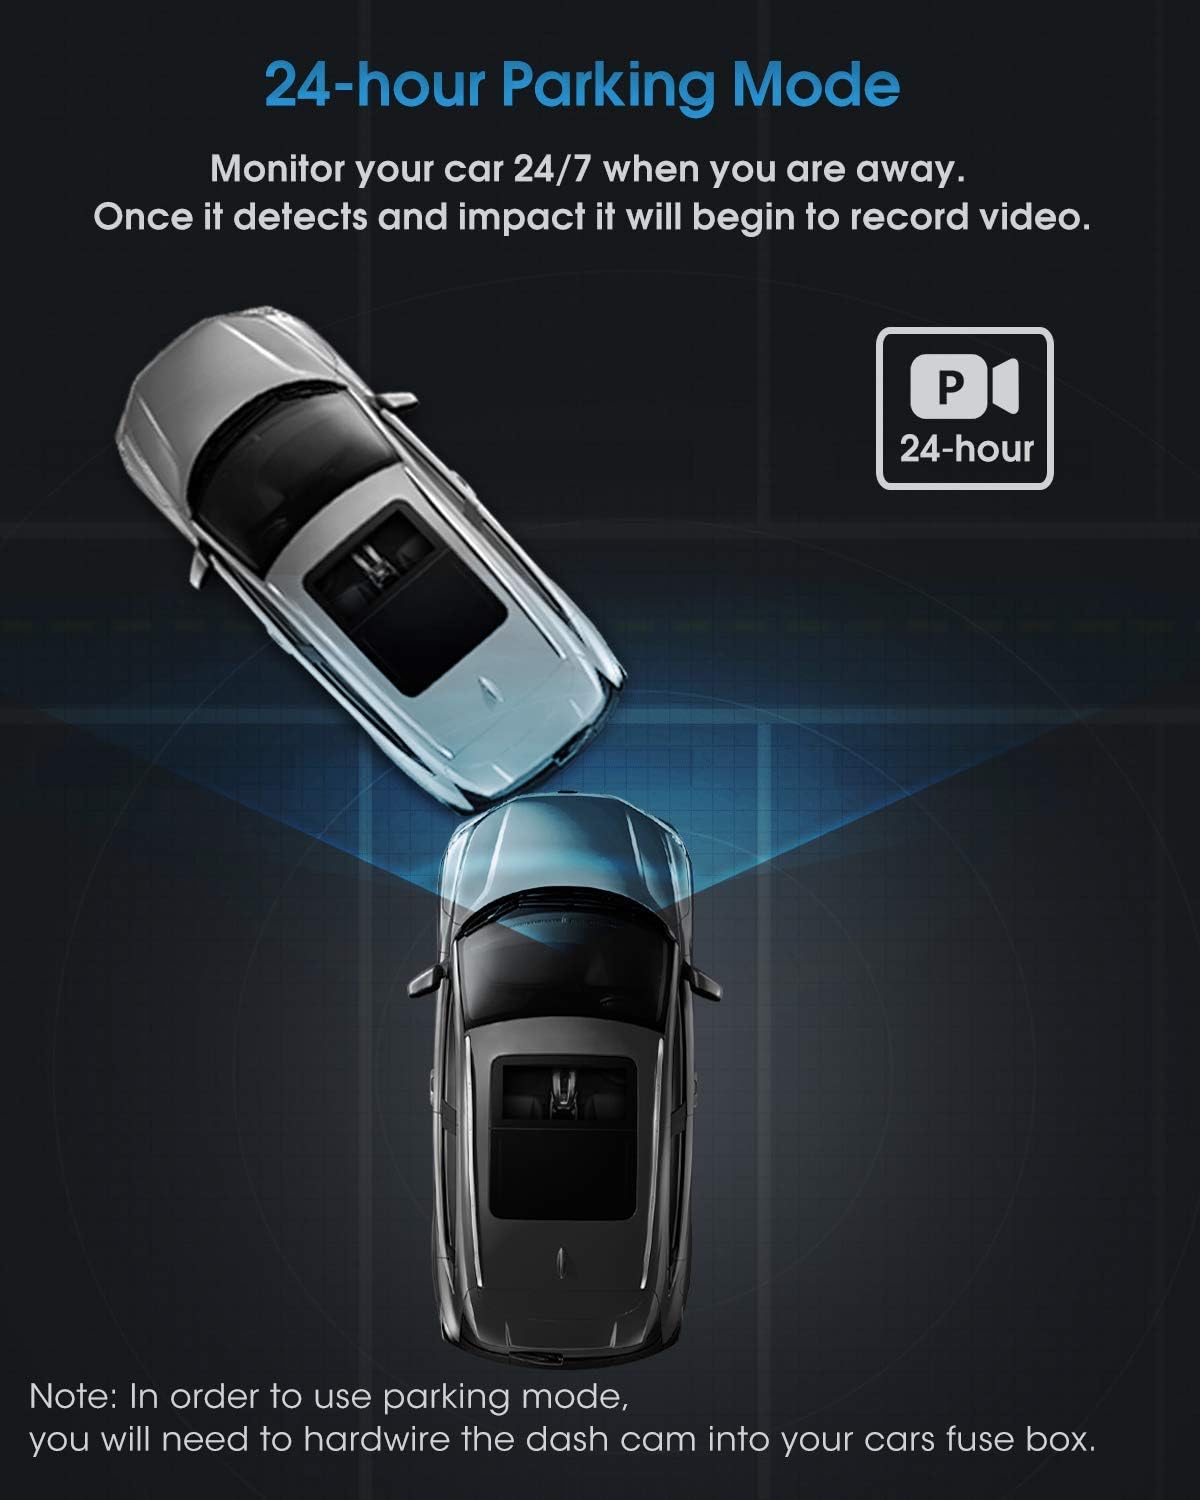
Image 3.5: Depiction of the 24-hour parking mode, indicating continuous monitoring.
4. Sąranka ir diegimas
Follow these steps for easy installation of your Abask J05 Dash Cam:
- Įdėkite Micro SD kortelę: Gently insert the provided 32GB Micro SD card into the dash cam's card slot until it clicks into place. Ensure the card is inserted correctly.
- Sumontuokite „Dash Cam“: Attach the suction cup mount to the dash cam. Clean a spot on your windshield, preferably near the rearview mirror, and firmly press the suction cup against the glass, then lock it into position. Adjust the camera angle to ensure a clear view kelio.
- Prijunkite maitinimą: Plug the car charger into your vehicle's cigarette lighter socket. Connect the other end of the cable to the dash cam's power input.
- Maršruto kabeliai: Use the provided crowbar and cable clips to neatly tuck and hide the power cable along the edges of your windshield and dashboard. This ensures a clean installation and prevents obstruction of your view.
- Maitinimas: Once connected, the dash cam will automatically power on and begin recording when your vehicle's ignition is turned on.

Image 4.1: Visual guide for easy installation, demonstrating how to route cables for a tidy setup.
5. Naudojimo instrukcijos
5.1 Pagrindinės operacijos
- Maitinimo įjungimas/išjungimas: The dash cam typically powers on and off automatically with your car's ignition. You can also manually power it on/off by pressing and holding the power button.
- Įrašas: Once powered on, the dash cam will automatically start loop recording. A red indicator light or icon on the screen usually confirms recording is active.
- Meniu naršymas: Use the 'MENU' button to access settings. Use the 'UP' and 'DOWN' arrows (or similar navigation buttons) to scroll through options and 'OK' to confirm selections.
5.2 Pagrindinės funkcijos
- G jutiklis: In the event of a sudden impact, the G-Sensor will automatically lock the current video file, preventing it from being overwritten. The sensitivity of the G-Sensor can usually be adjusted in the settings.
- Ciklo įrašymas: Vaizdo įrašas files are recorded in segments (e.g., 1, 3, or 5 minutes). When the memory card is full, the oldest unlocked files yra automatiškai perrašomi.
- Parkavimo monitorius: If enabled and properly hardwired, the dash cam will detect impacts or motion while parked and automatically record a short video.
- Atkūrimas: Jūs galite iš naujoview recorded videos directly on the dash cam's screen by entering playback mode via the menu. For interior camera videos, it is recommended to view them on a computer for better clarity.
6. Priežiūra
- Valymas: Use a soft, dry cloth to clean the camera lenses and screen. Avoid using abrasive cleaners or solvents.
- SD kortelės priežiūra: Regularly format the Micro SD card (at least once a month) within the dash cam's settings to maintain optimal performance and prevent data corruption. Use high-quality, high-speed (Class 10 or U1/U3) Micro SD cards.
- Temperatūra: Avoid exposing the dash cam to extreme temperatures for extended periods. If the car is parked in direct sunlight, consider removing the dash cam or shading it.
- Firmware atnaujinimai: Check the official Abask website periodically for any available firmware updates to ensure your dash cam has the latest features and bug fixes.
7. Problemų sprendimas
- Vaizdo registratorius neįsijungia:
- Ensure the car charger is properly connected to both the dash cam and the cigarette lighter socket.
- Check if the car's cigarette lighter socket is receiving power.
- Try a different USB cable or car charger if available.
- Vaizdo registratorius neįrašo:
- Įsitikinkite, kad „Micro SD“ kortelė įdėta teisingai.
- Format the Micro SD card in the dash cam's settings.
- Check if the loop recording function is enabled in the settings.
- The SD card might be full of locked files. Delete unnecessary locked filearba formatuokite kortelę.
- Video Footage is Blurry/Unclear:
- Kameros objektyvus valykite minkštu skudurėliu.
- Įsitikinkite, kad nuo objektyvo nuimta apsauginė plėvelė.
- Patikrinkite, ar priekinis stiklas ten, kur sumontuota kamera, yra švarus.
- Dash Cam Freezes/Crashes:
- Press the reset button (if available, usually a small pinhole) or disconnect and reconnect the power.
- Suformatuokite „Micro SD“ kortelę.
- Ensure you are using a genuine, high-speed Micro SD card.
- Parkavimo stebėjimo sistema neveikia:
- Verify that the parking monitor feature is enabled in the settings.
- Confirm that the dash cam is hardwired to the car's fuse box for continuous power. The standard cigarette lighter connection typically only provides power when the ignition is on.
8. Specifikacijos
| Funkcija | Detalė |
|---|---|
| Prekės ženklas | ABASK |
| Modelio pavadinimas | J05 |
| Spalva | Tamsiai Pilka |
| Ekrano dydis | 1.5 colių |
| Ryšio technologija | USB |
| Vaizdo įrašymo raiška | 1080p |
| Laukas View | 140 Degrees (Interior), 170 Degrees (Front) |
| Prekės svoris | 86 gramų |
| Montavimo tipas | Siurbimo laikiklis |
| Baterija | 1 ličio jonų (į komplektą įeina) |
| Įkraunama baterija | Nr |
9. Garantija ir palaikymas
9.1 Gamintojo garantija
The Abask J05 Dash Cam comes with a 2-year manufacturer's warranty. Please retain your proof of purchase for warranty claims.
9.2 Pagalba klientams
If you encounter any issues or have questions regarding your Abask J05 Dash Cam, please refer to the troubleshooting section first. If the issue persists, contact Abask customer support for assistance. Contact details are typically provided in the product packaging or on the official Abask websvetainę.


