1. Įvadas
Ačiū, kad pirkoteasing the PRIMO PR501SV Cordless 3-in-1 Stick Vacuum Cleaner. This manual provides essential information for the safe and efficient use, maintenance, and troubleshooting of your appliance. Please read it thoroughly before first use and keep it for future reference.
2. Saugos instrukcijos
Kad sumažintumėte gaisro, elektros smūgio ar sužalojimo riziką, naudodami elektros prietaisą visada laikykitės pagrindinių saugos priemonių.
- Prieš naudodami prietaisą perskaitykite visas instrukcijas.
- Nenaudokite lauke arba ant šlapių paviršių.
- Neleisti naudoti kaip žaislo. Būtinas didelis dėmesys, kai naudojasi vaikai arba jie yra šalia jų.
- Naudokite tik taip, kaip aprašyta šiame vadove. Naudokite tik gamintojo rekomenduojamus priedus.
- Nenaudokite su pažeistu laidu ar kištuku. Jei prietaisas neveikia taip, kaip turėtų, buvo numestas, pažeistas, paliktas lauke arba įmestas į vandenį, grąžinkite jį į techninės priežiūros centrą.
- Netraukite ir neneškite už laido, nenaudokite laido kaip rankenos, neuždarykite durelių ant laido ir netraukite laido už aštrių briaunų ar kampų. Neleiskite prietaiso per laidą. Laikykite laidą toliau nuo įkaitusių paviršių.
- Neištraukite kištuko traukdami už laido. Norėdami atjungti kištuką, imkite už kištuko, o ne už laido.
- Nelieskite kištuko ar prietaiso šlapiomis rankomis.
- Nekiškite jokių daiktų į angas. Nenaudokite, kai jokia anga užblokuota; saugokite nuo dulkių, pūkelių, plaukų ir nieko, kas gali sumažinti oro srautą.
- Plaukus, laisvus drabužius, pirštus ir visas kūno dalis laikykite toliau nuo angų ir judančių dalių.
- Neimkite nieko, kas dega ar rūko, pavyzdžiui, cigarečių, degtukų ar karštų pelenų.
- Nenaudokite degiems ar degiems skysčiams, pvz., benzinui, surinkti arba nenaudokite vietose, kur jų gali būti.
- Nerinkite toksiškų medžiagų (pvz., chloro baliklio, amoniako valiklio, kanalizacijos valiklio).
- Nenaudokite be dulkių puodelio ir (arba) filtrų.
- Išjunkite visus valdiklius prieš atjungdami.
- Būkite ypač atsargūs valydami laiptus.
- Nenaudokite kietiems ar aštriems daiktams, tokiems kaip stiklas, vinys, varžtai, monetos ir pan., surinkti.
- Apsaugokite nuo netyčinio paleidimo. Prieš prijungdami prie akumuliatoriaus, paimdami ar nešdami prietaisą, įsitikinkite, kad jungiklis yra išjungtoje padėtyje.
- Įkraukite tik gamintojo nurodytu įkrovikliu. Įkroviklis, tinkamas vieno tipo akumuliatorių paketui, gali sukelti gaisro pavojų, kai naudojamas su kitu akumuliatoriumi.
- Netinkamomis sąlygomis iš akumuliatoriaus gali išsiskirti skystis; vengti kontakto. Atsitiktinai kontaktuojant, nuplaukite vandeniu. Jei skysčio pateko į akis, papildomai kreipkitės medicininės pagalbos. Iš akumuliatoriaus išsiveržęs skystis gali sudirginti arba nudeginti.
3. Pakuotės turinys
Carefully unpack your PRIMO PR501SV and ensure all components are present and in good condition. Refer to the image below for identification.

3.1 pav. Įtraukti komponentai
This image displays the main components of the PRIMO PR501SV vacuum cleaner: the motor unit with integrated dust reservoir, the long lightweight metallic tube, the motorized floor brush, a crevice tool for narrow spaces, a dusting brush for delicate surfaces, the power adapter for charging, and a wall mount for convenient storage.
- Motor Unit with Dust Reservoir (0.6 L capacity)
- Lightweight Metallic Tube
- Motorizuotas grindų šepetys
- Plyšio įrankis
- Dulkių valymo šepetys
- Maitinimo adapteris
- Wall Mount with Screws
4. Produktas baigtasview
The PRIMO PR501SV is a versatile 3-in-1 cordless vacuum cleaner designed for various cleaning tasks. It can be configured as a stick vacuum, a handheld vacuum, or a crumb collector.

Figure 4.1: 3-in-1 Configurations
This image illustrates the three primary modes of the PR501SV: as a complete stick vacuum for floor cleaning, as a handheld unit equipped with the crevice tool for tight spots, and as a handheld unit with the dusting brush for upholstery or delicate surfaces. The wall mount is also visible, indicating a storage solution.
5. Sąranka ir surinkimas
Norėdami surinkti dulkių siurblį, atlikite šiuos veiksmus:
- Surinkite lazdelės tipo dulkių siurblį: Insert the metallic tube into the main motor unit until it clicks into place. Then, attach the motorized floor brush to the other end of the metallic tube, ensuring it is securely fastened.
- Nešiojamojo kompiuterio konfigūracija: To use as a handheld vacuum, detach the metallic tube and motorized floor brush from the motor unit. Attach either the crevice tool or the dusting brush directly to the motor unit's suction opening.
- Montavimas ant sienos: Choose a suitable location near a power outlet. Use the provided screws to securely attach the wall mount to the wall. Ensure it is at a height that allows the vacuum to hang freely.

Figure 5.1: Wall Mount Storage
This image shows a user placing the assembled stick vacuum onto the wall mount, demonstrating how the appliance can be conveniently stored and charged when not in use.
6. Akumuliatoriaus įkrovimas
The PRIMO PR501SV is powered by an 18.5V Lithium-ion battery. Before first use, fully charge the battery.
- Connect the power adapter to the charging port on the motor unit.
- Įjunkite adapterį į sieninį lizdą.
- The battery indicator lights will illuminate during charging. A full charge typically takes 4-5 hours.
- Once fully charged, the indicator lights will show a full battery level. Disconnect the charger.

Figure 6.1: Battery Indicator and Runtime
This close-up image displays the battery charge indicator on the vacuum cleaner. It shows two modes: 'MAX-R' (Max Power) offering approximately 20 minutes of runtime, and 'ECO-G' (Eco Mode) providing around 40 minutes of runtime, indicating the battery's endurance based on the selected power setting.
7. Naudojimo instrukcijos
Your vacuum cleaner offers two speed settings and multiple configurations for versatile cleaning.
7.1. Power On/Off and Speed Settings
- Press the power button once to turn on the vacuum in ECO mode.
- Press the power button a second time to switch to MAX power mode.
- Paspauskite maitinimo mygtuką trečią kartą, kad išjungtumėte siurblį.
7.2. Lazdelės tipo dulkių siurblio režimas
Use this mode for cleaning floors, carpets, and larger areas.
- Ensure the metallic tube and motorized floor brush are securely attached to the motor unit.
- Select the desired power mode (ECO or MAX).
- Guide the vacuum over the surface to be cleaned. The motorized brush helps agitate dirt for effective cleaning.

Figure 7.1: Agile and Flexible Cleaning
This image highlights the vacuum's maneuverability, showing it easily reaching under furniture like a sofa. The design allows for a 180-degree swivel, making it agile and flexible for cleaning hard-to-reach areas.
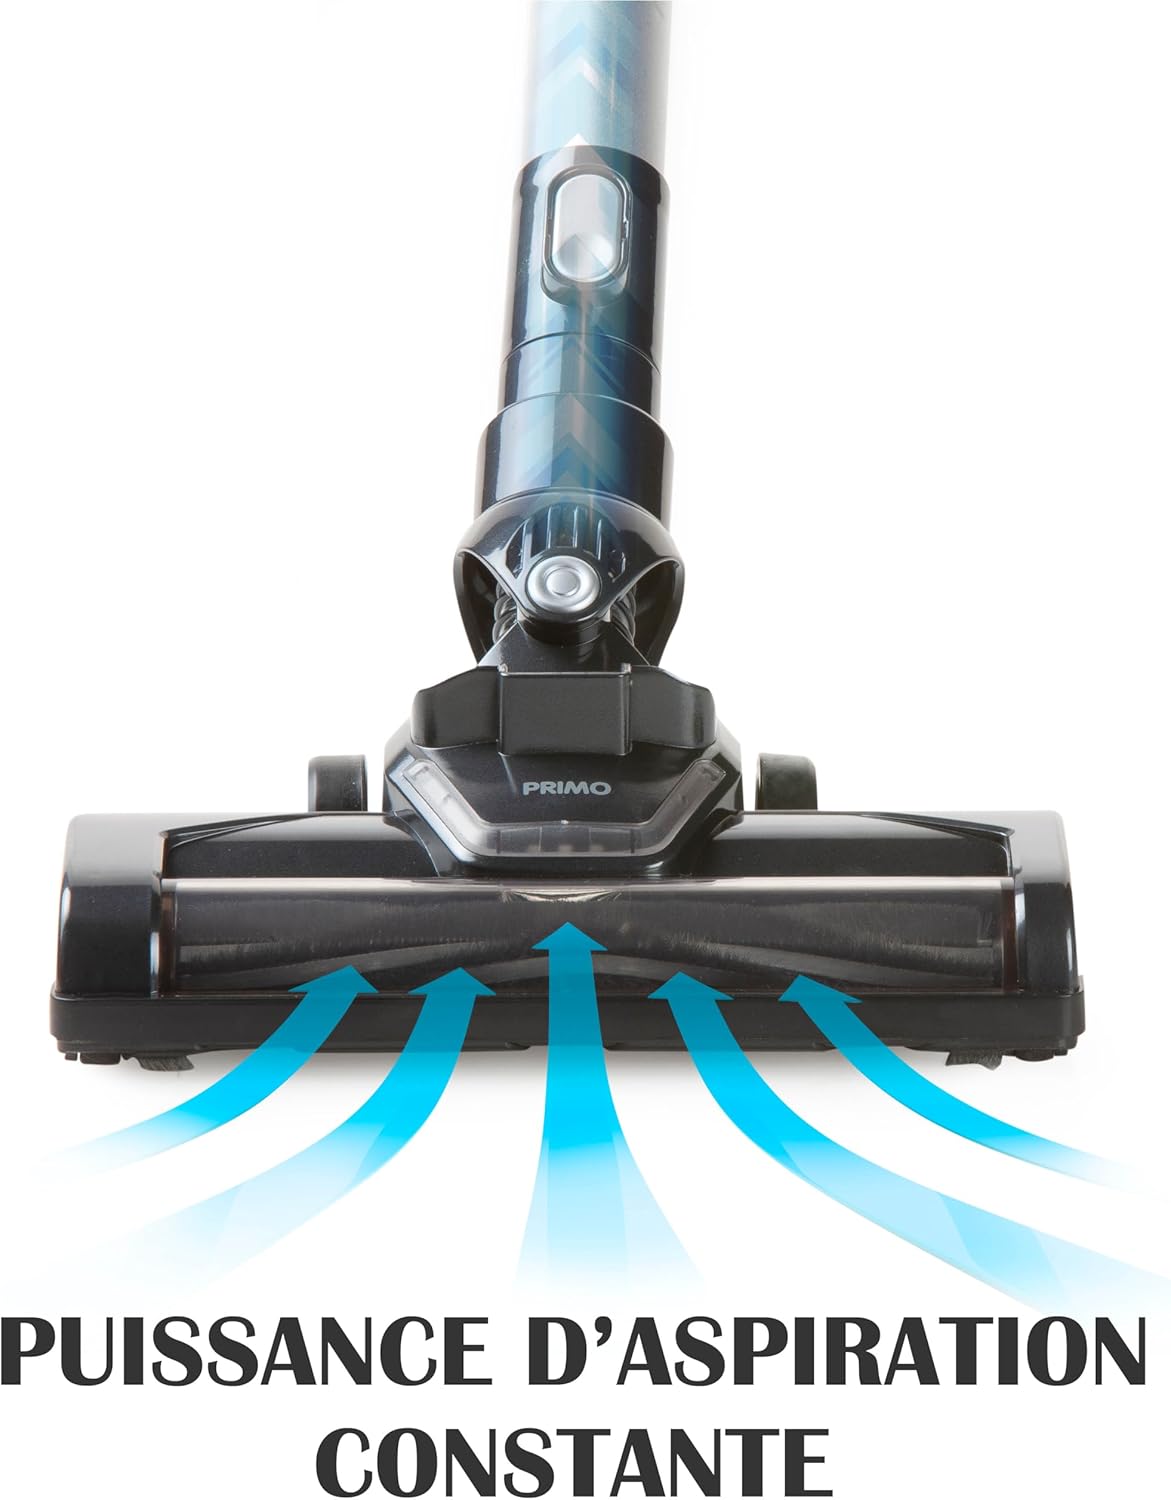
Figure 7.2: Constant Suction Power
This graphic illustrates the consistent and powerful suction generated by the vacuum's floor brush. Blue arrows depict the airflow, demonstrating how dirt and debris are effectively drawn into the vacuum head for thorough cleaning.
7.3. Rankinio dulkių siurblio režimas
Ideal for cleaning upholstery, car interiors, stairs, and small spills.
- Detach the metallic tube and motorized floor brush from the motor unit.
- Attach the crevice tool for narrow gaps or the dusting brush for surfaces like curtains or keyboards.
- Turn on the vacuum and clean the desired area.

Figure 7.3: Handheld Cleaning on Upholstery
This image shows the PRIMO PR501SV being used as a handheld vacuum to clean a sofa. It highlights the convenience and effectiveness of this mode for cleaning furniture and other elevated surfaces.
8. Priežiūra
Reguliarus valymas užtikrina optimalų veikimą ir prailgina dulkių siurblio tarnavimo laiką.
8.1. Emptying the Dust Reservoir
Empty the 0.6 L dust reservoir regularly, especially when it reaches the 'MAX' line.
- Įsitikinkite, kad dulkių siurblys yra išjungtas.
- Press the release button on the dust reservoir to detach it from the motor unit.
- Hold the dust reservoir over a trash bin and open the bottom flap to empty the contents.
- Close the flap and reattach the dust reservoir to the motor unit until it clicks securely.

Figure 8.1: Easy Dust Reservoir Emptying
This image illustrates the simple process of detaching the 0.6-liter dust reservoir from the main unit for emptying. The design allows for quick and hygienic disposal of collected debris.
8.2. HEPA filtro valymas
The HEPA 13 filter retains 99.95% of dust particles. Clean it regularly to maintain suction power.
- Remove the dust reservoir as described above.
- Carefully remove the HEPA filter from inside the dust reservoir.
- Tap the filter gently over a trash bin to remove loose dust.
- If heavily soiled, rinse the filter under running water. Ensure it is completely dry before reinserting. Do not use detergents or hot water.
- Reinsert the dry HEPA filter into the dust reservoir and reattach the reservoir to the motor unit.
8.3. Cleaning the Motorized Floor Brush
Hair and debris can get tangled in the brush roll, affecting performance.
- Ensure the vacuum is turned off and disconnected from the metallic tube.
- Locate the release mechanism on the side of the motorized brush head.
- Remove the brush roll from the housing.
- Žirklėmis arba šepečiu pašalinkite susivėlusius plaukus ar šiukšles nuo šepečio volelio.
- Įdėkite švarų šepečio ritinėlį atgal ir pritvirtinkite jį vietoje.
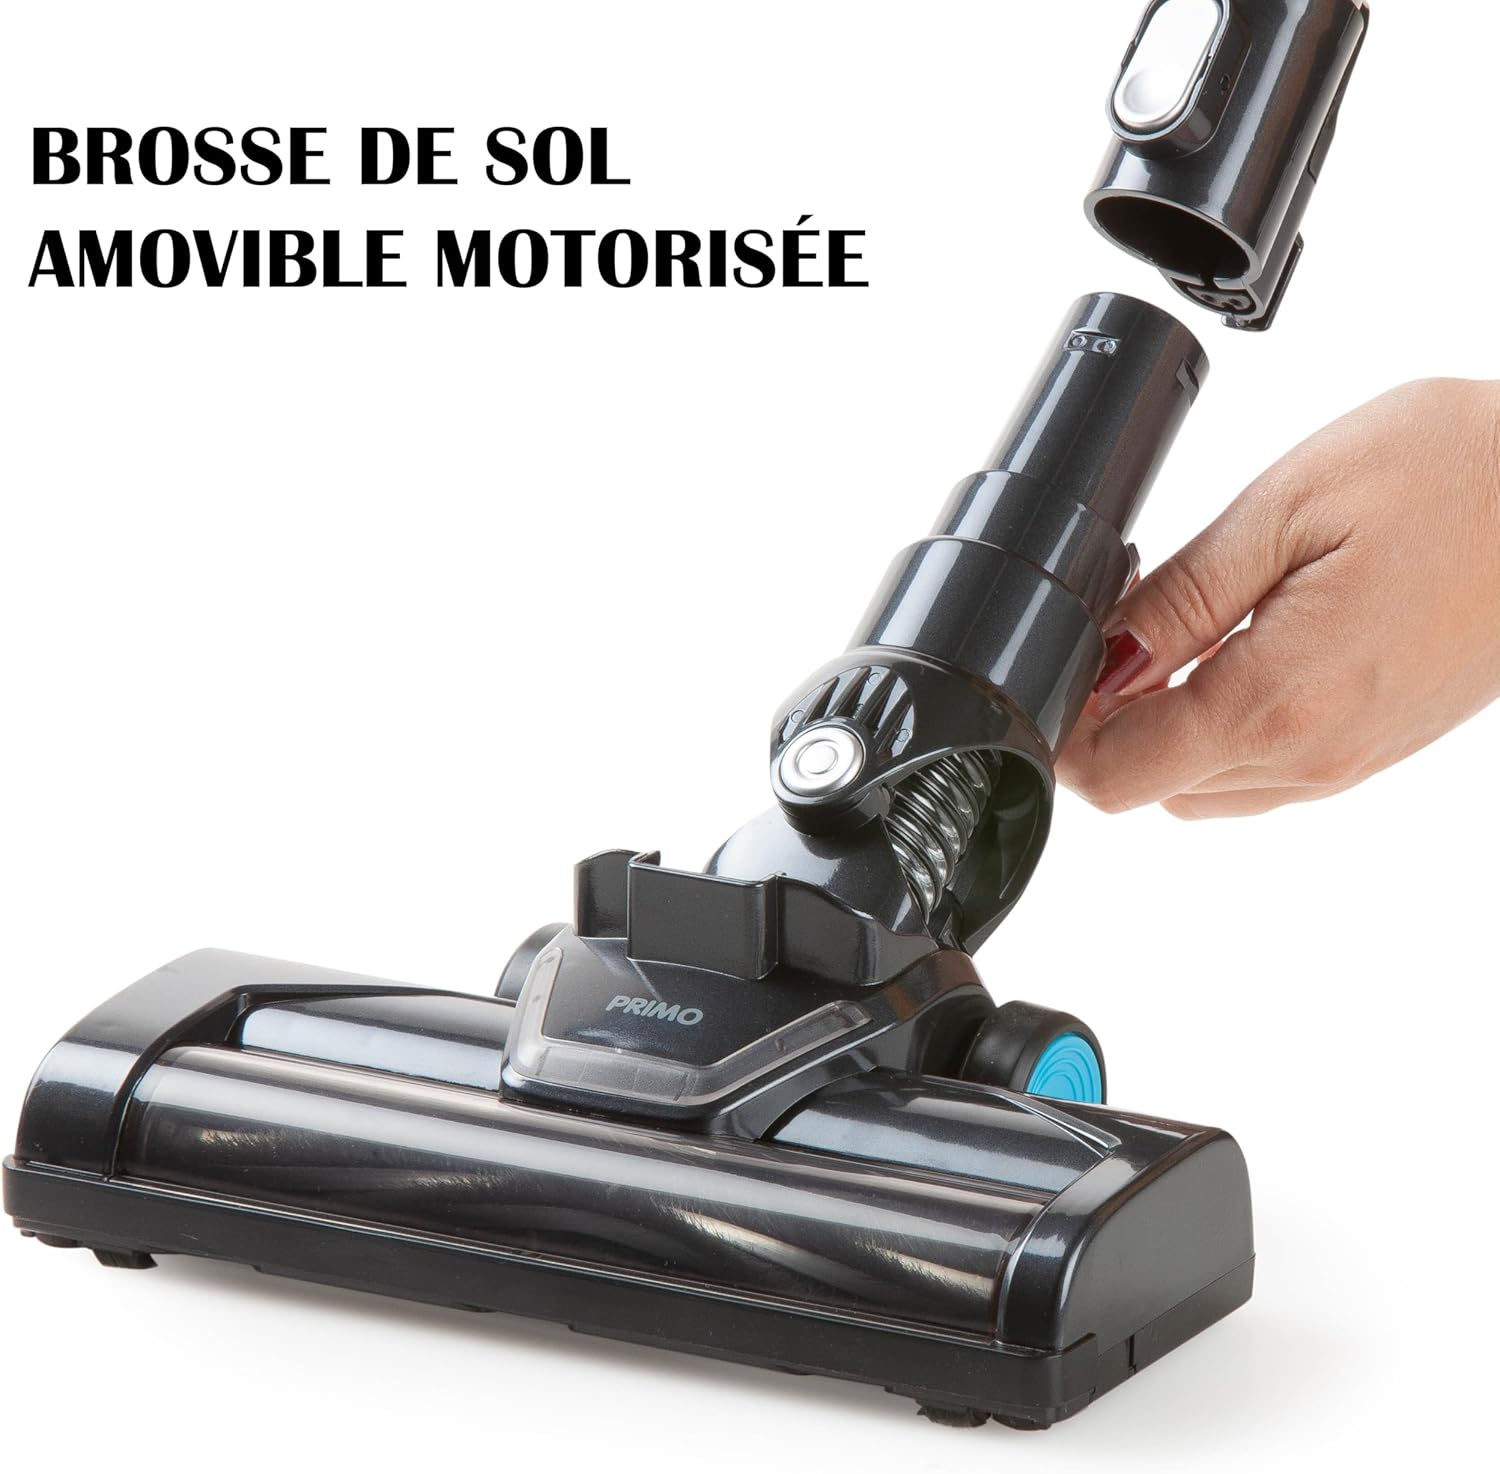
Figure 8.2: Removable Motorized Floor Brush
This image shows the motorized floor brush being detached from the vacuum's main body. This feature allows for easy access to the brush roll for cleaning tangled hair and debris, ensuring consistent performance.
9. Problemų sprendimas
If you encounter issues with your PRIMO PR501SV, refer to the following common problems and solutions:
| Problema | Galima priežastis | Sprendimas |
|---|---|---|
| Vakuumas neįsijungia | Baterija išsikrovusi Netinkamai paspaustas maitinimo mygtukas | Visiškai įkraukite akumuliatorių Tvirtai paspauskite maitinimo mygtuką |
| Maža siurbimo galia | Dust reservoir is full Filtras užsikimšęs Šepetėlio volelis susivėlęs Nozzle/tube is blocked | Empty the dust reservoir Išvalykite HEPA filtrą Clean the motorized brush roll Check and clear any blockages in the nozzle or tube |
| Motorized brush not rotating | Šepetėlio volelis susivėlęs Connection to main unit is loose | Nuvalykite šepetėlio ritinį Ensure the brush head is securely attached to the tube or motor unit |
| Trumpas baterijos veikimo laikas | Akumuliatorius nėra visiškai įkrautas Using MAX power mode continuously Akumuliatoriaus degradacija | Įsitikinkite, kad baterija yra visiškai įkrauta (4–5 valandos) Use ECO mode for longer runtime Contact customer support if battery life significantly decreases over time |
Jei problema išlieka ir išbandžius šiuos sprendimus, susisiekite su klientų aptarnavimo tarnyba.
10. Specifikacijos
| Funkcija | Specifikacija |
|---|---|
| Modelio numeris | PR501SV |
| Prekės ženklas | PRIMO |
| Tipas | Belaidis dulkių siurblys du viename |
| Baterija | 18.5 V ličio jonų |
| Įkrovimo laikas | 4-5 valandas |
| Veikimo laikas (ECO režimas) | apytiksliai 40 minučių |
| Runtime (MAX power) | apytiksliai 20 minučių |
| Dulkių rezervuaro talpa | 0.6 litrai |
| Filtro tipas | HEPA 13 |
| Greičių skaičius | 2 |
| Triukšmo lygis | 75 dB |
| Svoris | 2 kilogramo |
| Matmenys (I x P x A) | 16 x 23 x 113 cm |
| Rekomenduojamas paviršius | Kietos grindys |
| Įtraukti komponentai | Motor unit, metallic tube, motorized floor brush, crevice tool, dusting brush, power adapter, wall mount |
11. Garantija ir palaikymas
For warranty information and customer support, please refer to the warranty card included with your purchase or visit the official PRIMO websvetainėje. Išsaugokite pirkimo įrodymą, jei prireiktų pateikti garantinį ieškinį.


