1. Įvadas
Thank you for choosing the CREATE THERA RETRO PRO Semi-Automatic Espresso Machine. This machine is designed to provide you with high-quality espresso, cappuccino, and latte beverages using ground coffee. Featuring a 20-bar high-pressure pump, NTC temperature control, and an integrated milk tank, it offers convenience and excellent results. Please read this manual carefully before first use to ensure proper operation and maintenance.

1.1 vaizdas: priekis view of the CREATE THERA RETRO PRO Espresso Machine in Cream White.
2. Saugos instrukcijos
Naudodami elektros prietaisus, visada laikykitės pagrindinių saugos priemonių, kad sumažintumėte gaisro, elektros smūgio ir (arba) asmenų sužalojimo riziką, įskaitant:
- Prieš naudodami prietaisą perskaitykite visas instrukcijas.
- Nelieskite karštų paviršių. Naudokite rankenas arba rankenėles.
- Kad apsisaugotumėte nuo gaisro, elektros smūgio ir žmonių sužalojimų, nemerkite laido, kištukų ar prietaiso į vandenį ar kitą skystį.
- Atidžiai prižiūrėti būtina, kai bet kurį prietaisą naudoja vaikai arba jį naudoja šalia vaikų.
- Ištraukite kištuką iš elektros lizdo, kai nenaudojate ir prieš valydami. Prieš uždėdami ar nuimdami dalis ir prieš valydami prietaisą, leiskite atvėsti.
- Nenaudokite prietaiso su pažeistu laidu ar kištuku arba prietaisui sugedus arba jokiu būdu sugadinus.
- Prietaiso gamintojo nerekomenduojamų priedų naudojimas gali sukelti gaisrą, elektros smūgį arba susižaloti žmones.
- Nenaudoti lauke.
- Neleiskite laidui kaboti virš stalo ar prekystalio krašto ir neliesti karštų paviršių.
- Nedėkite ant įkaitusios dujinės ar elektrinės viryklės ar šalia jos, taip pat į įkaitintą orkaitę.
- Visada pirmiausia prijunkite kištuką prie prietaiso, o tik tada įkiškite laidą į sieninį lizdą. Norėdami atjungti, pasukite bet kurį valdiklį į „išjungta“, tada ištraukite kištuką iš sieninio lizdo.
- Nenaudokite prietaiso ne pagal paskirtį.
3. Gaminio komponentai
Familiarize yourself with the parts of your CREATE THERA RETRO PRO Espresso Machine.
- Pagrindinis įrenginys su valdymo skydeliu
- Vandens bakas (1.5 l talpos)
- Pieno bakas
- Portafilteris
- Filtrų krepšeliai (1 ir 2 puodeliams)
- Matavimo kaušelis su T raideamper
- Reguliuojamas lašėjimo padėklas
- Puodelių pašildymo padėklas

Image 3.1: Included accessories: Portafilter, two filter baskets, and a measuring scoop with integrated tamper.

Image 3.2: Detail of the control panel, showing beverage selection buttons and the temperature gauge.
4. Sąranka
4.1 Išpakavimas ir pradinis valymas
- Atsargiai nuimkite visas pakavimo medžiagas ir pastatykite prietaisą ant stabilaus, lygaus, karščiui atsparaus paviršiaus.
- Wash the water tank, milk tank, portafilter, filter baskets, and drip tray with warm, soapy water. Rinse thoroughly and dry.
- Nuvalykite mašinos išorę skelbimuamp audinys.
4.2 Vandens bako užpildymas
Remove the water tank from the back of the machine. Fill it with fresh, cold water up to the MAX line. Replace the tank securely.
4.3 Pieno bako paruošimas
If making milk-based drinks, fill the milk tank with desired milk (dairy or plant-based) between the MIN and MAX lines. Ensure the milk frothing tube is properly inserted into the tank.

Image 4.1: Removing the milk tank for filling or cleaning.
4.4 Pirmasis paleidimas / Įrenginio užpildymas
Prieš pirmą kartą naudojant arba jei prietaisas nebuvo naudojamas ilgą laiką, jį reikia užpildyti:
- Įsitikinkite, kad vandens bakas yra užpildytas.
- Place a large container under the coffee spout and milk frothing nozzle.
- Turn on the machine. It will start heating up.
- Once heated, press the Espresso button and let water flow through until the tank is almost empty. Repeat this process with the milk frothing function (if applicable, by selecting a milk-based drink without coffee grounds) to prime the milk system.
5. Naudojimo instrukcijos
5.1 Preparing Ground Coffee
Use freshly ground coffee for best results. We recommend using naturally roasted ground coffee. Avoid sugar-roasted mixed coffee as it can clog the filters over time.
- Pasirinkite tinkamą filtro krepšelį (vienkartinį arba dvigubą) ir įdėkite jį į portafiltrą.
- Fill the filter basket with ground coffee. Use the measuring scoop provided.
- Tamp tvirtai ir tolygiai paskirstykite kavą naudodami tamper end of the scoop.
- Nuvalykite kavos perteklių nuo portafiltro krašto.
- Įstatykite portafiltrą į virimo galvutę ir pasukite jį į dešinę, kol jis tvirtai užsifiksuos.
5.2 Espreso gaminimas
- Ensure the machine is heated and ready (temperature gauge indicates optimal temperature).
- Place your cup(s) on the drip tray under the portafilter spouts.
- Paspauskite Espreso button. The machine will dispense the programmed amount of espresso.
- To adjust the volume, press and hold the Espresso button until the desired volume is reached, then release. The machine will remember this setting for future use.

Image 5.1: Preparing two cups of espresso simultaneously.
5.3 Making Cappuccino or Latte
The machine features an integrated milk tank for automatic milk frothing.
- Ensure the milk tank is filled with milk and properly attached.
- Place your cup under both the coffee spout and the milk frothing nozzle.
- For Cappuccino, press the Cappuccino button. The machine will first dispense frothed milk, then coffee.
- For Latte, press the Latte button. The machine will dispense frothed milk, then coffee, with a different milk-to-coffee ratio.
- To adjust the volume of milk foam, use the foam adjustment dial on the milk tank.
- To adjust the total volume of the drink, press and hold the respective button until the desired volume is reached, then release.
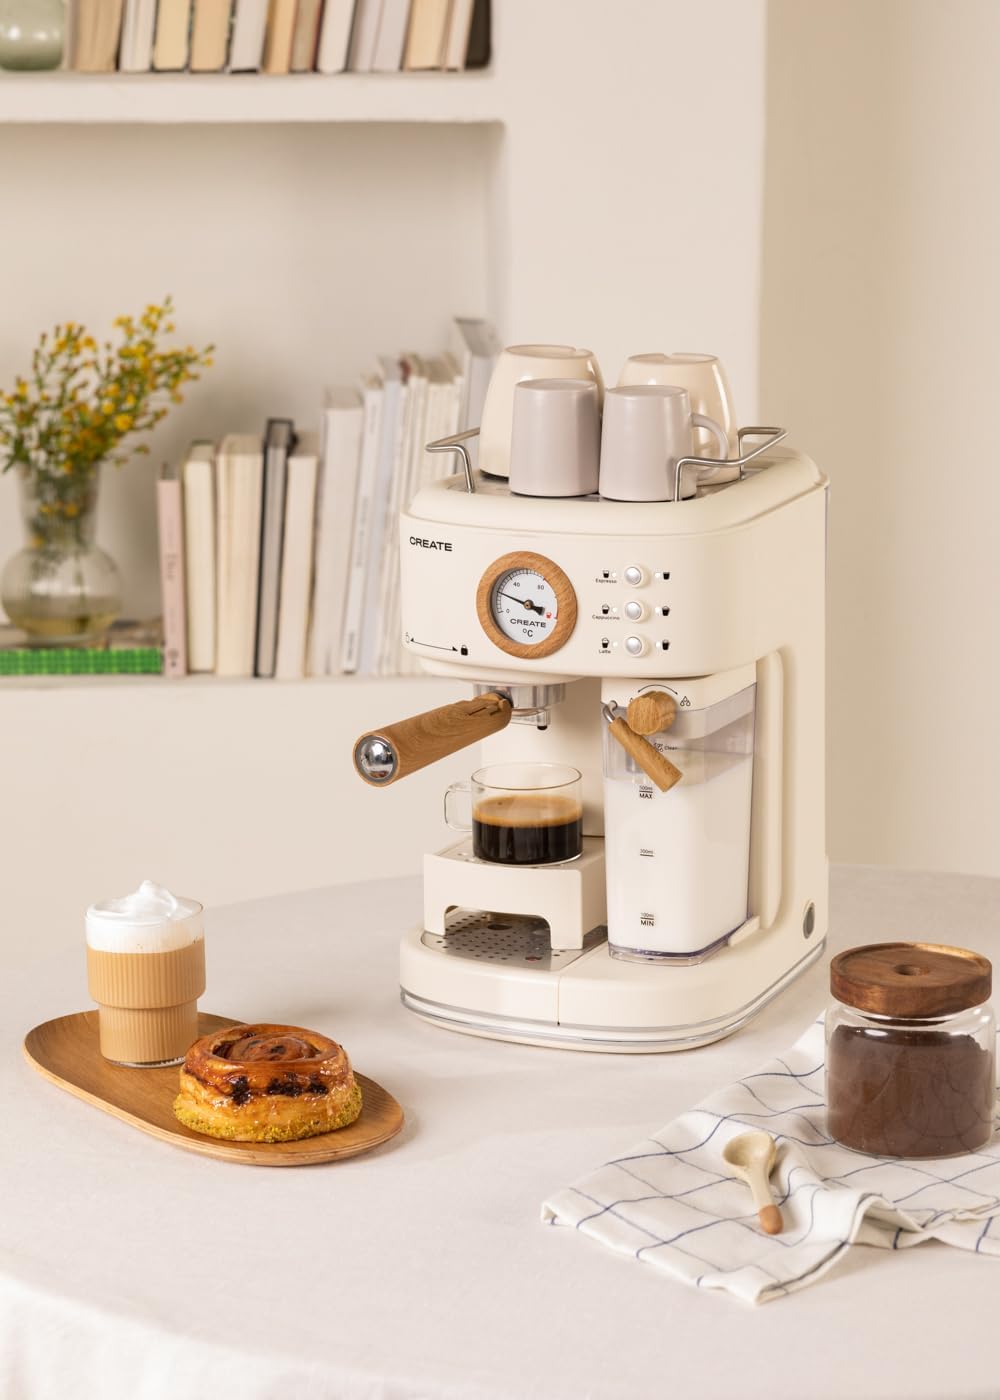
Image 5.2: User interacting with the control panel to select a beverage.
5.4 Adjustable Drip Tray
The drip tray can be adjusted to accommodate different cup sizes. Simply lift or lower the tray as needed to fit your cup comfortably and minimize splashing.

Image 5.3: The adjustable drip tray, designed to fit various cup sizes.
6. Priežiūra
6.1 Kasdienis valymas
- Lašėjimo padėklas: Empty and clean the drip tray daily or when the indicator shows it's full. Wash with warm, soapy water and rinse.
- Milk Tank and Frothing Nozzle: After each use, remove the milk tank and clean it thoroughly. Run the "Clean" function (if available, or dispense hot water through the nozzle) to clear any milk residue from the frothing system. This is crucial to prevent blockages and maintain hygiene.
- Portafiltras ir filtrų krepšeliai: Remove spent coffee grounds. Rinse the portafilter and filter baskets under running water. Use a brush to remove any stubborn coffee residue.
- Išorė: Nuvalykite mašinos išorę minkšta, damp audinys. Nenaudokite abrazyvinių valiklių ar šveitimo pagalvėlių.
6.2 Nukalkinimas
Regular descaling is essential to maintain machine performance and extend its lifespan, especially in areas with hard water. The frequency depends on water hardness and usage. Refer to the machine's indicator (if any) or descale every 2-3 months.
- Use a descaling solution specifically designed for coffee machines. Follow the instructions on the descaling solution packaging.
- Empty the water tank and fill it with the descaling solution mixed with water according to the solution's instructions.
- Place a large container under the coffee spout and milk frothing nozzle.
- Run the descaling cycle as per your machine's specific instructions (often involves pressing and holding certain buttons, or a dedicated descaling program).
- After the descaling solution has run through, rinse the water tank and fill it with fresh water. Run several cycles of plain water through the machine to thoroughly rinse out any descaling solution.
7. Problemų sprendimas
| Problema | Galima priežastis | Sprendimas |
|---|---|---|
| Kava nebėga arba teka lėtai. | Vandens bakas tuščias; aparatas neužpildytas; kava per smulkiai sumalta arba per daug sumaltaamped; brewing head clogged. | Fill water tank; prime the machine; use coarser grind or less coffee; clean brewing head. |
| Milk not frothing properly or no milk dispensed. | Milk tank empty; milk frothing nozzle clogged; milk too cold/warm or type of milk. | Fill milk tank; clean frothing nozzle thoroughly; use cold milk (4-6°C); try different milk types. |
| Kava nėra pakankamai karšta. | Machine not fully preheated; cups not preheated. | Allow machine to fully preheat; preheat cups using hot water or the cup warming tray. |
| Mašina praleidžia vandenį. | Vandens bakelis netinkamai įstatytas; lašų surinkimo padėklas pilnas; sandarinimo problemos. | Ensure water tank is correctly inserted; empty drip tray; contact support if problem persists. |
| Small coffee portions. | Programmed volume is too low. | Reprogram the desired volume by holding the button until the cup is filled to your preference. |
8. Specifikacijos
| Funkcija | Detalė |
|---|---|
| Prekės ženklas | KURTI |
| Modelis | THERA RETRO PRO |
| Spalva | Kremas baltas |
| Gaminio matmenys (I x P x A) | 22.8 x 32.5 x 36 cm |
| Prekės svoris | 5 kilogramo |
| Volume (Water Tank) | 1.5 litrai |
| ttage | 240 voltų |
| Spaudimas | 20 barų |
| Kavos rūšis | Malta kava |
| Ypatinga funkcija | Integrated Milk Frother, Adjustable Drip Tray, NTC Temperature Control, Quick Heating |

Image 8.1: Product dimensions: 36cm height, 22.81cm width, 32.51cm depth.
9. Garantija ir palaikymas
Your CREATE THERA RETRO PRO Espresso Machine comes with a standard manufacturer's warranty. For detailed warranty information, please refer to the warranty card included with your product or visit the official CREATE website. For technical support, spare parts, or service inquiries, please contact CREATE customer service directly. Ensure you have your model number (THERA RETRO PRO) and purchase details ready when contacting support.
For further assistance, please visit the official CREATE brand store: CREATE Brand Store


