Įvadas
This manual provides comprehensive instructions for the installation, operation, and maintenance of your VJOYCAR Wireless Car Alarm System. This universal vehicle anti-theft security system features a 2-way LCD pager remote control, a siren horn, and integrated shock, vibration, window, door, and trunk open alarm capabilities. Designed for DIY installation, it offers advanced security without complex wiring.
Pakuotės turinys
Įsitikinkite, kad pakuotėje yra visi komponentai:
- Car Alarm Siren with Motion Sensor
- Two-Way Remote Key (LCD Pager)
- One-Way Remote Key
- Car Adaptor Air Sensor
- High Frequency Antenna
- Power Cables (Red/Black) with Fuse

Figure 1: Included components of the VJOYCAR Wireless Car Alarm System.
Sąranka ir diegimas
The VJOYCAR Wireless Car Alarm System is designed for quick and easy DIY installation, typically taking about 5 minutes. No cutting of original car cables is required, preserving your vehicle's circuit integrity.
Siren Installation
- Connect the red cable of the siren to the car battery's positive (+) terminal.
- Connect the black cable of the siren to the car battery's negative (-) terminal.
- Connect the high frequency antenna to the designated connector on the siren.
- Securely fix the siren in a suitable location, such as near the wiper, ensuring it is stable and protected.

Figure 2: Simplified diagram of the siren's power connection to the car battery.
Air Pressure Sensor Setup
- Locate the on/off button on the car adaptor air sensor and turn it on. The LED light will flash, indicating it is active.
- Plug the car adaptor air sensor into your car's cigarette lighter port. The red light will flash, confirming it is working.
- The air sensor can be removed and hidden anywhere in the car after it is fully charged (lasts for approximately 5 days on a full charge).

Figure 3: The car adaptor air sensor, designed for easy plug-and-play operation.
Diegimo vaizdo vadovas
Video 1: Official VJOYCAR installation guide demonstrating the connection of the siren and antenna to the car battery.
Naudojimo instrukcijos
Sistemos įjungimas ir išjungimas
Use the 2-way LCD pager remote control to arm or disarm the alarm system. When armed, the system monitors for unauthorized entry or significant vibrations.
Video 2: Demonstration of arming and disarming the alarm system using the remote control.
2-Way Pager and Long Distance Monitoring
The system features a 2-way LCD pager remote control that receives notifications from the alarm siren. The RF high-frequency antenna ensures a communication range of up to 1000 meters (in open air conditions).
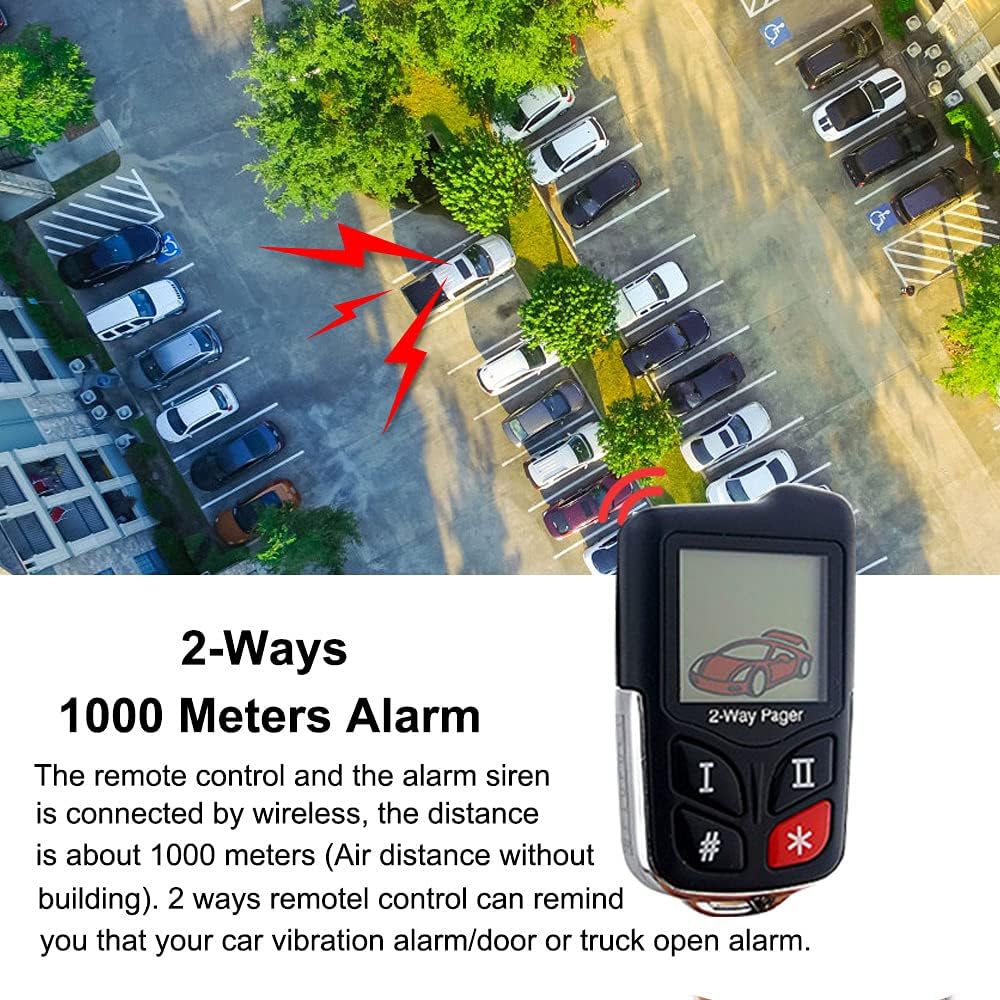
Figure 4: The 2-way pager remote control provides real-time alerts over long distances.
Sensor Functionality
The system incorporates multiple sensors to detect various threats:
- Oro slėgio jutiklis: Detects illegal opening of car doors, windows, or the trunk. The siren will alarm, and a notification will be sent to the LCD remote control.
- Vibration/Motion Sensor: Detects car vibration or motion. The siren will alarm, and a notification will be sent to the LCD remote control.

Figure 5: Visual representation of air sensor detecting door/trunk opening and shock sensor detecting car movement.
Video 3: Demonstration of the alarm triggering when a car door is opened.
Video 4: Demonstration of the alarm triggering when the car trunk is opened.
Find Car Function
With just one click on your remote, you can activate a function to help you locate your car in a large parking area.

Figure 6: The 'Find Car' feature assists in locating your vehicle.
Adjusting Vibration Sensitivity
The system offers 8 levels of vibration sensitivity, from low to high. You can adjust this setting to suit your environment and prevent false alarms.

Figure 7: Adjusting the vibration sensitivity of the alarm system.
Video 5: Guide on how to adjust the siren's sensitivity using the remote control.
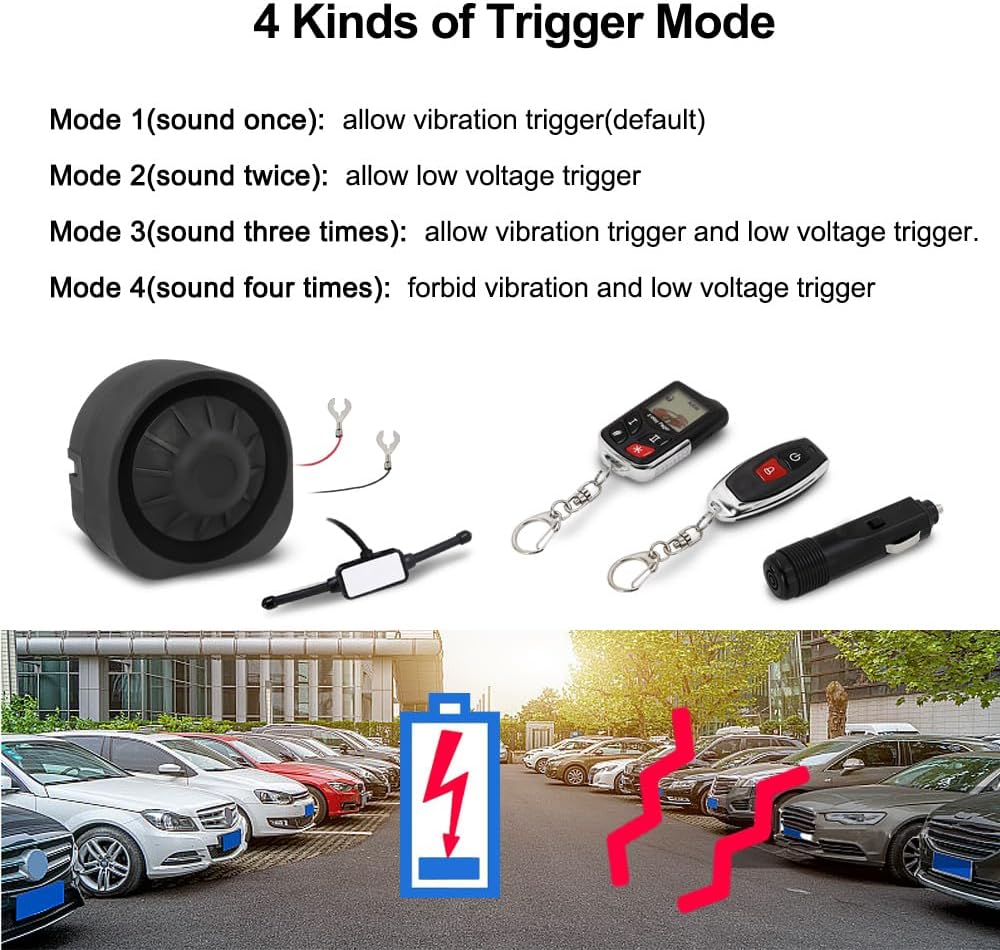
Suaktyvinimo režimai
The alarm system supports four different trigger modes:
- Mode 1 (Sound Once): Allows vibration trigger (default setting).
- Mode 2 (Sound Twice): Allows low voltage gaiduką.
- Mode 3 (Sound Three Times): Allows both vibration trigger and low voltage gaiduką.
- Mode 4 (Sound Four Times): Forbids both vibration and low voltage triggers (effectively mutes the siren).
8 pav. Baigtaview of the four available trigger modes for the alarm system.
Priežiūra
To ensure the longevity and optimal performance of your VJOYCAR Wireless Car Alarm System, follow these general maintenance guidelines:
- Keep the siren and sensors clean and free from excessive dirt or debris.
- Regularly check the connections to the car battery to ensure they are secure.
- Monitor the battery life of the air pressure sensor and recharge as needed.
- Avoid exposing the remote controls and siren to extreme temperatures or direct water immersion.
- If the system is not functioning correctly, refer to the troubleshooting section before attempting any repairs.
Trikčių šalinimas
If you encounter issues with your VJOYCAR Wireless Car Alarm System, please consult the following common troubleshooting steps:
| Problema | Galima priežastis / sprendimas |
|---|---|
| Siren does not sound or stops working. |
|
| False alarms or excessive sensitivity. |
|
| Nuotolinio valdymo pultas nereaguoja. |
|
For any complex issues or if troubleshooting steps do not resolve the problem, please do not hesitate to contact VJOYCAR customer support. They can provide the latest user manual or specific assistance.
Gaminio specifikacijos
| Funkcija | Detalė |
|---|---|
| Prekės ženklas | VJOYCAR |
| Prekės svoris | 1.63 svaro |
| Pakuotės matmenys | 7.83 x 6.3 x 3.39 colio |
| Belaidis nuotolinio valdymo pultas | Taip |
| Suderinami įrenginiai | Cars (12-15V power input) |
| Didžiausias diapazonas | 1000 Meters (RF high frequency antenna) |
| Triukšmo lygis | 125 dB |
| Jutikliai | Built-in shock/vibration sensor, built-in air pressure sensor |
| Diegimo tipas | „Pasidaryk pats“ (angl. „pasidaryk pats“) |
Garantija ir palaikymas
For warranty information, technical support, or to obtain the latest version of this user manual, please contact VJOYCAR customer service through their official channels. Your satisfaction is important, and they are available to assist with any questions or concerns regarding your product.
Taip pat galite kreiptis į oficialų Vartotojo vadovas (PDF) dėl papildomos informacijos.


