1. Įvadas
Thank you for choosing the YUYTE Digital Programmable Thermostat. This manual provides essential information for the safe and efficient operation of your new thermostat. Please read it thoroughly before installation and use, and retain it for future reference.
2. Saugos informacija
- Always disconnect power to the heating system before installing or servicing the thermostat.
- Installation should be performed by a qualified electrician or heating technician.
- Saugokite termostatą nuo vandens ar per didelės drėgmės.
- Keep out of reach of children to prevent misoperation.
- Įsitikinkite, kad baterijos įdėtos teisingai, atsižvelgiant į poliškumo žymėjimus.
3. Pakuotės turinys
Patikrinkite, ar pakuotėje yra visi reikalingi daiktai:
- 1 x YUYTE Digital Programmable Thermostat
- 1 x Naudotojo vadovas (šis dokumentas)
- Tvirtinimo varžtai (paprastai pridedami)

Image: The YUYTE Digital Programmable Thermostat, its user manual, and mounting screws, as typically found in the product package.
4. Produktas baigtasview
4.1 Savybės
- High reliability single-chip performance with strong anti-interference ability.
- Child lock function to prevent accidental operation.
- Data memory function retains settings during power failure.
- Holiday mode for comfortable temperatures when returning home.
- Easy operation with intuitive buttons for various working modes.
- Built-in product sensor.
- 0.5°C accuracy.
4.2 Komponentai

Vaizdas: priekis view of the thermostat, showing the digital LCD display and the control buttons below it. The display shows room temperature, set temperature, time, and mode indicators.
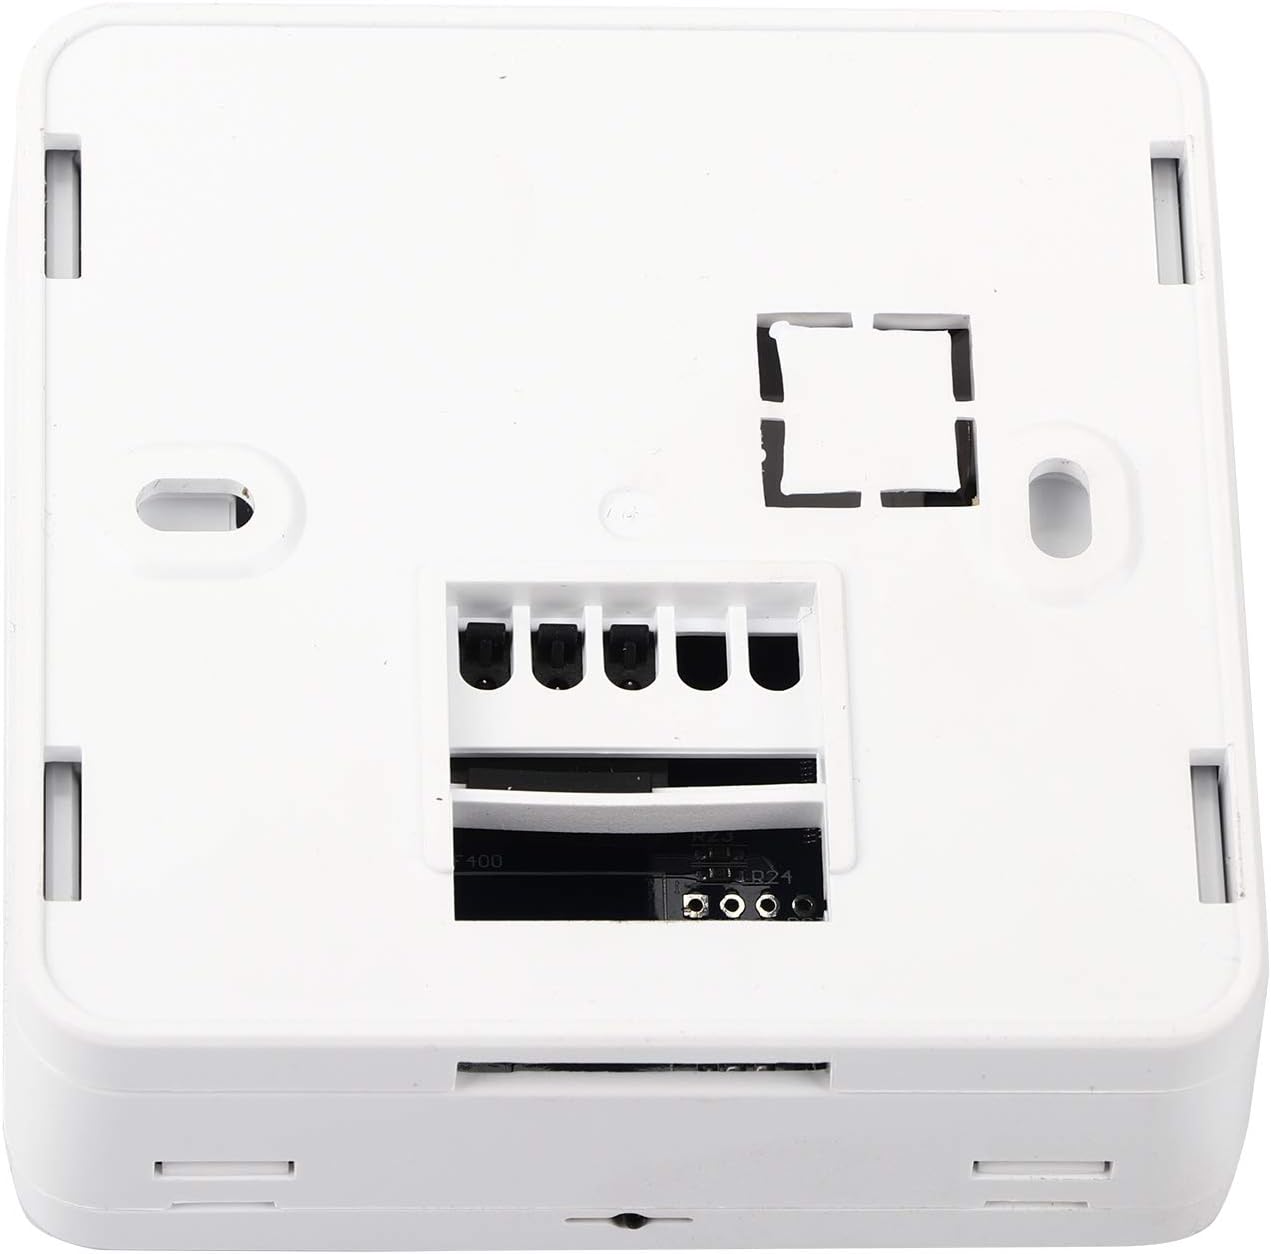
Vaizdas: Galinis view of the thermostat, revealing the wiring terminals for electrical connection to the heating system.
The thermostat features a clear LCD display for temperature and time, along with intuitive buttons for setting adjustments. The rear panel contains the necessary terminals for connecting to your heating system.
5. Sąranka ir diegimas
5.1 Montavimo vieta
Choose a location on an interior wall, approximately 1.5 meters (5 feet) above the floor, away from direct sunlight, drafts, and heat sources (e.g., radiators, televisions). Ensure good air circulation around the thermostat.
5.2 Laidų prijungimo instrukcijos
- Išjungti: Before beginning, ensure the main power supply to your heating system is turned off at the circuit breaker.
- Nuimkite seną termostatą (jei taikoma): Carefully disconnect and label the wires from your existing thermostat.
- Montavimas: Secure the thermostat base to the wall using the provided screws. The thermostat is designed for flat mounting and fits standard 86mm hidden boxes or 60mm European boxes.
- Prijunkite laidus: Refer to the wiring diagram provided with your heating system and connect the wires to the appropriate terminals on the YUYTE thermostat. The thermostat is suitable for water heating systems (load current 3A) or boiler heating systems (capacity 5A).
- Termostato prijungimas: Once wiring is complete, carefully attach the front panel of the thermostat to its base.
- Maitinimas: Atkurkite šildymo sistemos elektros tiekimą automatiniu jungikliu.

Paveikslėlis: Šoninis profesionalasfile of the thermostat, illustrating its compact design and how it sits against the wall after installation.
5.3 Akumuliatoriaus įdėjimas
The thermostat requires 2 AA batteries (not included) for operation. Open the battery compartment, insert the batteries according to the polarity markings (+/-), and close the compartment. The display will illuminate upon successful battery installation.
6. Naudojimo instrukcijos
6.1 Pagrindinės operacijos
Upon initial power-up or after battery replacement, the thermostat will display the current room temperature and time. Use the buttons below the display to navigate and adjust settings.

Image: Close-up of the thermostat's front panel, highlighting the digital display and the 'SET', 'OK', 'Up', and 'Down' arrow buttons for user interaction.
6.2 Laiko ir dienos nustatymas
- Paspauskite NUSTATYTI mygtuką, kad įjungtumėte laiko nustatymo režimą.
- Naudokite Up ir Žemyn rodyklių mygtukus, kad nustatytumėte valandą. Paspauskite OK patvirtinti.
- Pakartokite minutėms ir savaitės dienai.
- Paspauskite OK to exit time setting mode.
6.3 Temperatūros nustatymas
- Įprastu darbo režimu naudokite Up ir Žemyn arrow buttons to adjust the desired set-point temperature.
- The new setting will be automatically saved after a few seconds.
6.4 Programming Schedule (7-Day Cycle)
The thermostat allows for a programmable schedule, set per 1 week as a cycle. Detailed programming steps are typically found in the full manual, but generally involve:
- Paspauskite ir palaikykite NUSTATYTI mygtuką, norėdami įjungti programavimo režimą.
- Naudokite NUSTATYTI to cycle through different periods (e.g., morning, day, evening, night) for each day of the week.
- Naudokite Up ir Žemyn arrows to adjust the start time and desired temperature for each period.
- Paspauskite OK to confirm settings and move to the next period/day.
- Išeikite iš programavimo režimo paspausdami NUSTATYTI until the normal display returns.
6.5 Atostogų režimas
Activate Holiday Mode to maintain a specific temperature for a set duration, ideal for when you are away. This feature ensures a comfortable temperature upon your return without needing to manually adjust settings daily.
- Press a specific button (refer to the full manual, often a dedicated 'Holiday' button or a combination of 'SET' and an arrow) to enter Holiday Mode settings.
- Set the desired temperature and the number of days for the holiday period.
- Confirm the settings. The thermostat will revert to its programmed schedule after the holiday period ends.
6.6 Užrakto nuo vaikų funkcija
To prevent accidental changes to settings, the thermostat includes a child lock function. Typically, this is activated by pressing and holding two specific buttons simultaneously for a few seconds (e.g., 'Up' and 'Down' arrows). Repeat the action to unlock.
7. Priežiūra
7.1 Valymas
Termostato išorę nuvalykite minkšta,amp šluoste. Nenaudokite abrazyvinių valiklių ar tirpiklių, nes jie gali pažeisti apdailą ar vidinius komponentus.
7.2 Akumuliatoriaus keitimas
When the battery indicator appears on the display, replace the 2 AA batteries promptly. Ensure the power to the heating system is off before opening the battery compartment. Dispose of old batteries responsibly.
8. Problemų sprendimas
| Problema | Galima priežastis | Sprendimas |
|---|---|---|
| Ekranas tuščias | Nėra elektros; išsikrovusios baterijos. | Check circuit breaker; replace batteries. |
| Šildymo sistema nereaguoja | Incorrect wiring; system power off; thermostat in wrong mode. | Verify wiring connections; check heating system power; ensure thermostat is in heating mode. |
| Temperatūros rodmenys netikslūs | Termostatas veikiamas skersvėjų ar šilumos šaltinių. | Relocate thermostat or shield it from external influences. |
| Settings cannot be changed | Užraktas nuo vaikų aktyvus. | Deactivate child lock (refer to section 6.6). |
Jei problemos išlieka, susisiekite su klientų aptarnavimo tarnyba.
9. Specifikacijos
| Funkcija | Detalė |
|---|---|
| Modelio numeris | Cimenn-GZP-124896736 |
| Maitinimo šaltinis | 2 x AA baterijos (į komplektą neįeina) |
| Load Current (Water Heating) | 3A |
| Capacity (Boiler Heating) | 5A |
| Temperatūros rodymo diapazonas | 0–70 °C |
| Darbinė temperatūra | 1–70 °C |
| Tikslumas | ±0.5°C |
| Set-point Temperature Range | 5–35 °C |
| Išvestis | Perjungimo relė |
| Zondas jutiklis | NTC (10K, 1%) |
| Veikianti programa | Nustatykite 1 savaitę kaip ciklą |
| Matmenys | Maždaug 8.6 x 8.6 x 2.9 cm (3.39 x 3.39 x 1.14 colio) |
| Svoris | apytiksliai 170 g (6 uncijos) |
| Medžiaga | ABS, plastikas |
| Spalva | Baltas |
| Ekrano tipas | Digital, Manual |
| Foninis apšvietimas | Taip |
10. Garantija ir palaikymas
10.1 Informacija apie garantiją
YUYTE products are manufactured to high-quality standards. For specific warranty details, please refer to the warranty card included with your purchase or contact YUYTE customer service. Keep your purchase receipt as proof of purchase.
10.2 Pagalba klientams
If you have any questions, require technical assistance, or encounter issues not covered in this manual, please contact YUYTE customer support. Visit the official YUYTE store on Amazon for more information: YUYTE Store.