1. Įvadas
Thank you for choosing the Aigostar Retro Desk LampŠiame vadove pateikiama esminė informacija, kaip saugiai ir efektyviai naudoti jūsų naująjį lampPrieš surinkdami ir naudodami atidžiai perskaitykite šias instrukcijas ir išsaugokite jas ateičiai.

Figure 1: Aigostar Retro Desk Lamp naudojamas.
2. Pakuotės turinys
Ensure all components are present and undamaged before proceeding with assembly. If any parts are missing or damaged, please contact customer support.
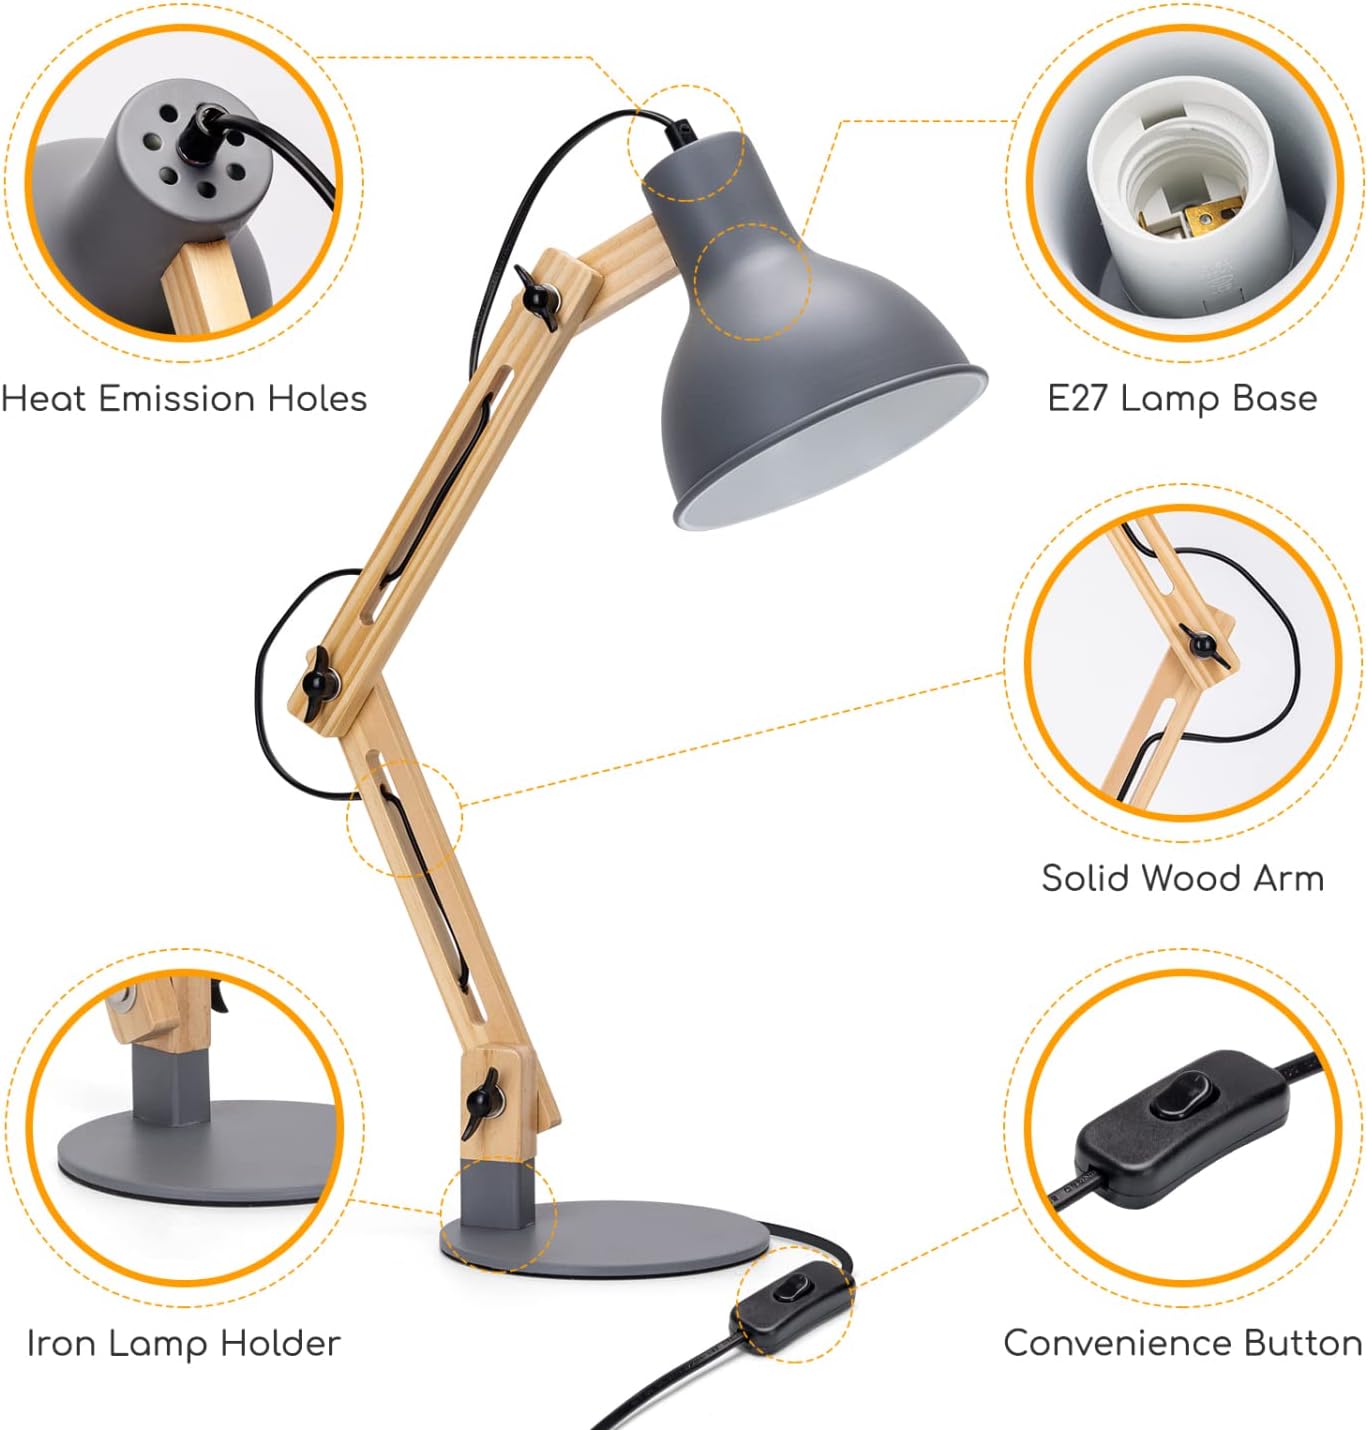
- Lamp Bazė
- Adjustable Wooden Arm Assembly
- Lamp Shade with E27 Socket
- Power Cord with On/Off Switch
- Vartotojo vadovas
Note: The light bulb is not included and must be purchased separately.
3. Sąrankos instrukcijos
The Aigostar Retro Desk Lamp is designed for tool-free setup. Follow these steps to assemble your lamp:
- Išpakuokite komponentus: Atsargiai išimkite visas dalis iš pakuotės.
- Padėkite pagrindą: Padėkite lamp pagrindą ant stabilaus, lygaus paviršiaus.
- Pritvirtinkite svirties mazgą: The wooden arm assembly is pre-attached to the base and lamp head. Ensure all joints are securely tightened.
- Įdiekite lemputę: Screw an E27 base bulb (maximum 40W) into the lamp lizdas. Neperveržkite.
- Prijunkite maitinimą: Įkiškite maitinimo laidą į tinkamą elektros lizdą.

Figure 2: Tool-free setup for quick assembly.
3 pav. Baigtaview iš lamp komponentai.

4 paveikslas: Lamp dimensions and bulb specifications.
4. Naudojimo instrukcijos
Your Aigostar Retro Desk Lamp is designed for ease of use and flexibility.
4.1 Įjungimas / išjungimas
Locate the convenience button (switch) on the power cord. Press the switch to turn the lamp įjungti arba išjungti.
4.2 L reguliavimasamp Arm
Lamp features a swivel hinge arm and multiple adjustable joints, allowing you to direct light precisely where needed. Gently loosen the wing nuts at the joints, adjust the arm to your desired position, and then tighten the wing nuts to secure it.
- Lamp head can rotate up to 210 degrees.
- The upper arm can adjust by 60 degrees.
- The lower arm can adjust by 15 degrees.

Figure 5: Demonstrating the adjustable design of the lamp.

Figure 6: Specific adjustment angles for optimal light positioning.
5. Priežiūra
5.1 Valymas
Norėdami išvalyti lamp, ensure it is unplugged from the power outlet. Use a soft, dry cloth to wipe down the surfaces. Do not use abrasive cleaners or solvents, as these may damage the finish.
5.2 Lemputės keitimas
Before replacing the bulb, always unplug the lamp and allow the old bulb to cool completely. Unscrew the old E27 bulb and screw in a new E27 bulb, ensuring it does not exceed 40W. Refer to Figure 4 for bulb specifications.
6. Problemų sprendimas
- Lamp neįsijungia:
- Patikrinkite, ar maitinimo laidas tvirtai įjungtas į sieninį lizdą.
- Ensure the bulb is correctly screwed into the socket and is not burnt out.
- Verify that the on/off switch on the power cord is in the 'on' position.
- Šviesos mirgėjimas:
- Priveržkite lemputę į lizdą.
- Išbandykite kitą lemputę, kad atmestumėte gedimo priežastį.
- Lamp arm is loose:
- Tighten the wing nuts at the adjustable joints to secure the arm in place.
7. Specifikacijos
| Funkcija | Specifikacija |
|---|---|
| Modelio numeris | 218188 |
| Gaminio matmenys (D x P x A) | 16 cm gylio x 16 cm pločio x 45.5 cm aukščio |
| Prekės svoris | 1.38 kilogramo |
| Spalva | Pilka |
| Bazinė medžiaga | Mediena |
| Lampatspalvis Medžiaga | Geležis |
| Lamp Lizdas | E27 |
| Maksas Vatastage | 40.00 W |
| Jungiklio tipas | Touch (Inline Switch) |
| Ypatingos savybės | Reguliuojama rankena |
| Maitinimo šaltinis | Su laidu elektra |
| Naudojimas viduje / lauke | Vidinis |
| Kilmės šalis | Kinija |
8. Garantija ir palaikymas
For warranty information or technical support, please refer to the documentation provided with your purchase or contact Aigostar customer service directly. Keep your purchase receipt as proof of purchase.


