1. Įvadas
This manual provides detailed instructions for the safe and efficient operation of your InFocus P120 INL412 Multimedia Projector (Model INL4128). Please read this manual thoroughly before using the projector and keep it for future reference. This projector is designed for high-quality image projection, suitable for various applications including presentations, home entertainment, and gaming.
2. Saugos informacija
Kad nesugadintumėte projektoriaus ir užtikrintumėte naudotojo saugumą, laikykitės šių saugos priemonių:
- Vėdinimas: Ensure adequate ventilation around the projector. Do not block ventilation openings. Maintain a minimum distance of 30 cm (12 inches) from walls or other objects.
- Maitinimo šaltinis: Naudokite tik nurodytą maitinimo šaltinį ir garsumątage. Tvirtai prijunkite maitinimo laidą.
- Šiluma: The projector generates heat during operation. Do not touch the projector's vents or exhaust areas directly after use.
- Šviesos išvestis: Nežiūrėkite tiesiai į projektoriaus objektyvą, kai lamp įjungtas, nes intensyvi šviesa gali pažeisti akis.
- Vieta: Place the projector on a stable, level surface. Avoid placing it in direct sunlight, near heat sources, or in areas with high humidity or dust.
- Valymas: Prieš valydami atjunkite maitinimo laidą. Naudokite minkštą, sausą šluostę. Nenaudokite skystų ar aerozolinių valiklių.
- Aptarnavimas: Nebandykite patys atlikti projektoriaus techninės priežiūros. Visus techninės priežiūros darbus patikėkite kvalifikuotiems techninės priežiūros specialistams.
3. Produktas baigtasview
3.1 Top Panel and Lens Area
The top panel features the control buttons for basic operation and the lens area with focus and zoom adjustments.

3.1 paveikslas: viršuje view of the InFocus P120 INL412 projector, highlighting the control panel on the right and the lens adjustment area on the left. The InFocus logo is visible on the top surface.
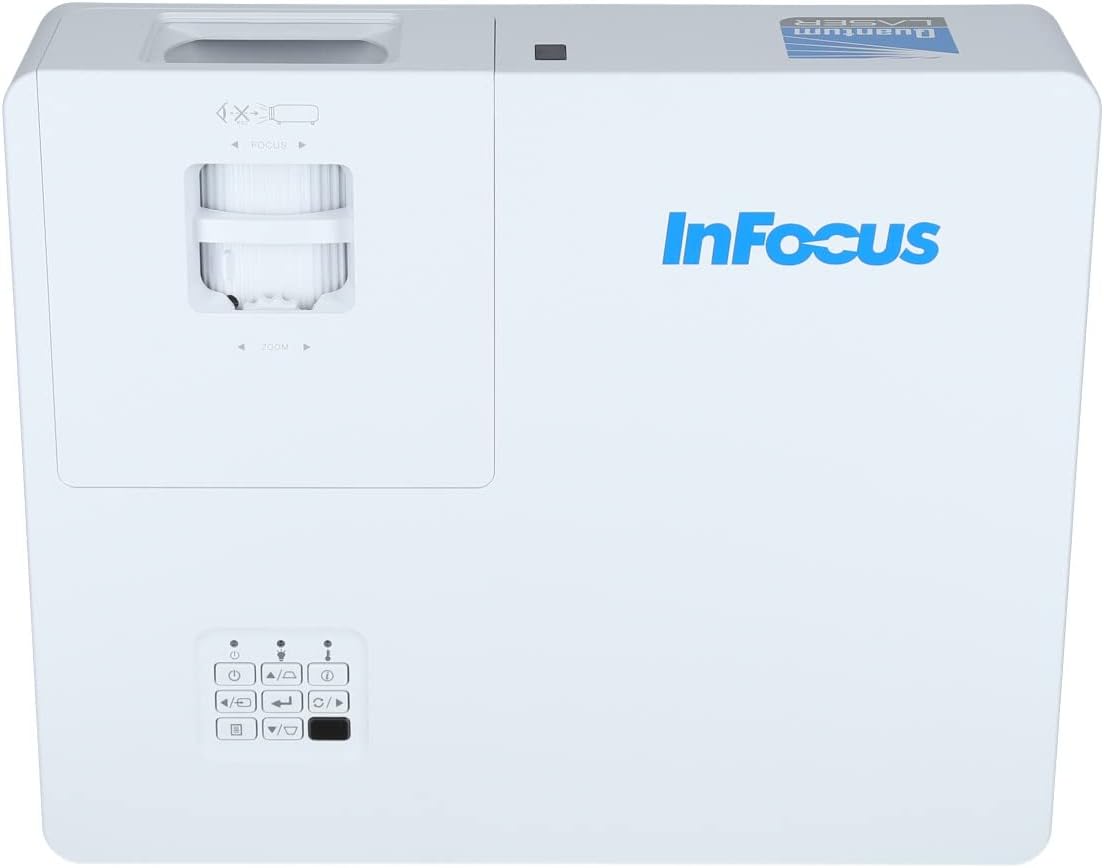
3.2 pav.: Uždarytojas view of the projector's top panel, showing the focus and zoom rings near the lens opening and the array of control buttons for power, menu, source selection, and navigation.
3.2 Galinio skydelio jungtys
Galiniame skydelyje yra įvairios įvesties ir išvesties jungtys išoriniams įrenginiams prijungti.

Figure 3.3: Rear panel of the InFocus P120 INL412 projector, displaying a comprehensive array of connectivity options including HDMI (x2), USB, S-Video, Ethernet (LAN), VGA In (x2), VGA Out, RS232, and Audio In/Out ports. The power input is located on the bottom left.
Key ports include:
- HDMI 1 ir 2: For connecting high-definition digital video and audio sources.
- USB: For connecting USB devices, potentially for media playback or firmware updates.
- „S-Video“: For connecting older video sources.
- VGA IN 1 & 2: For connecting computers or other devices with VGA output.
- VGA išėjimas: For connecting to an external monitor.
- Ethernet (LAN): Tinklo ryšiui ir valdymui.
- Audio IN 1 & 2 / Audio OUT: Analoginėms garso jungtims.
- RS232: Serijiniam valdymui.
- Maitinimo įvestis: Kintamosios srovės maitinimo laido prijungimui.
3.3 Front and Side Panels
The front panel houses the projection lens and front ventilation, while the side panels feature additional ventilation grilles.

3.4 pav.: priekis view of the InFocus P120 INL412 projector, displaying the main projection lens on the right and the extensive front ventilation grille on the left, crucial for heat dissipation.

3.5 pav.: šonas view of the InFocus P120 INL412 projector, illustrating the side ventilation grilles that contribute to maintaining optimal operating temperature.
4. Sąranka
4.1 Projektoriaus išdėstymas
Position the projector on a stable, flat surface or mount it securely. Ensure the projector is within the optimal projection distance for your screen size. Maintain clear space around the projector for proper ventilation.
4.2 Įrenginių prijungimas
Before connecting any cables, ensure the projector and all source devices are powered off.
- HDMI jungtis: Connect an HDMI cable from your source device (e.g., laptop, Blu-ray player, gaming console) to either the HDMI 1 or HDMI 2 port on the projector.
- VGA jungtis: Connect a VGA cable from your computer to either VGA IN 1 or VGA IN 2. For audio, connect a separate audio cable from your computer's audio output to the corresponding Audio IN port on the projector.
- USB jungtis: Insert a USB drive into the USB port for media playback (if supported by firmware) or service functions.
- Ethernet (LAN) jungtis: Connect an Ethernet cable to the LAN port for network control or updates.
- Garso išvestis: If using external speakers, connect an audio cable from the Audio OUT port on the projector to your audio system.
4.3 Maitinimo jungtis
Connect the power cord to the projector's power input and then plug the other end into a grounded electrical outlet.
5. Naudojimo instrukcijos
5.1 Įjungimas / išjungimas
- Maitinimas: Paspauskite Galia button on the projector's control panel or the remote control. The power indicator light will change.
- Išjungti: Paspauskite Galia button again. A confirmation message may appear. Press the button a second time to confirm shutdown. Allow the projector to cool down before unplugging it.
5.2 Fokusavimo ir priartinimo reguliavimas
Rotate the focus ring around the lens until the image appears sharp and clear. Use the zoom ring to adjust the image size to fit your screen.
5.3 Įvesties šaltinio pasirinkimas
Paspauskite Šaltinis button on the control panel or remote control to cycle through available input sources (HDMI 1, HDMI 2, VGA 1, VGA 2, S-Video, USB). Select the input corresponding to your connected device.
5.4 Meniu naršymas
Naudokite Meniu button to access the on-screen display (OSD) menu. Use the arrow buttons to navigate through menu options and the Įeikite mygtuką, kad pasirinktumėte. Paspauskite Meniu dar kartą išeiti.
6. Priežiūra
6.1 Objektyvo valymas
Gently wipe the lens with a soft, lint-free cloth specifically designed for optical surfaces. Do not use abrasive cleaners or excessive force, as this can scratch the lens.
6.2 Cleaning the Projector Exterior
Projektoriaus korpusą valykite minkštu, sausu skudurėliu.asing. Įsisenėjusiam purvui, dampen the cloth slightly with water, then wipe dry immediately. Avoid getting liquids into the projector's openings.
6.3 Vėdinimo priežiūra
Regularly check the projector's ventilation grilles for dust accumulation. Use a soft brush or a vacuum cleaner with a brush attachment to gently remove dust from the vents to ensure proper airflow and prevent overheating.
7. Problemų sprendimas
7.1 Nerodomas vaizdas
- Įsitikinkite, kad projektorius įjungtas ir maitinimo indikatoriaus lemputė šviečia nuolat.
- Verify that the video cable (HDMI, VGA, etc.) is securely connected to both the projector and the source device.
- Check that the correct input source is selected on the projector.
- Confirm that the source device (laptop, player) is powered on and outputting a signal.
7.2 Vaizdas neryškus arba nefokusuotas
- Reguliuokite projektoriaus objektyvo fokusavimo žiedą, kol vaizdas taps ryškus.
- Įsitikinkite, kad projektorius yra tinkamu atstumu nuo ekrano.
- Nuvalykite projektoriaus objektyvą, jei jis atrodo nešvarus.
7.3 Nėra garso
- If using HDMI, ensure the source device's audio output is set to HDMI.
- If using VGA, ensure a separate audio cable is connected from the source to the projector's Audio IN port.
- Patikrinkite garsumo nustatymus ir projektoriuje, ir šaltinio įrenginyje.
- If using external speakers, ensure they are properly connected to the Audio OUT port and powered on.
8. Specifikacijos
| Funkcija | Detalė |
|---|---|
| Prekės ženklas | InFocus |
| Gamintojas | Focus |
| Modelio pavadinimas | P120 INL412 |
| Modelio numeris | INL4128 |
| Metai | 2023 |
| Techninės įrangos sąsaja | Ethernet, HDMI, S-Video, USB |
| Prekių skaičius | 1 |
| Krašto santykis | 16:9 |
| Vattage | 341 vatų |
| Baterijos įtrauktos | Nr |
| Reikalingos baterijos | Nr |
| Formos faktorius | Darbalaukis |
| Montavimo tipas | Stalo laikiklis |
| Pridedamas nuotolinio valdymo pultas | Taip |
| Gaminio matmenys | 56.13 x 46.48 x 25.15 cm |
| Prekės svoris | 5.5 kg |
| Maksimalus vaizdo dydis | 308.28 colių |
| Minimalus vaizdo dydis | 910.63 milimetrų |
| Pirmoji laisva data | 5 m. sausio 2022 d |
9. Garantija ir palaikymas
For warranty information and technical support, please refer to the documentation included with your purchase or visit the official InFocus websvetainėje. Išsaugokite pirkimo įrodymą garantiniams reikalavimams.


