Įvadas
Thank you for choosing the Carro 52-inch Low Profile Smart Ceiling Fan with Light. This manual provides essential information for the safe installation, operation, and maintenance of your new smart ceiling fan. Please read this manual thoroughly before installation and keep it for future reference.
This smart ceiling fan is designed to provide efficient air circulation and illumination, featuring smart control options via app, voice commands (Alexa, Google Assistant, Siri Shortcuts), and a wall control switch. Its low-profile design is ideal for various indoor spaces, including living rooms, bedrooms, and kitchens.
Saugos informacija
ĮSPĖJIMAS: To reduce the risk of fire, electric shock, or personal injury, always turn off power at the main circuit breaker or fuse box before beginning installation or performing any maintenance.
- Visos elektros jungtys turi atitikti vietinius kodeksus, potvarkius arba nacionalinius elektros kodeksus. Jei nesate susipažinę su tinkama elektros instaliacija, pasitarkite su kvalifikuotu elektriku.
- Ensure the installation site is structurally sound and can support the weight of the fan.
- Do not connect the fan to a dimmer switch unless specifically designed for ceiling fans. The included wall control switch is designed for this fan.
- This fan is designed for flush-mount installation only and cannot be angled.
- Requires Neutral Wire (White), Live Wire (Red or Black), Bare or Ground Wire (Green), and separate Load Wires (2 wires) for Fan & Light. Confirm your home's wiring compatibility before purchase.
Pakuotės turinys
Carefully unpack all components and ensure all items are present before beginning installation. If any parts are missing or damaged, contact customer support.
- Lubų ventiliatoriaus variklio mazgas
- Ventiliatoriaus mentės (3)
- LED Light Kit with Frosted Glass Cover
- Sieninis valdymo jungiklis
- Tvirtinimo detalės (varžtai, vielinės veržlės ir kt.)
- Instrukcijų vadovas

Image: The Carro 52-inch Low Profile Smart Ceiling Fan with Light, showcasing its gold/black finish and three blades.
Specifikacijos
| Funkcija | Detalė |
|---|---|
| Prekės ženklas | Carro |
| Modelio numeris | VWGS-523B-L11-G2-1 |
| Spalva | Auksinis/juodas |
| Medžiaga | Engineered Wood (Blades), Glass (Shade) |
| Gaminio matmenys | 52 colio ilgio x 52 colių pločio x 11.6 colio aukščio |
| Naudojimas viduje / lauke | Vidinis |
| Maitinimo šaltinis | Su laidu elektra |
| Diegimo tipas | Flush Mount (Cannot be angled) |
| Šviesos šaltinio tipas | LED |
| Ryškumas | 1062 liumenų |
| Šviesios spalvos | Šilta šviesa (3000K) |
| ttage | 120 voltų |
| Vattage | 68 vatų |
| Kontrolės metodas | App, Wall Control, Voice (Alexa/Google Assistant/Siri) |
| Variklio tipas | Reversible AC Motor |
| Prekės svoris | 16.7 svaro |
Montavimas
Before starting, ensure the power is turned off at the circuit breaker. It is recommended to have a second person assist with the installation.
1. Ventiliatoriaus montavimas
- Secure the mounting bracket to the ceiling junction box. Ensure the junction box is securely fastened to the building structure.
- Pritvirtinkite ventiliatoriaus variklio mazgą prie tvirtinimo kronšteino.

Image: The Carro 52-inch Low Profile Smart Ceiling Fan installed flush against a ceiling in a room.
2. Ventiliatoriaus prijungimas
This fan requires specific wiring for proper operation. You will need a Neutral Wire (White), Live Wire (Red or Black), Bare or Ground Wire (Green), and two separate Load Wires for the fan and light functions.
- Connect the fan's light wire to the light load wire from the ceiling.
- Connect the fan's motor wire to the fan load wire from the ceiling.
- Connect the fan's neutral wire to the neutral wire from the ceiling.
- Connect the fan's ground wire to the ground wire from the ceiling.

Image: A detailed diagram illustrating the wiring connections for the Carro Smart Ceiling Fan's wall control switch, showing connections for Live, Neutral, Ground, and separate Load wires for fan and light.
3. Wiring Instruction Video
For a visual guide on wiring, please refer to the official instruction video below:
Video: A step-by-step guide demonstrating the wire connection process for the smart ceiling fan, showing how to link light, neutral, motor, and ground wires.
4. Attaching the Blades and Light Kit
- Attach the fan blades securely to the motor housing.
- Install the LED light kit and secure the frosted glass cover.
Setup & Smart Features
Your Carro Smart Ceiling Fan offers multiple control methods for convenience.
1. Sienos valdymas
The included wall control switch allows direct control of fan speeds and light functions. The fan and light can be operated separately.
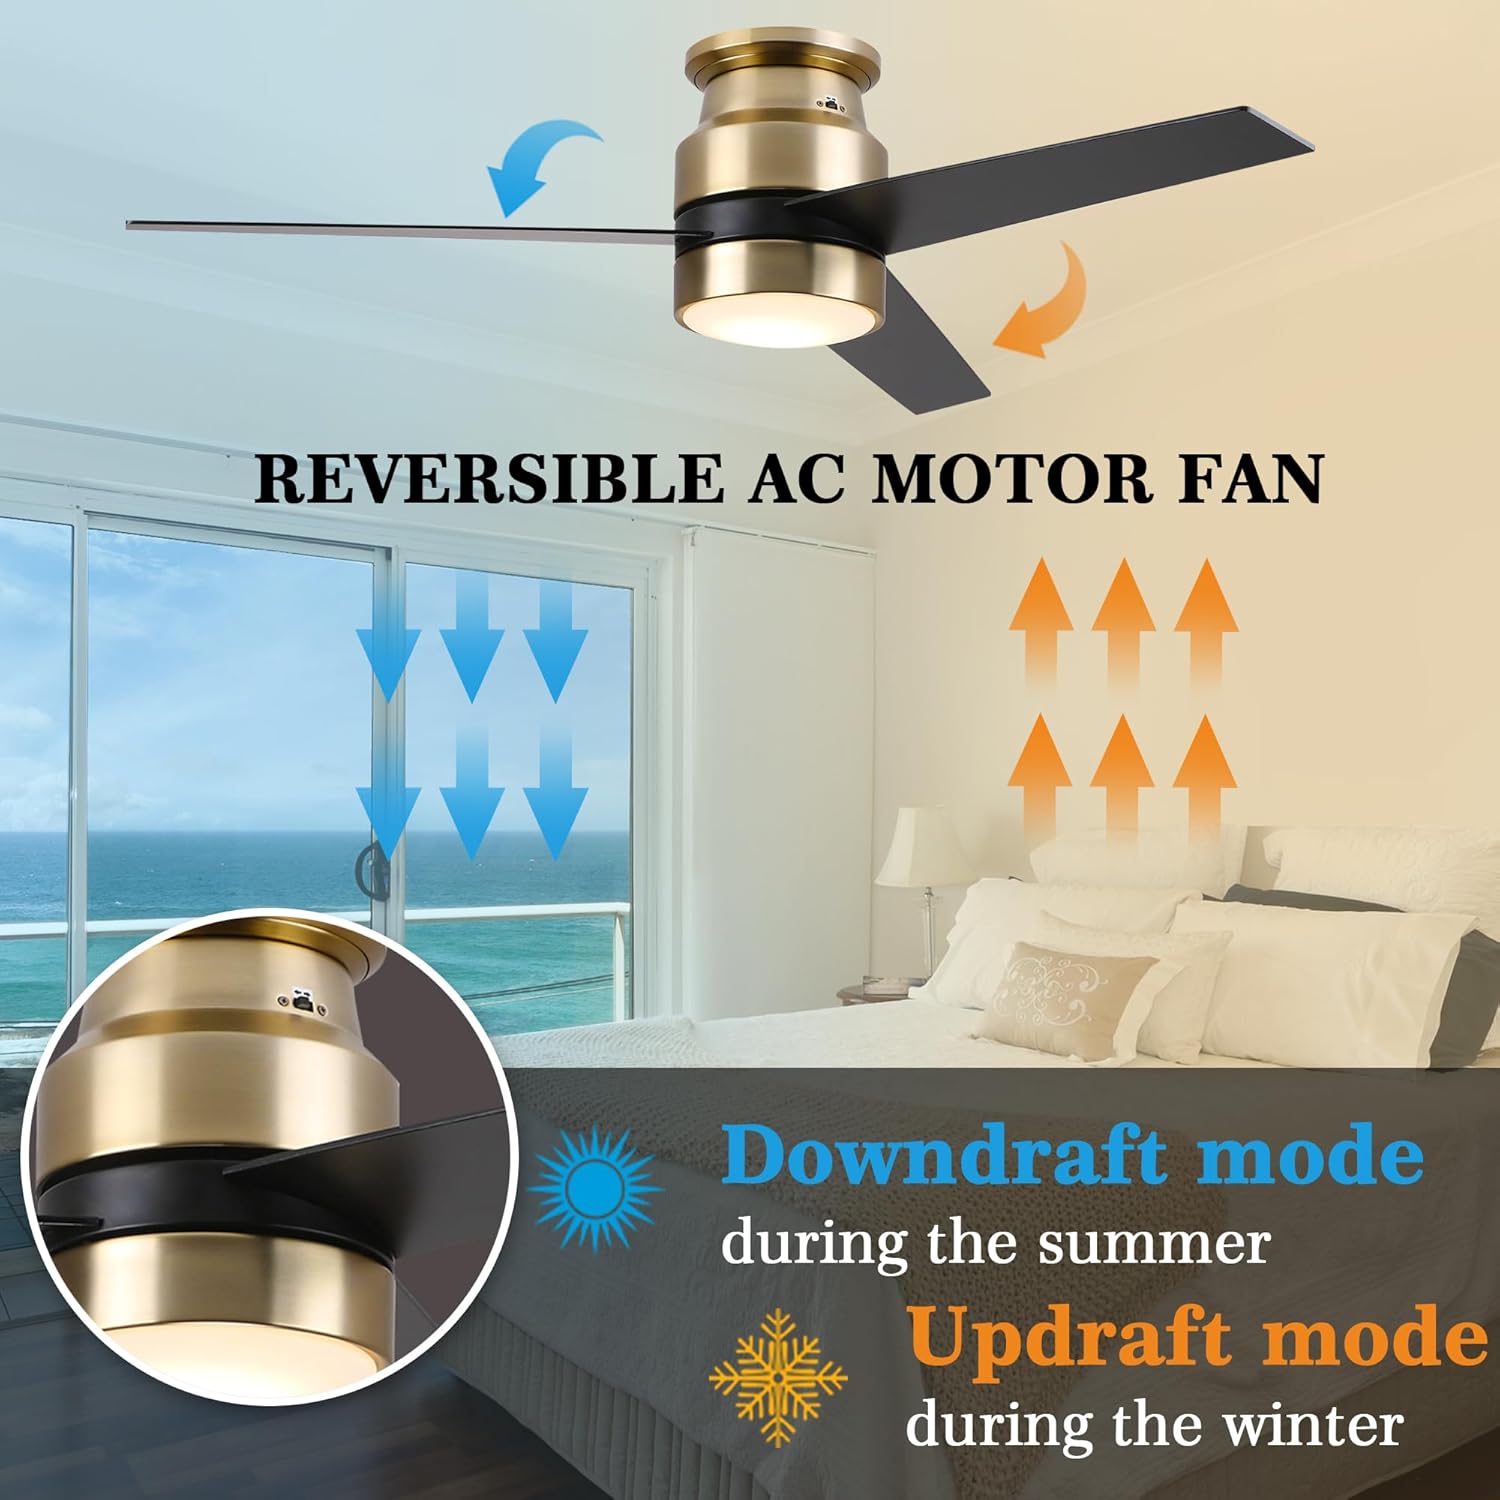
Image: The Carro Smart Ceiling Fan wall control switch, showing buttons for fan speed, light on/off, and other functions.
2. Programos valdymas
Download the official Carro app from your smartphone's app store. Follow the in-app instructions to connect your fan. The fan requires a 2.4GHz Wi-Fi connection for initial setup; after connection, it can operate on 5GHz networks.
The app provides full functionality, including fan speed adjustment, light control, and advanced features like scheduling and timing (up to 24 hours).

Image: An illustration showing the four control methods for the Carro Smart Ceiling Fan: Wall Control, App Control, Voice of Alexa, and Google Assistant, with a couple dancing in a room with the fan.
3. Voice Control (Alexa, Google Assistant, Siri Shortcuts)
Integrate your Carro Smart Ceiling Fan with your preferred smart home ecosystem. Once connected via the app, you can use simple voice commands to control the fan and light.
- "Alexa, turn on ceiling fan to speed 3."
- "Hey Google, turn off the ceiling fan and light."
- "Siri, set fan to low."

Image: A kitchen scene demonstrating voice control, with an Amazon Echo device and speech bubbles showing commands like "Alex, turn on ceiling fan to speed 3" and "Alex turn off the ceiling fan and light."
Naudojimo instrukcijos
Ventiliatoriaus greičio valdymas
Adjust the fan speed using the wall control or the Carro app. The fan offers multiple speed settings to suit your comfort needs.
Šviesos valdymas
Turn the LED light on or off using the wall control, app, or voice commands. The integrated LED light provides 1062 Lumens of 3000K warm light.
Grįžtamoji variklio funkcija
The fan features a reversible AC motor, allowing you to change the direction of airflow for year-round comfort. This function is typically controlled via a button on the fan housing or through the app.
- Žemyn nukreipto oro režimas (vasara): Peiliai sukasi prieš laikrodžio rodyklę, stumdami vėsų orą žemyn.
- Aukštesnės traukos režimas (žiema): Mentės sukasi pagal laikrodžio rodyklę, traukdamos vėsų orą aukštyn ir cirkuliuodamos šiltą orą, įstrigusį prie lubų.

Image: An illustration demonstrating the downdraft mode (blue arrows, pushing air down for summer) and updraft mode (orange arrows, pulling air up for winter) of the reversible AC motor fan.
Scheduling and Timer
Utilize the Carro app to set schedules for your fan and light to automate operation according to your daily routine. You can also set countdown timers for automatic shut-off.
Image: A visual representation of the timer and scheduling features, showing examples like "Timer: 7:30/ON" and "Countdown: 15 min/OFF" with people waking up and sleeping.
Priežiūra
Reguliarus valymas padės prailginti lubų ventiliatoriaus tarnavimo laiką ir našumą.
- Valymas: Kad nepažeistumėte apdailos, ventiliatorių valykite minkšta šluosteamp cloth only. Do not use abrasive cleaners or solvents.
- Ašmenų priežiūra: Periodically check the blade screws for tightness. Loose blades can cause wobbling and noise.
- Šviesos rinkinys: The LED light kit is integrated and designed for long life (50,000+ hours). Replacement of individual LEDs is not typically required.
Trikčių šalinimas
Jei kyla problemų dėl ventiliatoriaus, atlikite šiuos įprastus trikčių šalinimo veiksmus:
| Problema | Galima priežastis | Sprendimas |
|---|---|---|
| Ventiliatorius neveikia | No power; loose wiring; incorrect wiring; circuit breaker tripped. | Check power supply; ensure all wire connections are secure; verify wiring against diagram; reset circuit breaker. |
| Šviesa neveikia | Loose wiring; incorrect wiring; LED failure (rare). | Check light wire connections; verify wiring; contact support if LED is suspected to be faulty. |
| Ventiliatoriaus virpėjimas | Atsilaisvinę peiliai; nesubalansuoti peiliai; atsilaisvinęs tvirtinimo laikiklis. | Tighten blade screws; ensure blades are balanced (balancing kit not included, but can be purchased); secure mounting bracket. |
| Nepavyksta prisijungti prie „Wi-Fi“ / programėlės | Incorrect Wi-Fi band (not 2.4GHz); weak signal; incorrect password. | Ensure your router is broadcasting a 2.4GHz network; move closer to router; re-enter Wi-Fi password carefully. |
| Balso valdymas nereaguoja | Not linked to smart assistant; incorrect voice commands. | Verify fan is linked in Alexa/Google Home app; use precise commands as listed in manual or app. |
Garantija ir palaikymas
Carro offers a 5-year guarantee to resolve any quality problems related to the motor. If there is any problem with the product, please contact us. We will be glad to assist with replacement or refund.
For further assistance, please visit the official Carro websvetainėje arba susisiekite tiesiogiai su jų klientų aptarnavimo tarnyba. Išsaugokite pirkimo kvitą garantiniams reikalavimams.
Kontaktinė informacija: Please refer to the product packaging or official Carro websvetainę, kurioje rasite naujausią kontaktinę informaciją.


