1. Įvadas
Thank you for choosing the Conentool 21V Cordless Drill Driver Set. This manual provides essential information for the safe and effective use of your new tool. Please read all instructions carefully before operation to ensure proper handling, maximize performance, and prevent injury. Keep this manual for future reference.
2. Saugos instrukcijos
Naudodami elektrinius įrankius, visada laikykitės pagrindinių saugos priemonių, kad sumažintumėte gaisro, elektros smūgio ir sužalojimo riziką.
Bendrieji elektrinių įrankių saugos įspėjimai
- Darbo zonos sauga: Darbo vieta turi būti švari ir gerai apšviesta. Netvarkingos arba tamsios vietos skatina nelaimingus atsitikimus. Nenaudokite elektrinių įrankių sprogioje aplinkoje, pavyzdžiui, ten, kur yra degių skysčių, dujų ar dulkių.
- Elektros sauga: Venkite kūno kontakto su įžemintais paviršiais, tokiais kaip vamzdžiai, radiatoriai, viryklės ir šaldytuvai. Saugokite elektrinius įrankius nuo lietaus ar drėgmės.
- Asmeninis saugumas: Visada dėvėkite akių apsaugos priemones. Naudokite tinkamas apsaugos priemones, pvz., dulkių kaukes, neslystančius apsauginius batus, šalmus arba klausos apsaugos priemones, kai reikia. Tinkamai apsirenkite; venkite laisvų drabužių ar papuošalų.
- Įrankio naudojimas ir priežiūra: Nenaudokite elektrinio įrankio per jėgą. Naudokite savo darbui tinkamą elektrinį įrankį. Prieš atlikdami bet kokius reguliavimo veiksmus, keisdami priedus arba padėdami elektrinį įrankį sandėliuoti, atjunkite kištuką nuo maitinimo šaltinio ir (arba) išimkite akumuliatorių.
- Baterijos naudojimas ir priežiūra: Įkraukite tik gamintojo nurodytu įkrovikliu. Nenaudokite akumuliatorių su jokiais kitais elektriniais įrankiais.
3. Pakuotės turinys
Your Conentool 21V Cordless Drill Driver Set includes the following items:
- 1x akumuliatorinis gręžtuvas
- 1x nešiojimo dėklas
- 2x 1500mAh Lithium-Ion Batteries
- 1x pakrovėjas
- 9x Socket Wrenches ( 4-12mm)
- 12x Screwdriver Bits
- Conventional Drill Bits
- Tile Drill Bit
- Long Screwdriver Bit
- 1x Flexible Drill Shaft

Image: Complete Conentool 21V Cordless Drill Driver Set with all accessories laid out.
Vaizdas: Stambus planas view of the various accessories included in the set, such as the drill, batteries, charger, and different types of bits and wrenches.
4. Produktas baigtasview
The Conentool 21V Cordless Drill Driver is a versatile and powerful tool designed for various drilling and screwing tasks. It features a robust motor, ergonomic design, and multiple adjustable settings for optimal performance.
Pagrindinės funkcijos:
- 45N.m Max Torque: Suteikia ampgalia reiklioms programoms.
- 18+1 Torque Adjustment: Allows precise control for different materials and tasks, from delicate screwing to heavy-duty drilling.
- Dviejų greičių nustatymas: Offers flexibility with a low speed (0-400rpm) for high torque applications and a high speed (0-1500rpm) for faster drilling.
- Dvi 1500 mAh baterijos: Ensures extended operation time with quick charging.
- Kompaktiškas ir lengvas dizainas: Minimizes user fatigue during prolonged use.
- Integruota LED lemputė: Illuminates the work area for improved visibility in low-light conditions.
- 3/8" (10mm) Self-Locking Chuck: Leidžia greitai ir lengvai pakeisti antgalius.
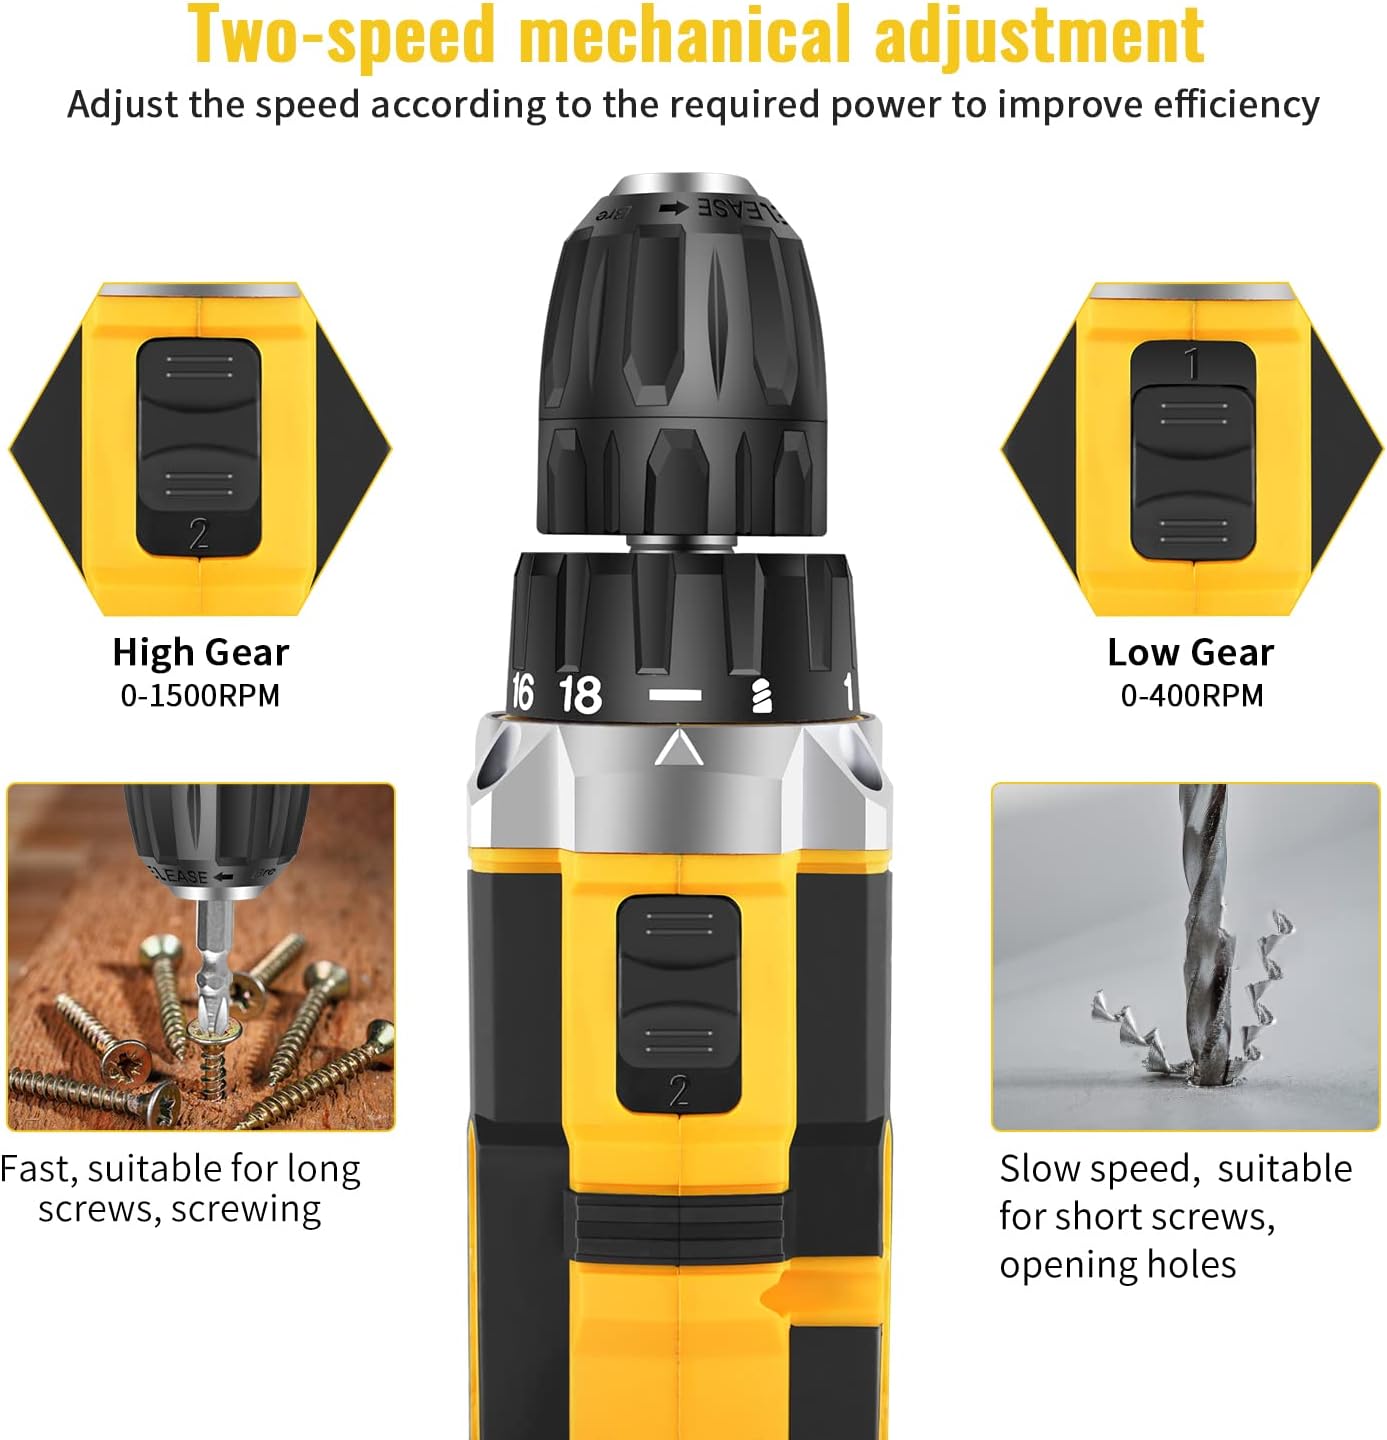
Image: Detailed diagram pointing out various features of the drill, including torque settings, speed selector, ventilation, LED light, and grip.

Image: Visual representation of the drill's internal motor, highlighting its 45N.m maximum torque and efficient heat dissipation.

Image: The drill depicted as lightweight and compact, designed to reduce user fatigue.

Image: Illustration of the drill's motor cooling system, demonstrating effective heat dissipation.

Image: Close-up of the integrated LED light, designed to illuminate the work area.
5. Sąranka
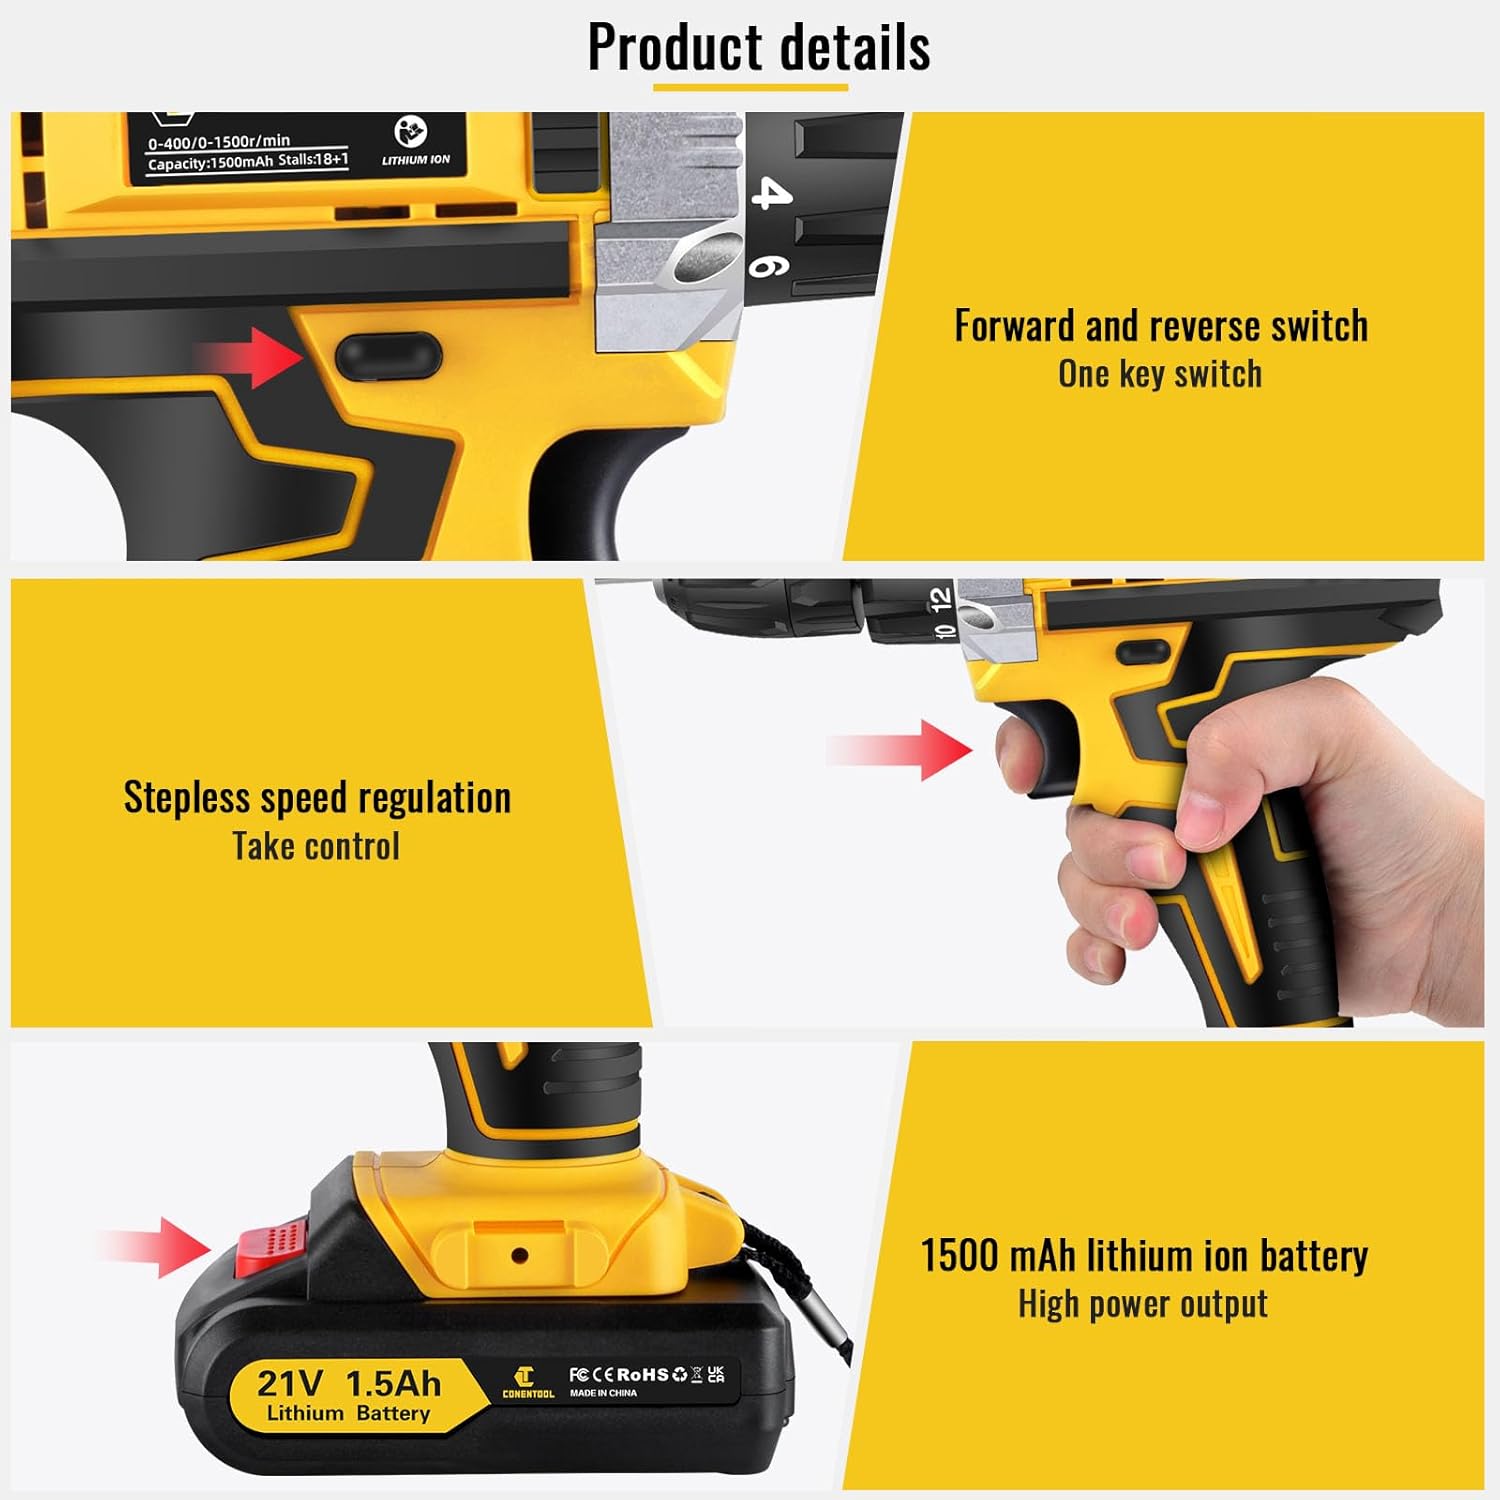
5.1 Akumuliatoriaus įkrovimas
The drill comes with two 1500mAh lithium-ion batteries. Before first use, fully charge both batteries. A fast charger is included, and a full charge typically takes about 1 hour.
- Prijunkite įkroviklį prie standartinio maitinimo lizdo.
- Stumkite akumuliatorių bloką ant įkroviklio, kol jis spragtelėdamas užsifiksuos vietoje.
- The charger indicator light will show the charging status (refer to charger manual for specific light indications).
- Visiškai įkrautą akumuliatorių išimkite iš įkroviklio.
5.2 Baterijos įdėjimas / išėmimas
- Norėdami įdiegti: Sulygiuokite akumuliatorių bloką su grąžto rankenos pagrindu ir stumkite jį, kol jis tvirtai užsifiksuos vietoje.
- Norėdami pašalinti: Press the battery release button located on the front of the battery pack and slide the battery out of the drill handle.

Image: Details on battery installation and removal, along with trigger and switch controls.
5.3 Installing Drill Bits/Screwdriver Bits
The drill features a 3/8" (10mm) self-locking chuck for quick and easy bit changes.
- Pasukite griebtuvą prieš laikrodžio rodyklę, kad atidarytumėte žandikaulius.
- Įkiškite norimą grąžtą arba atsuktuvą į griebtuvą ir įsitikinkite, kad jis tvirtai įstatytas.
- Rotate the chuck clockwise to tighten the jaws securely around the bit. Ensure the bit is centered and tight before operation.

Image: Close-up of the drill chuck, showing how to insert and secure bits.
6. Naudojimo instrukcijos
6.1 Įjungimas / išjungimas ir kintamo greičio paleidiklis
The drill is activated by pressing the variable speed trigger. The speed of rotation increases as you press the trigger further.
- To start the drill, press the trigger.
- To increase speed, press the trigger further.
- Norėdami sustabdyti gręžtuvą, atleiskite gaiduką.

Image: Illustration of the variable speed trigger and the forward/reverse button.
6.2 Two-Speed Mechanical Adjustment
The drill has two mechanical speed settings, selected via a switch on top of the drill housing.
- Gear 1 (Low Speed: 0-400rpm): Provides higher torque, ideal for driving screws or drilling into harder materials.
- Gear 2 (High Speed: 0-1500rpm): Provides lower torque but faster rotation, suitable for drilling into softer materials or for quick tasks.

Image: Diagram showing the two-speed selector switch and its corresponding RPM ranges.
6.3 Torque Adjustment (18+1 Settings)
The torque collar allows you to adjust the amount of rotational force the drill applies. This prevents over-tightening screws or damaging materials.
- Rotate the torque collar to select the desired setting from 1 to 18. Lower numbers are for smaller screws and softer materials, higher numbers for larger screws and harder materials.
- Gręžimo piktogramos nustatymas skirtas gręžimo darbams, užtikrinant maksimalų sukimo momentą.

Image: The torque adjustment ring with settings for different materials.
6.4 Tiesioginės / atbulinės eigos jungiklis
The forward/reverse switch is located above the trigger and controls the direction of rotation.
- Norėdami sukti į priekį (gręžimui ir varžtų priveržimui), paspauskite jungiklį į kairę.
- Push the switch to the right for reverse rotation (for loosening screws or removing bits).
- Kai jungiklis yra vidurinėje padėtyje, gaidukas yra užrakintas, taip išvengiant atsitiktinio įjungimo.
6.5 LED šviesos naudojimas
Integruotas LED apšvietimas automatiškai įsijungia paspaudus gaiduką, taip užtikrindamas matomumą prastai apšviestose darbo vietose.

Image: The LED light in action, illuminating the work surface, and the onboard bit holder.
7. Priežiūra
Reguliarus techninis aptarnavimas užtikrina jūsų gręžtuvo ilgaamžiškumą ir optimalų veikimą.
- Valymas: Ventiliacijos angas laikykite švarias ir laisvas. Naudokite minkštą, sausą šluostę.amp šluoste įrankiui nuvalyti. Nenaudokite stiprių cheminių medžiagų ar abrazyvinių valiklių.
- Akumuliatoriaus priežiūra: Baterijas laikykite vėsioje, sausoje vietoje, toliau nuo tiesioginių saulės spindulių. Nelaikykite visiškai išsikrovusių baterijų ilgą laiką. Jei nenaudojate, periodiškai jas įkraukite.
- Saugykla: Store the drill and all accessories in the provided carry case in a dry, secure location, out of reach of children.
8. Problemų sprendimas
If you encounter issues with your Conentool drill, refer to the following common problems and solutions:
| Problema | Galima priežastis | Sprendimas |
|---|---|---|
| Gręžtuvas neprasideda | Battery not charged; Battery not properly inserted; Forward/Reverse switch in center (locked) position. | Charge battery; Re-insert battery securely; Move switch to forward or reverse position. |
| Galios praradimas veikimo metu | Battery low; Overload. | Recharge battery; Reduce pressure on the drill or use a lower speed/higher torque setting. |
| Antgalis svyruoja arba iškrenta | Chuck not tightened sufficiently; Bit shank damaged. | Re-tighten chuck firmly; Replace damaged bit. |
| Perkaitimas | Prolonged heavy use; Blocked ventilation. | Allow tool to cool down; Clear ventilation openings. |
If the problem persists after attempting these solutions, please contact Conentool customer support.
9. Specifikacijos
| Funkcija | Specifikacija |
|---|---|
| Modelio numeris | 000125 p |
| ttage | 21 V |
| Baterijos tipas | Ličio jonas |
| Baterijos talpa | 1500 mAh (1.5 Ah) |
| Max torque | 45 Nm |
| Sukimo momento nustatymai | 18+1 |
| Tuščiosios eigos greitis (mažas) | 0-400 aps./min |
| Tuščiosios eigos greitis (didelis) | 0-1500 aps./min |
| Chuck dydis | 3/8 colio (10 mm) |
| Maitinimo šaltinis | Maitinamas baterijomis |
| Medžiaga | Metalas |
| Prekės svoris | 2.5 kg |
| Gaminio matmenys | 30.5 x 27 x 10.5 cm |
10. Garantija ir palaikymas
Conentool is committed to providing high-quality tools. For any product-related inquiries, technical assistance, or warranty claims, please contact Conentool customer support. Refer to your purchase documentation for specific warranty terms and contact information.
You can also visit the official Conentool store on Amazon for more information and support: Conentool Store


