1. Įvadas
Ačiū, kad pirkoteasing the DOOMAY Digital Alarm Clock. This compact and versatile alarm clock is designed for convenience and readability, featuring an adjustable LCD display, snooze function, weekend mode, and temperature display. This manual will guide you through the setup, operation, and maintenance of your new alarm clock to ensure optimal performance.
2. Saugos informacija
- Laikykite prietaisą atokiau nuo vandens ir didelės drėgmės aplinkoje.
- Avoid exposing the clock to direct sunlight or extreme temperatures.
- Nebandykite patys ardyti ar taisyti įrenginio. Dėl remonto kreipkitės į kvalifikuotus specialistus.
- Naudokite tik nurodyto tipo baterijas (2 x AAA).
- Jei prietaisas ilgesnį laiką nebus naudojamas, išimkite baterijas, kad išvengtumėte elektrolito pratekėjimo.
- Baterijas laikykite vaikams nepasiekiamoje vietoje.
3. Pakuotės turinys
- DOOMAY skaitmeninis žadintuvas (1 vnt.)
- AAA baterijos (2 vnt.)
- Vartotojo vadovas (šis dokumentas)
4. Produktas baigtasview
Familiarize yourself with the components and controls of your DOOMAY Digital Alarm Clock.
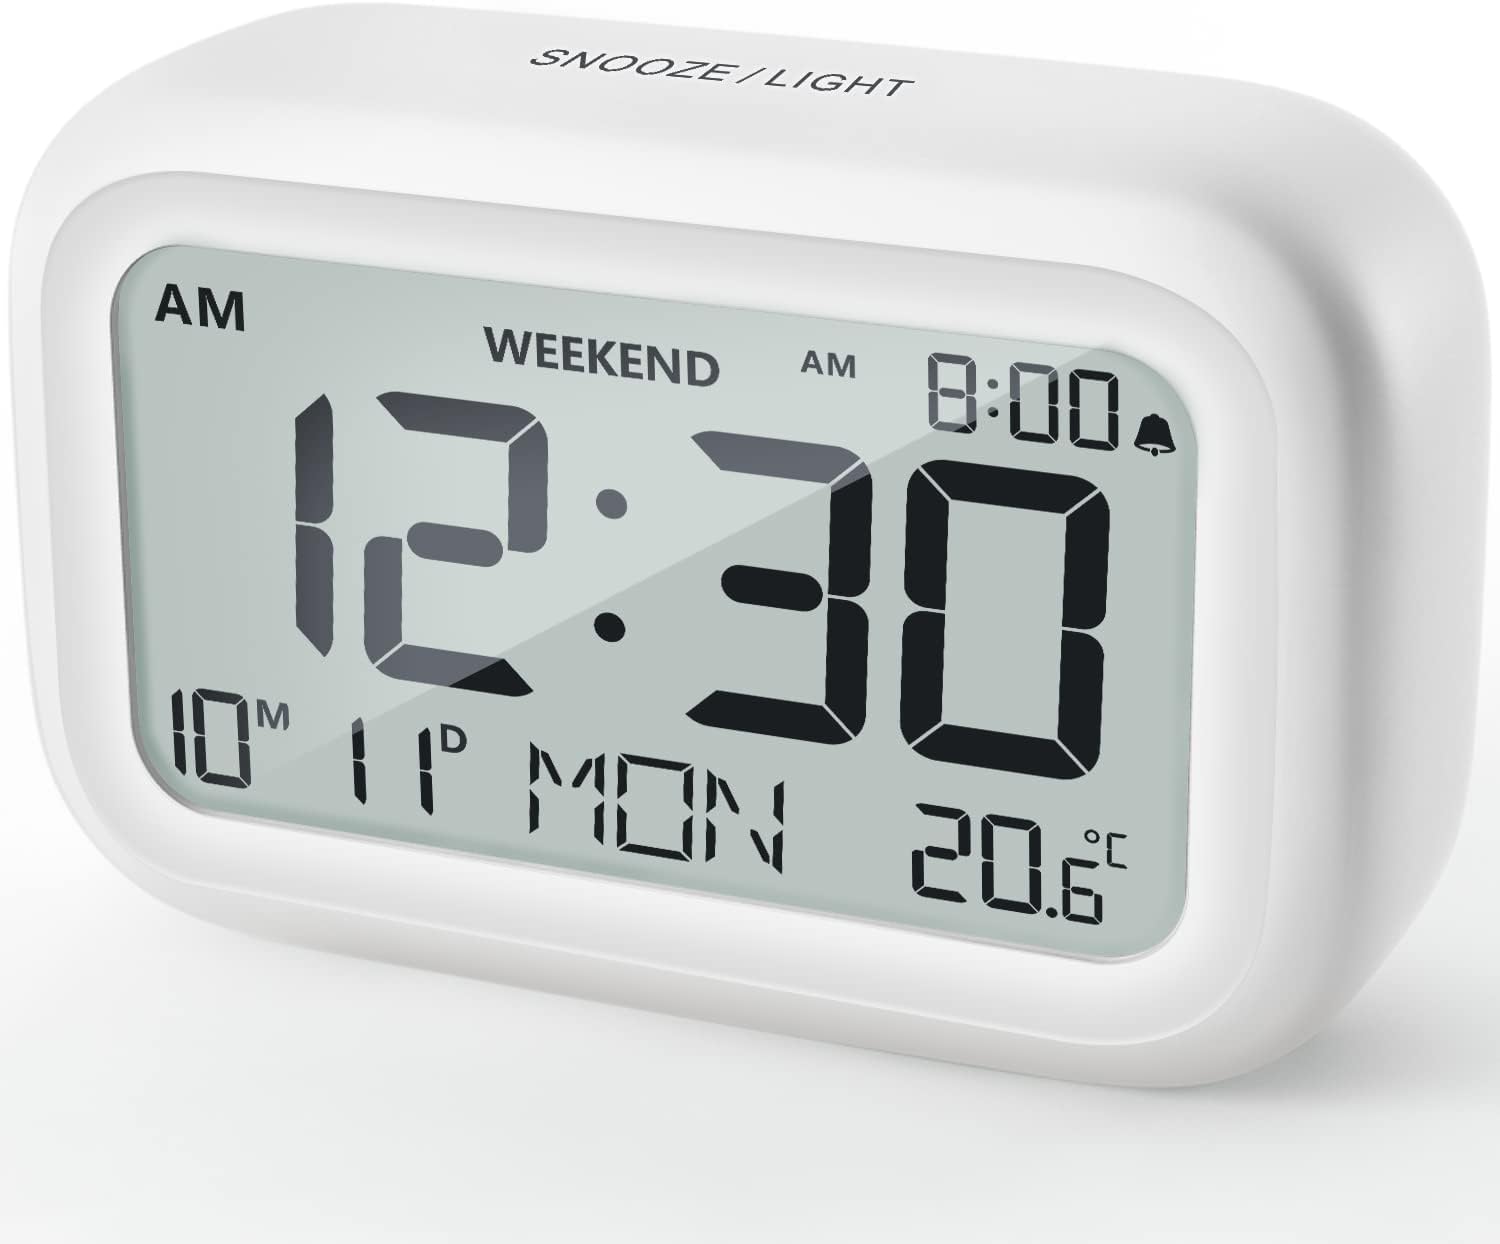
4.1 pav.: priekis View of the Alarm Clock
This image displays the front of the DOOMAY Digital Alarm Clock, highlighting its large, clear LCD screen. The screen shows the current time (12:30), AM indicator, day of the week (MON), date (10th month, 11th day), and indoor temperature (20.6°C). The top of the clock has a "SNOOZE/LIGHT" button.

4.2 pav.: Pagrindinės funkcijosview
This diagram illustrates the main functionalities of the alarm clock: 12/24H time display, calendar, alarm setting, adjustable volume, snooze function, backlight, weekend mode, and temperature display. The clock itself is shown on a wooden table, displaying 7:00 AM, Friday, and 28.8 degrees.

Figure 4.3: Back Panel Controls
This image shows the rear of the alarm clock, detailing the various control buttons and the battery compartment. Buttons are clearly labeled for: 12/24H time format, Alarm setting, Weekend mode, Date setting, Minus (-) for decreasing values, Plus (+) for increasing values, and °C/°F for temperature unit selection. The battery compartment is visible, designed for two AAA batteries.
Valdikliai ir ekranas:
- LCD ekranas: Shows time, date, day of week, AM/PM indicator, alarm status, and temperature.
- SNOOZE/LIGHT Button (Top): Activates snooze function during alarm; illuminates backlight for 5 seconds.
- 12/24H Button (Back): Perjungia 12 valandų ir 24 valandų laiko formatus.
- ALARM Button (Back): Įjungiamas žadintuvo nustatymo režimas.
- WEEKEND Button (Back): Activates/deactivates weekend mode.
- DATE Button (Back): Enters date setting mode.
- MINUS (-) Button (Back): Decreases values during setting; adjusts alarm volume.
- PLUS (+) Button (Back): Increases values during setting; adjusts alarm volume.
- °C/°F Button (Back): Perjungia temperatūros matavimo vienetus pagal Celsijų ir Farenheitą.
5. Sąranka
5.1 Akumuliatoriaus įdėjimas
- Atidarykite akumuliatoriaus skyriaus dangtelį, esantį laikrodžio gale.
- Įdėkite dvi (2) AAA baterijas, užtikrindami teisingą poliškumą (+ ir -).
- Saugiai uždarykite akumuliatoriaus skyriaus dangtelį.
- The display will light up, and the clock will be ready for initial setup. A low battery symbol will appear when batteries need replacement. If the display shows "8888" flashing, it's also an indication to change batteries.
5.2 Pradinis laiko ir datos nustatymas
- Nustatyti laiką:
- Paspauskite 12/24H button to switch between 12-hour (with AM/PM) and 24-hour formats.
- Paspauskite ir palaikykite 12/24H Norėdami įjungti laiko nustatymo režimą, 3 sekundes palaikykite nuspaudę mygtuką . Pradės mirksėti valandų skaitmenys.
- Naudokite + or - mygtukai valandoms reguliuoti.
- Paspauskite 12/24H dar kartą paspauskite mygtuką , kad patvirtintumėte valandas ir pereitumėte prie minučių nustatymo. Minučių skaitmenys mirksės.
- Naudokite + or - mygtukai minutėms reguliuoti.
- Paspauskite 12/24H button one more time to exit time setting.
- Nustatyti datą:
- Paspauskite ir palaikykite DATA button for 3 seconds to enter date setting mode. The year digits will flash.
- Naudokite + or - mygtukai metams reguliuoti.
- Paspauskite DATA button again to confirm the year and move to month setting.
- Adjust the month using + or -.
- Paspauskite DATA again to move to day setting.
- Adjust the day using + or -.
- Paspauskite DATA one more time to exit date setting. The day of the week will automatically adjust.
6. Naudojimo instrukcijos
6.1 Signalizacijos nustatymas
- Paspauskite ir palaikykite SIGNALAS mygtuką 3 sekundes. Pradės mirksėti žadintuvo valandų skaitmenys.
- Naudokite + or - mygtukus, kad nustatytumėte norimą žadintuvo valandą.
- Paspauskite SIGNALAS button again to confirm the hour and move to minute setting. The alarm minute digits will flash.
- Naudokite + or - buttons to set the desired alarm minute.
- Paspauskite SIGNALAS button one more time to exit alarm setting. The alarm icon (bell symbol) will appear on the display, indicating the alarm is active.
- To turn the alarm ON/OFF, simply press the SIGNALAS button once. The bell icon will appear/disappear.
6.2 Snausti funkcija
When the alarm sounds, gently tap the large SNAIGĖ / ŠVIESA button on the top of the clock. The alarm will pause for 9 minutes and then sound again. This can be repeated multiple times.

Figure 6.1: Activating Snooze
This image demonstrates how to activate the snooze function by touching the top of the alarm clock. The text highlights that this action provides an additional 9 minutes of sleep after the alarm sounds.
To completely turn off the alarm after it sounds (without snoozing), press any button on the back of the clock.
6.3 Savaitgalio režimas
The weekend mode allows the alarm to sound only from Monday to Friday, preventing it from ringing on Saturday and Sunday.

Figure 6.2: Weekend Mode Activated
This image shows the alarm clock display with the "WEEKEND" indicator prominently displayed, signifying that the weekend mode is active. The accompanying text clarifies that in this mode, the alarm will only sound from Monday to Friday, ensuring undisturbed weekends.
- To activate Weekend Mode, press the SAVAITGALIS button once. The "WEEKEND" indicator will appear on the display.
- To deactivate Weekend Mode, press the SAVAITGALIS button again. The "WEEKEND" indicator will disappear.
6.4 Reguliuojamas aliarmo garsumas
The alarm clock offers two volume levels: Low (70 dB) and High (85 dB).

Figure 6.3: Alarm Volume Levels
This image visually represents the two available alarm volume settings: L01 (85 dB) for a louder alarm and L02 (70 dB) for a softer alarm. The alarm clock is shown in a bedroom setting, emphasizing its use as a bedside device.
- Įprasto laiko rodymo režime paspauskite + or - buttons to cycle between the two alarm volume levels. The current volume level will be briefly displayed.
6.5 Foninio apšvietimo funkcija
To illuminate the display in low light conditions, simply tap the SNAIGĖ / ŠVIESA button on the top of the clock. The backlight will activate for approximately 5 seconds, providing clear visibility of the time and other information.
Figure 6.4: Backlight in Action
This image provides a side-by-side comparison of the alarm clock's display. On the left, the clock is shown in a well-lit environment. On the right, the same clock is shown in a dark setting with its 5-second backlight activated, demonstrating how the display becomes clearly visible at night.
6.6 Temperatūros ekranas
Laikrodis rodo vidaus temperatūrą. Galite perjungti Celsijaus (°C) ir Farenheito (°F) matavimo vienetus.
- To change the temperature unit, press the ° C / ° F mygtuką, esantį laikrodžio gale.
7. Priežiūra
7.1 Valymas
Laikrodį valykite minkšta, sausa šluoste. Nenaudokite abrazyvinių valiklių ar tirpiklių, nes jie gali pažeisti paviršių.
7.2 Akumuliatoriaus keitimas
When the low battery indicator appears on the display, or if the display shows "8888" flashing, it is time to replace the batteries. Follow the steps in Section 5.1 Battery Installation to replace the two AAA batteries.
8. Problemų sprendimas
| Problema | Galima priežastis | Sprendimas |
|---|---|---|
| Ekranas tuščias arba blankus. | Baterijos išsikrovusios arba neteisingai įdėtos. | Pakeiskite baterijas naujomis AAA baterijomis, užtikrindami teisingą poliškumą. |
| Signalizacija neskamba. | Alarm is not activated, or Weekend Mode is ON. | Ensure the alarm icon is displayed. Check if Weekend Mode is active and deactivate if necessary. |
| Snaudimo funkcija neveikia. | Not tapping the SNOOZE/LIGHT button correctly. | Ensure a firm, brief tap on the top SNOOZE/LIGHT button when the alarm is sounding. |
| Laikas / data neteisingi. | Neteisingai nustatyta arba buvo išimtos baterijos. | Refer to Section 5.2 Initial Time and Date Setting to re-set. |
9. Specifikacijos
| Funkcija | Detalė |
|---|---|
| Modelio numeris | 5293 JK |
| Prekės ženklas | DOOMAY |
| Matmenys (I x P x A) | 10.9 x 3.81 x 6.9 cm (4.29 x 1.5 x 2.72 colio) |
| Svoris | 127.01 gramai (0.28 svaro) |
| Medžiaga | Akrilnitrilo butadieno stirenas (ABS) |
| Maitinimo šaltinis | 2 x AAA baterijos (pridedamos) |
| Ekrano tipas | Skaitmeninis LCD |
| Signalizacijos garsumo lygiai | Low (70 dB), High (85 dB) |
| Snaudimo trukmė | 9 minučių |
| Foninio apšvietimo trukmė | 5 sekundžių |
| Temperatūros vienetai | Celsijaus (°C) / Farenheito (°F) |
10. Garantija ir palaikymas
DOOMAY products are designed for reliability and performance. For any questions, technical support, or warranty claims, please contact your retailer or visit the official DOOMAY website for assistance. Please retain your proof of purchase for warranty purposes.
For further information, you may visit the brand's Amazon store page: DOOMAY Store on Amazon


