1. Įvadas
Thank you for choosing the USX MOUNT TV Wall Mount. This manual provides essential information for the safe and correct installation, operation, and maintenance of your new TV wall mount. Please read these instructions thoroughly before installation and retain them for future reference.
2. Saugos informacija
ĮSPĖJIMAS: Failure to read and follow these instructions may result in serious personal injury, property damage, or voiding of your warranty. If you have any questions, please contact customer service.
- Įsitikinkite, kad tvirtinimo paviršius gali saugiai atlaikyti laikiklio ir televizoriaus bendrą svorį.
- Neviršykite maksimalios 35 kg (77 svarų) keliamosios galios.
- This product is designed for installation on wood studs or solid concrete walls only. Do not install on drywall alone.
- Visada naudokite sijų ieškiklį, kad tiksliai rastumėte medines sijas.
- Use appropriate safety gear during installation, including eye protection.
- Siekiant užtikrinti saugumą, montavimą rekomenduojama atlikti dviem žmonėms.
3. Pakuotės turinys
Verify that all components are present and undamaged before beginning installation. If any parts are missing or defective, contact customer service.
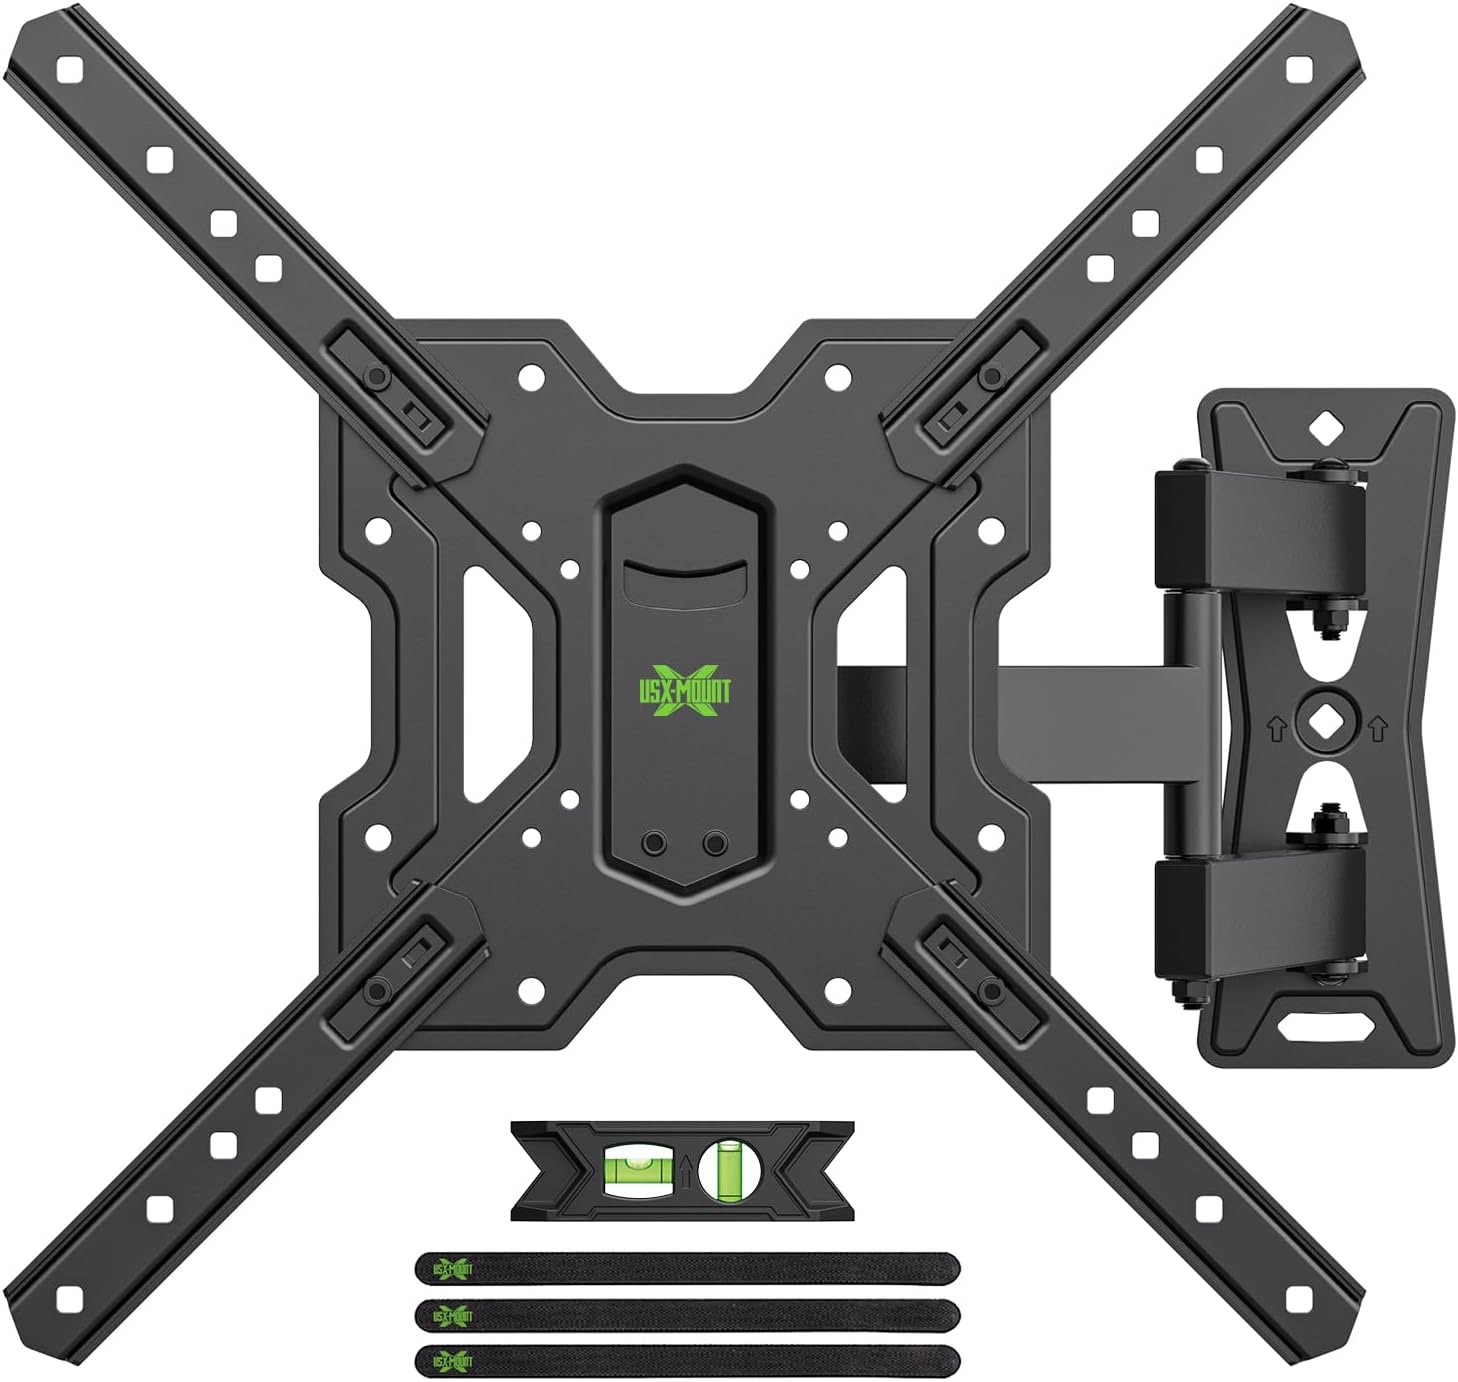
3.1 paveikslas: Baigėsiview of the USX MOUNT TV Wall Mount and all included accessories, such as the main mount assembly, VESA extension arms, bubble level, and cable ties.
Įtraukta aparatinė įranga:
- Sieninės plokštės surinkimas
- TV Plate (VESA Adapter)
- Various screws, washers, and spacers for TV attachment
- Lag bolts and concrete anchors for wall attachment
- Burbulo lygis
- Kabelių ryšiai
- „Hex Key“
4. Specifikacijos
| Funkcija | Specifikacija |
|---|---|
| Suderinami televizoriaus dydžiai | 26-55 colių |
| Didžiausia apkrova | 35 kg (77 svaro) |
| VESA suderinamumas | 75x75mm, 100x100mm, 100x200mm, 200x100mm, 200x200mm, 150x150mm, 200x300mm, 200x400mm, 300x200mm, 300x300mm, 400x200mm, 400x300mm, 400x400mm |
| Pakreipimo kampas | +5° iki -15° |
| Pasukimo kampas | ±90° (priklausomai nuo televizoriaus dydžio) |
| Lygio reguliavimas | ±4° |
| Atstumas iki sienos | nuo 70 mm (min.) iki 480 mm (maks.) |
| Medžiaga | Plienas |
| Spalva | Juoda |

4.1 paveikslas: VESA compatibility chart and maximum load capacity for the mount. Always check your TV's VESA pattern before installation.

4.2 paveikslas: Visual representation of various VESA mounting patterns supported by the mount, indicating horizontal and vertical screw hole distances.
5. Montavimo instrukcijos
Step 1: Attach TV Plate to TV
- Atsargiai padėkite televizorių ekranu žemyn ant minkšto, švaraus paviršiaus, kad nepažeistumėte ekrano.
- Nustatykite VESA tvirtinimo angas televizoriaus gale.
- Iš pateikto tvirtinimo detalių rinkinio pasirinkite tinkamus varžtus, poveržles ir tarpiklius, kurie tinka jūsų televizoriaus tvirtinimo angoms.
- Attach the TV plate (VESA adapter) to the back of your TV using the selected hardware. Ensure it is securely fastened but do not overtighten.
2 veiksmas: pritvirtinkite sieninę plokštę prie sienos
SVARBU: Determine your wall type before proceeding. This mount is suitable for wood stud walls and solid concrete walls.

5.1 paveikslas: Illustration of compatible wall types for installation: wood stud and solid concrete. Ensure your wall matches one of these types.
Medinėms sijų sienoms:
- Use a stud finder to locate the edges and center of the wood stud. Mark the center of the stud.
- Position the wall plate at your desired height and use the integrated bubble level to ensure it is perfectly horizontal. Mark the pilot hole locations.
- Drill pilot holes into the center of the stud at the marked locations. The drill bit size should be 5/32" (4 mm) and the depth approximately 2.36" (60 mm).
- Attach the wall plate to the wall using the provided lag bolts. Tighten securely with a wrench.
For Solid Concrete Walls:
- Position the wall plate at your desired height and use the integrated bubble level to ensure it is perfectly horizontal. Mark the pilot hole locations.
- Drill pilot holes into the concrete at the marked locations. The drill bit size should be 3/8" (10 mm) and the depth approximately 2.36" (60 mm).
- Insert the concrete anchors into the drilled holes. Tap them gently with a hammer until they are flush with the wall surface.
- Attach the wall plate to the wall using the provided lag bolts. Tighten securely with a wrench.
Step 3: Hang and Secure TV to Wall Plate
- With assistance, carefully lift the TV (with the TV plate attached) and hook it onto the wall plate.
- Ensure the TV is properly seated and centered on the wall plate.
- Pritvirtinkite televizorių prie sieninės plokštės naudodami pateiktus apsauginius varžtus arba fiksavimo mechanizmus. Tai apsaugo nuo atsitiktinio iškritimo.
„5.1“ vaizdo įrašas: A short demonstration of the installation process, including attaching the TV plate, mounting the wall plate, and hanging the TV. This video also briefly shows the leveling and tilting adjustments.
6. Naudojimo instrukcijos (reguliavimas)
Your USX MOUNT TV Wall Mount offers various adjustments for optimal viewing.
Pakreipimo reguliavimas:
The mount allows for a tilt range of +5° to -15°. To adjust the tilt:
- Locate the tilt adjustment knobs on the TV plate.
- Loosen the knobs to allow the TV to tilt freely.
- Adjust the TV to your desired vertical angle.
- Tighten the knobs to secure the TV in place.
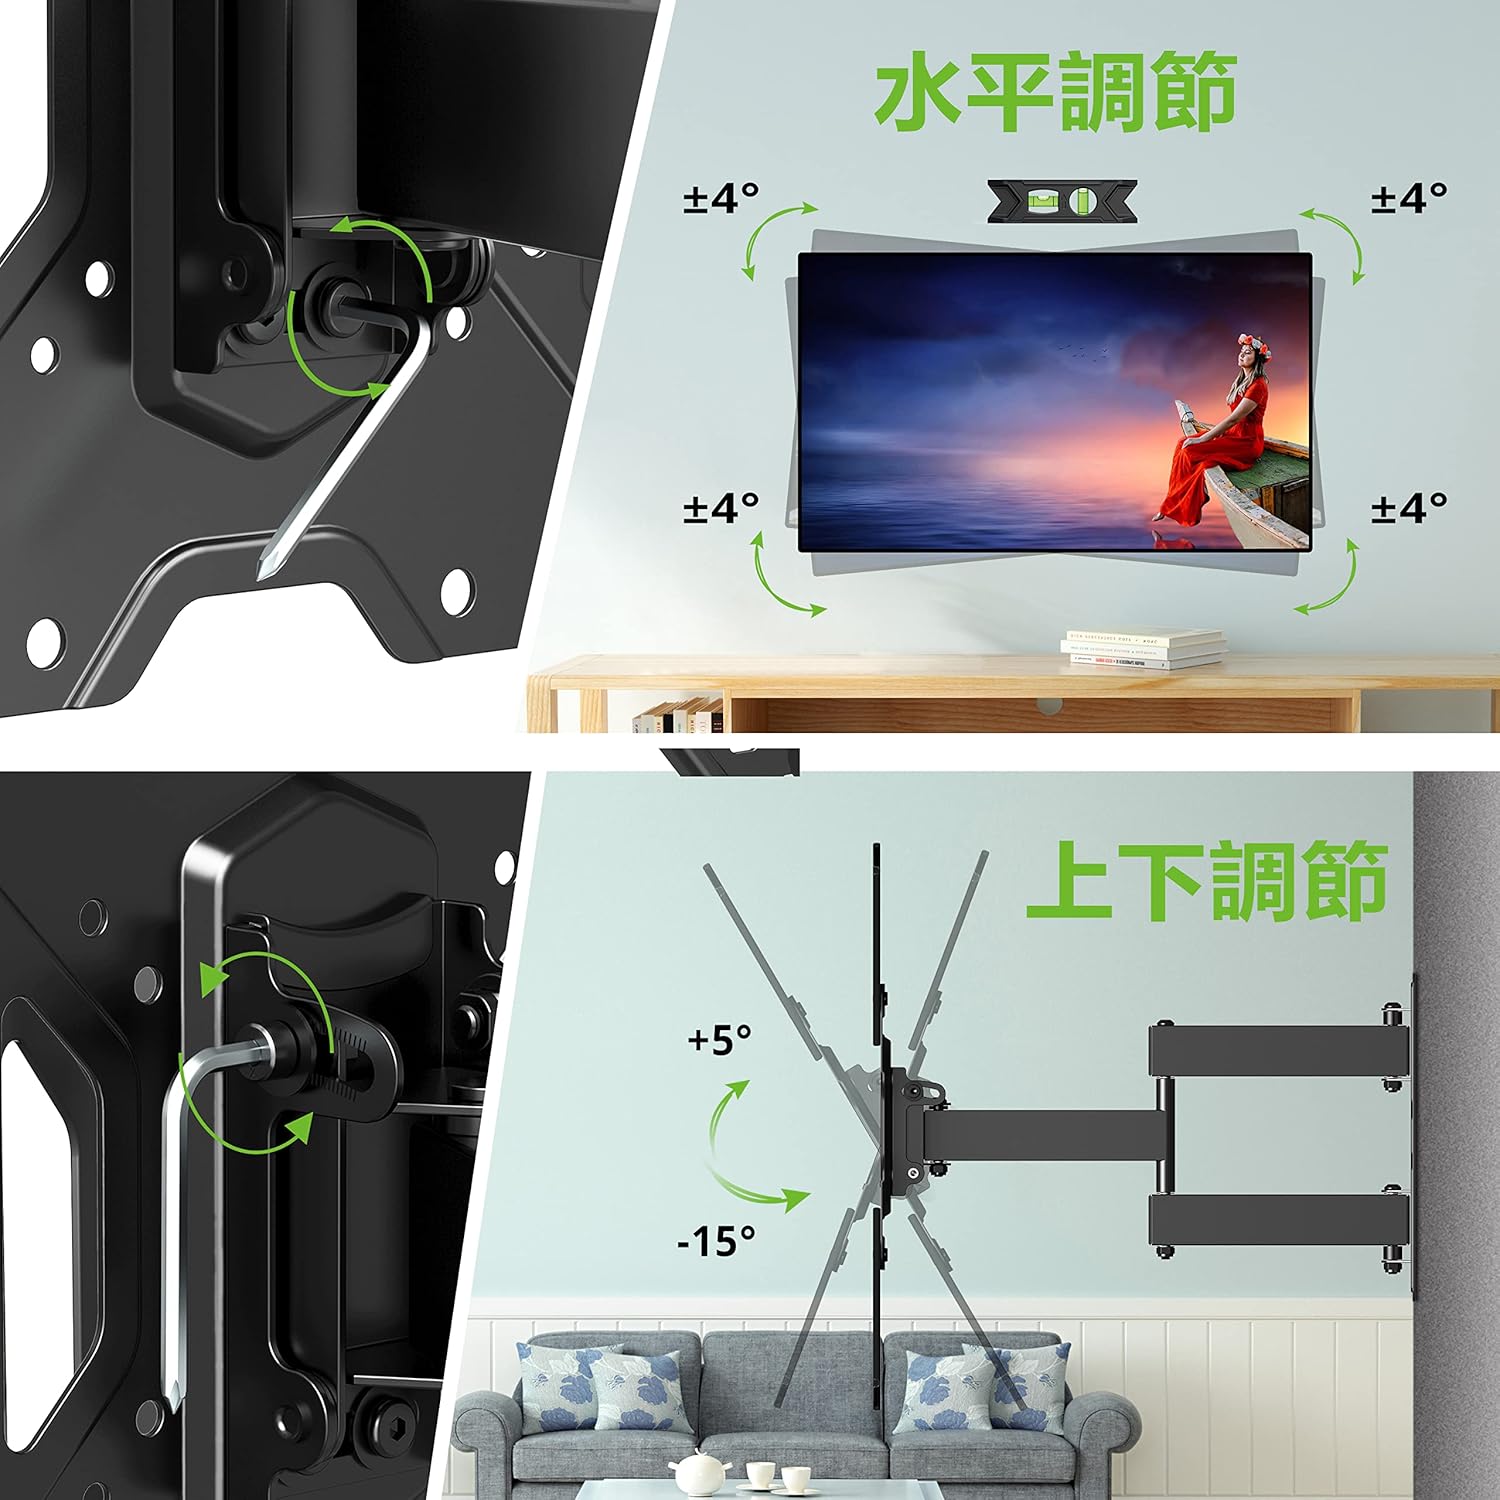
6.1 paveikslas: Visual guide for adjusting the horizontal level and vertical tilt of the TV. The top panel shows ±4° leveling, and the bottom panel shows +5° to -15° tilt.

6.2 paveikslas: This image illustrates the adjustable distance from the wall (70mm to 426mm) and the tilt angles (+5° backward, -15° forward) of the TV mount.
Sukimosi reguliavimas:
The mount allows for a swivel of up to ±90° (left/right), depending on the size of your TV. To adjust the swivel:
- Gently push or pull the TV to the desired left or right angle.
- The friction joints will hold the TV in position.

6.3 paveikslas: This diagram demonstrates the ±90° swivel capability of the TV mount, allowing for flexible viewkampai iš įvairių kambario pozicijų.
Lygio reguliavimas:
The mount allows for a level adjustment of ±4° after installation. To adjust the level:
- Use the provided hex key to loosen the leveling screws on the TV plate.
- Adjust the TV until it is perfectly level using the bubble level.
- Tighten the leveling screws to secure the TV in the desired horizontal position.
7. Priežiūra
- Periodiškai patikrinkite visus varžtus ir veržles, kad jie būtų tvirtai priveržti. Jei reikia, priveržkite.
- Laikiklį valykite minkštu, sausu skudurėliu. Venkite abrazyvinių valiklių ar tirpiklių.
- Ensure cables are managed neatly using the provided cable ties to prevent strain or damage.
8. Problemų sprendimas
If you encounter any issues during or after installation, please refer to the following common solutions:
- Televizorius nelygus: Use the level adjustment feature as described in Section 6.
- Laikiklis jaučiasi laisvas: Recheck all wall and TV attachment points and tighten any loose fasteners. Ensure the wall type is appropriate for installation.
- Sunku reguliuoti pakreipimą / pasukimą: Ensure all adjustment knobs/screws are sufficiently loosened before attempting to move the TV.
If the problem persists, contact USX MOUNT customer support.
9. Garantija ir palaikymas
USX MOUNT provides a 10-year quality guarantee from the date of purchase. This warranty covers manufacturing defects and ensures the product's structural integrity under normal use.
For any questions, missing parts, or support needs, please contact USX MOUNT customer service. Our team is dedicated to providing assistance and ensuring your satisfaction.
Kontaktinė informacija: Please refer to the contact details provided with your purchase or visit the official USX MOUNT websvetainę.


