1. Įvadas
This manual provides detailed instructions for the setup, operation, and maintenance of your KECAG 10.1 Inch Digital Picture Frame. Please read this manual thoroughly before using the device to ensure proper functionality and to maximize your user experience. Keep this manual for future reference.
2. Produktas baigtasview
2.1 Pagrindinės savybės
- 10.1 Inch 1080P HD IPS Screen: Features a 1920x1080 resolution with a 180° wide-angle IPS display for clear viewiš įvairių kampų.
- Multimedijos atkūrimas: Supports photo slideshows, video playback, and music playback.
- Judesio jutiklis: Automatically turns the frame on/off based on detected movement to conserve energy.
- Timing On/Off Function: Allows scheduled power on and off times.
- Universalus medijos palaikymas: Compatible with SD cards and USB flash drives.
- Patogi vartotojo sąsaja: Simple main menu for easy navigation.
- Nuotolinio valdymo pultas: Užtikrina patogų valdymą per atstumą.
- Papildomos funkcijos: Includes calendar and alarm features.
2.2 Pakuotės turinys
- KECAG 10.1 Inch Digital Picture Frame
- 32 GB USB atmintinė
- Nuotolinio valdymo pultas
- Maitinimo adapteris
- Vartotojo vadovas

2.2.1 paveikslas: The KECAG 10.1 Inch Digital Picture Frame displaying a family photo, accompanied by its remote control.
3. Sąranka
3.1 Maitinimo jungtis
- Locate the power adapter included in the package.
- Connect the small end of the power adapter cable to the DC IN port on the back of the digital picture frame.
- Kitą maitinimo adapterio galą prijunkite prie standartinio elektros lizdo.
- The frame will automatically power on or enter standby mode.
3.2 Inserting Media (USB Drive or SD Card)
The digital picture frame supports both USB flash drives and SD cards for media playback.
- Identify the USB port and SD card slot on the side or back of the frame.
- For a USB drive: Carefully insert the USB flash drive into the USB port.
- For an SD card: Insert the SD card into the SD card slot with the metal contacts facing down, until it clicks into place.
- Ensure the media is inserted correctly to avoid damage.

3.2.1 paveikslas: Illustrated steps for connecting media (USB/SD card) and power to the digital picture frame.
3.3 Initial Power On and Language Settings
- Once powered on, the frame may display a language selection screen.
- Use the remote control's navigation buttons (Up/Down/Left/Right) to select your preferred language.
- Paspauskite ENTER mygtuką, kad patvirtintumėte savo pasirinkimą.
4. Naudojimo instrukcijos
4.1 Nuotolinio valdymo pulto funkcijos
The remote control allows for convenient navigation and setting adjustments. Ensure the remote is aligned with the infrared sensor on the frame during use.
- MENIU: Access the main menu or return to the previous menu.
- NUOTRAUKA: Directly enter photo playback mode.
- MUZIKA: Directly enter music playback mode.
- FILMAS: Directly enter video playback mode.
- UŽDARYTI: Exit current function or menu.
- Įveskite: Confirm selection or play/pause media.
- NUSTATYMAS: Pasiekite sistemos nustatymus.
- Naršymo mygtukai (aukštyn / žemyn / kairėn / dešinėn): Naršykite meniu ir parinktis.
- VOL+/VOL-: Adjust volume during video or music playback.
4.2 Naršymas pagrindiniame meniu
From the main menu, you can select different functions:
- Paveikslėlis: View photos in a slideshow.
- Muzika: Leisti garsą files.
- Kalendorius: Display calendar and set alarms.
- Nustatymai: Configure device preferences.

4.2.1 paveikslas: The digital picture frame's interface showing options for Calendar, Photo/Video, and Music playback.
4.3 Nuotraukų atkūrimas
- Pagrindiniame meniu pasirinkite Paveikslėlis arba paspauskite FOTO nuotolinio valdymo pulto mygtuką.
- The frame will automatically start a slideshow of photos found on the inserted media.
- Atkūrimo tvarka: In settings, you can choose between Shuffle, Sequential, or Repeat All.
- Perėjimo efektai: Select from various effects like Up/Down, Mosaic, Left/Right, or Random.
- Vaizdas Preview: Access a thumbnail view of your photos.
- Vaizdo pasukimas: Adjust the orientation of images (vertical/horizontal).
- Ekrano ryškumas: Adjust the display brightness in the settings menu.
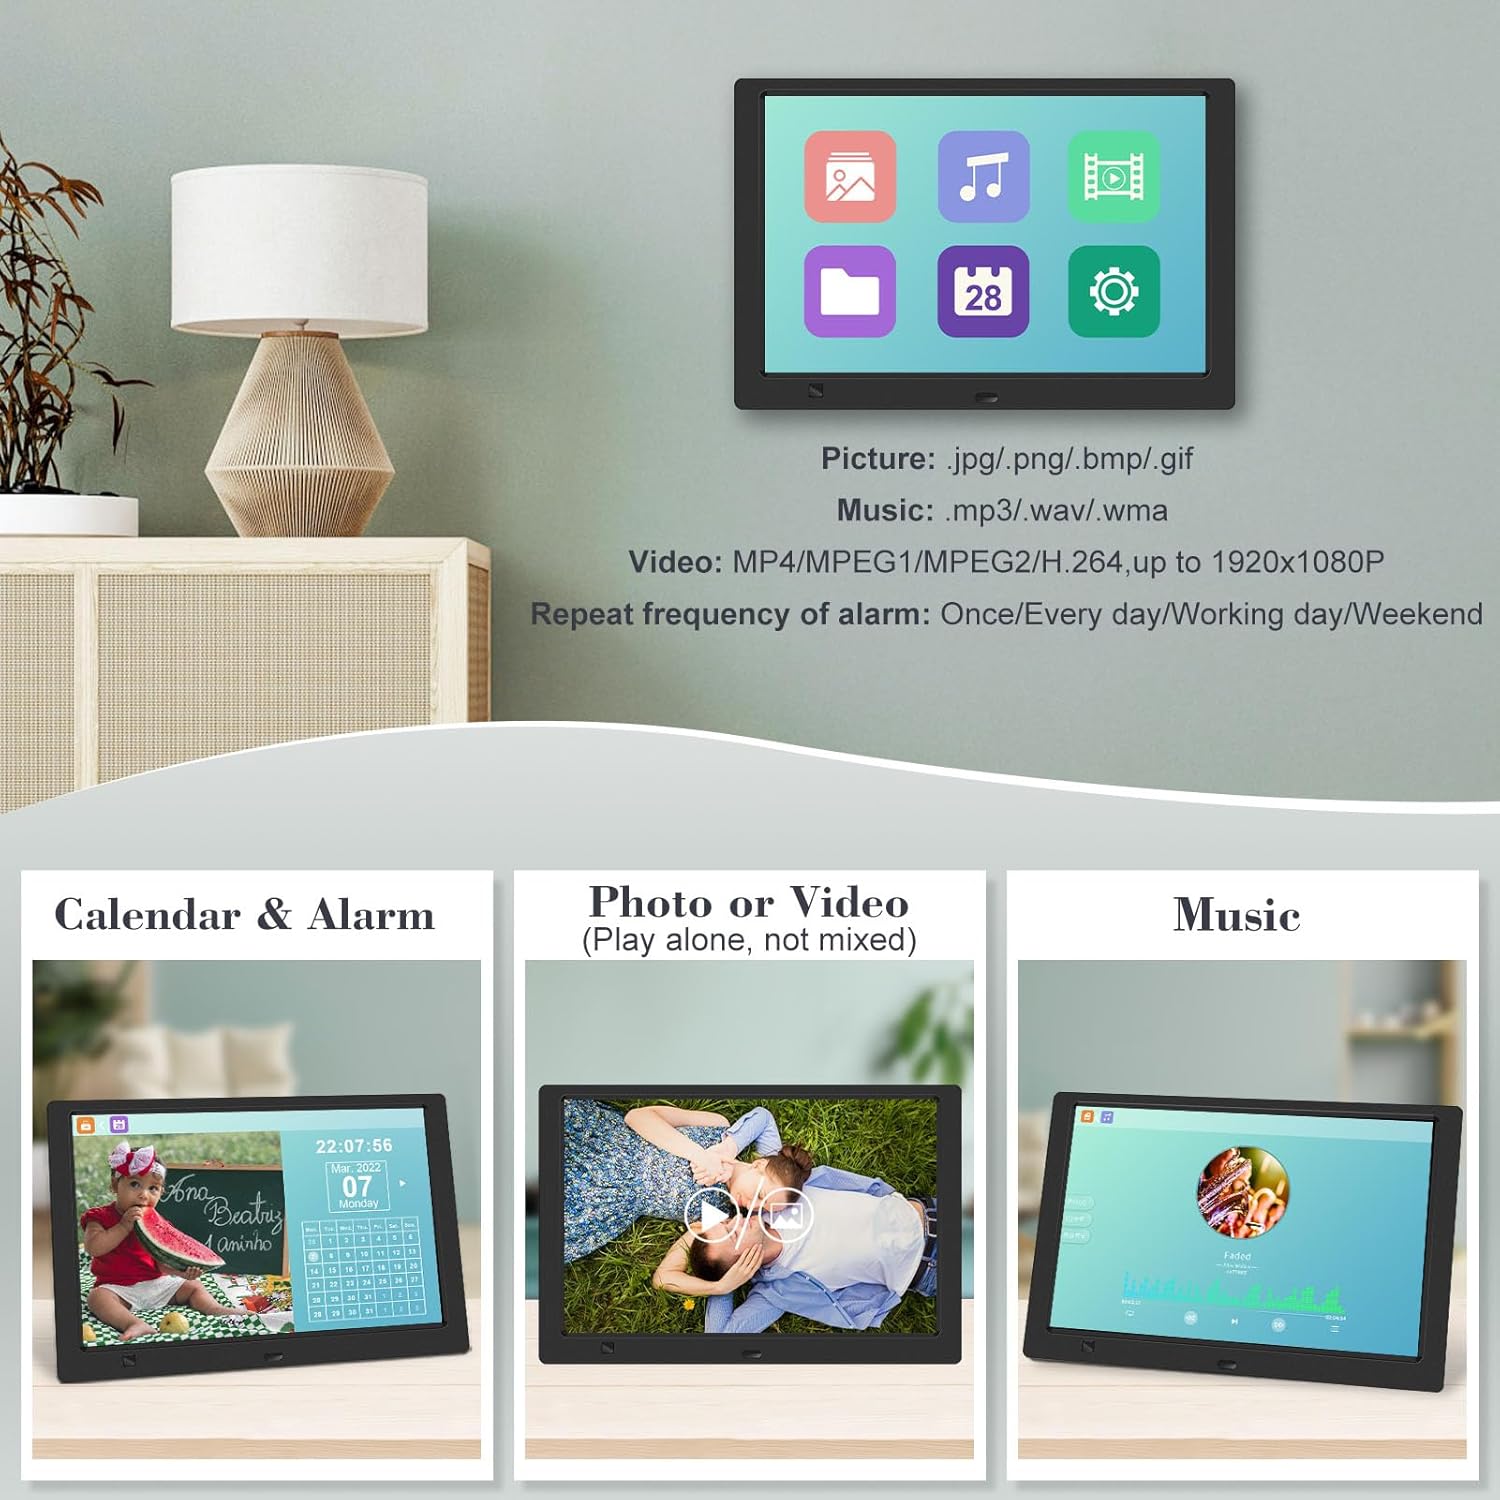
4.3.1 paveikslas: The digital picture frame displaying a photo slideshow with background music and various image transition options.

4.3.2 paveikslas: Visual representation of slideshow and image preview options, including settings for playback order, display scale, picture rotation, time window, and screen brightness adjustment.
4.4 Video and Music Playback
- Pagrindiniame meniu pasirinkite Filmas or Muzika, or use the corresponding buttons on the remote.
- Eikite į norimą file using the remote control and press ENTER žaisti.
- Supported video formats: MP4/MPEG1/MPEG2/H.264 up to 1920x1080.
- Supported music formats: MP3/WAV/WMA.
4.5 Judesio jutiklio funkcija
The motion sensor helps save energy by automatically turning the frame on or off.
- To enable/disable the motion sensor, go to the Nustatymai meniu.
- Select the motion sensor option and toggle it On or Off.
- When enabled, the frame will power on when movement is detected and turn off after a period of inactivity.
4.6 Timing On/Off Function
Set specific times for the frame to automatically power on and off.
- Prisijunkite prie Nustatymai meniu.
- Locate the Timing On/Off function.
- Set your desired power-on time and power-off time. You can also configure this for specific days (e.g., weekdays, weekends, every day).

4.6.1 paveikslas: Demonstrates the smart motion sensor turning on the frame when movement is detected and the timing on/off function for scheduled operation.
5. Priežiūra
5.1 Ekrano valymas
Norėdami išvalyti ekraną, švelniai nuvalykite jį minkštu, sausu, nepūkuotu skudurėliu. Jei dėmės sunkiai pašalinamos, šiek tiek nuvalykiteampNuvalykite šluostę vandeniu arba ekranui saugiu valymo tirpalu. Venkite naudoti stiprias chemines medžiagas ar abrazyvines medžiagas.
5.2 Bendroji priežiūra
- Keep the frame away from direct sunlight, heat sources, and excessive moisture.
- Saugokitės, kad prietaisas nenukristų ir nepatirtų stipraus smūgio.
- Do not attempt to disassemble the frame; this will void the warranty.
- Užtikrinkite tinkamą vėdinimą aplink įrenginį.
6. Problemų sprendimas
If you encounter issues with your digital picture frame, please refer to the following common problems and solutions:
| Problema | Galima priežastis | Sprendimas |
|---|---|---|
| Rėmelis neįsijungia. | Neprijungtas maitinimo adapteris arba sugedęs lizdas. | Ensure the power adapter is securely connected to the frame and a working electrical outlet. Try a different outlet. |
| No photos/videos/music displayed. | No media inserted, media not recognized, or unsupported file formatu. | Ensure a USB drive or SD card is properly inserted. Check if files are in supported formats (JPG/PNG/BMP/GIF for photos; MP4/MPEG1/MPEG2/H.264 for video; MP3/WAV/WMA for music). Try reformatting the media (backup data first). |
| Nuotolinio valdymo pultas neveikia. | Battery depleted, remote not aimed correctly, or sensor obstructed. | Replace the remote control battery. Ensure the remote is pointed directly at the frame's infrared sensor. Remove any obstructions between the remote and the frame. |
| Ekranas tuščias arba užstrigo. | Laikinas programinės įrangos triktis. | Unplug the power adapter, wait 10 seconds, then plug it back in to restart the frame. |
7. Specifikacijos
| Funkcija | Specifikacija |
|---|---|
| Ekrano dydis | 10.1 colių |
| Rezoliucija | 1920 x 1080 (1080p HD IPS) |
| Krašto santykis | 16:9 |
| Viewing kampas | 180° |
| Suderinami įrenginiai | SD kortelė, USB atmintinė |
| Palaikomi nuotraukų formatai | JPG, PNG, BMP, GIF |
| Palaikomi vaizdo formatai | MP4, MPEG1, MPEG2, H.264 (up to 1920x1080) |
| Palaikomi muzikos formatai | MP3, WAV, WMA |
| Judesio jutiklis | Taip |
| Prekės modelio numeris | KECAG-CA-001 |
| Gaminio matmenys | 6.4 x 9.7 x 0.99 colio |
| Prekės svoris | 1.59 svaro |
| Baterijos (nuotolinio valdymo pultui) | 1 ličio metalo baterija (pridedama) |
| Gamintojas | KECAG |
8. Garantija ir palaikymas
For warranty information, please refer to the documentation included with your product packaging. KECAG provides 24-hour customer service to assist with any issues or questions you may have regarding your digital picture frame. Please contact customer support for assistance.


