1. Įvadas
The THIRDREALITY ZigBee Smart Button offers a convenient and versatile way to control your smart home devices. This wireless and compact button integrates seamlessly with various ZigBee hubs, allowing for personalized automation of lights, fans, humidifiers, and other connected devices. With multiple control settings (single press, double press, and held), you can trigger different scenarios to simplify your daily routines.
This manual provides detailed instructions for setting up, operating, and maintaining your Smart Button to ensure optimal performance and integration within your smart home ecosystem.
2. Kas yra dėžutėje
Your THIRDREALITY ZigBee Smart Button 3 Pack includes the following items:
- 3 x THIRDREALITY ZigBee Smart Buttons (Red, Blue, Yellow)
- Dvipusė lipni juosta tvirtinimui
- Magnetic strips for mounting
- Vartotojo vadovas

Image: The three colored Smart Buttons, demonstrating their wireless design and flexible installation options.
3. Sąranka
The THIRDREALITY ZigBee Smart Button requires a compatible ZigBee hub (sold separately) for functionality. Supported hubs include SmartThings, Aeotec, Hubitat, Third Reality Smart Hub, and Home Assistant. For Apple HomeKit integration, the Smart Bridge MZ1 (sold separately) is required.
3.1. Pairing with a ZigBee Hub
- Ensure your ZigBee hub is powered on and in pairing mode. Refer to your hub's specific instructions for enabling pairing mode.
- On the Smart Button, press and hold the button for 5 seconds until the LED indicator blinks.
- The button will attempt to connect to the nearest ZigBee hub. Once successfully paired, the LED will stop blinking.
- Open your smart home app (e.g., SmartThings, Hubitat, Homey) and confirm that the Smart Button is detected and listed as a new device.
- You can now configure the button's actions within your smart home app.
3.2. Connecting to Specific Hubs (Video Guides)
How to connect Smart Button to Homey
Video: A step-by-step guide demonstrating the process of connecting the THIRDREALITY Smart Button to a Homey smart home hub.
How to connect Smart Button to SmartThings
Video: A tutorial showing how to successfully connect the THIRDREALITY Smart Button to a SmartThings hub for smart home control.
How to connect Smart Button to Hubitat
Video: Instructions on pairing the THIRDREALITY Smart Button with a Hubitat smart home system.
How to connect Smart Button to Alexa
Video: A guide demonstrating how to connect the THIRDREALITY Smart Button for control via Amazon Alexa.
4. Operating the Smart Button
The Smart Button offers three distinct control settings, allowing for flexible automation of your smart home devices or groups. These actions are configured within your connected ZigBee hub's application.
- Pressed (Single Press): A quick press and release of the button. Ideal for simple on/off functions, like turning on a light.
- Double Pressed: Two quick presses in succession. Can be used for a secondary action, such as turning on a fan or humidifier.
- Held (Long Press): Press and hold the button for a few seconds. Suitable for triggering more complex scenes, like turning off all lights before sleeping.
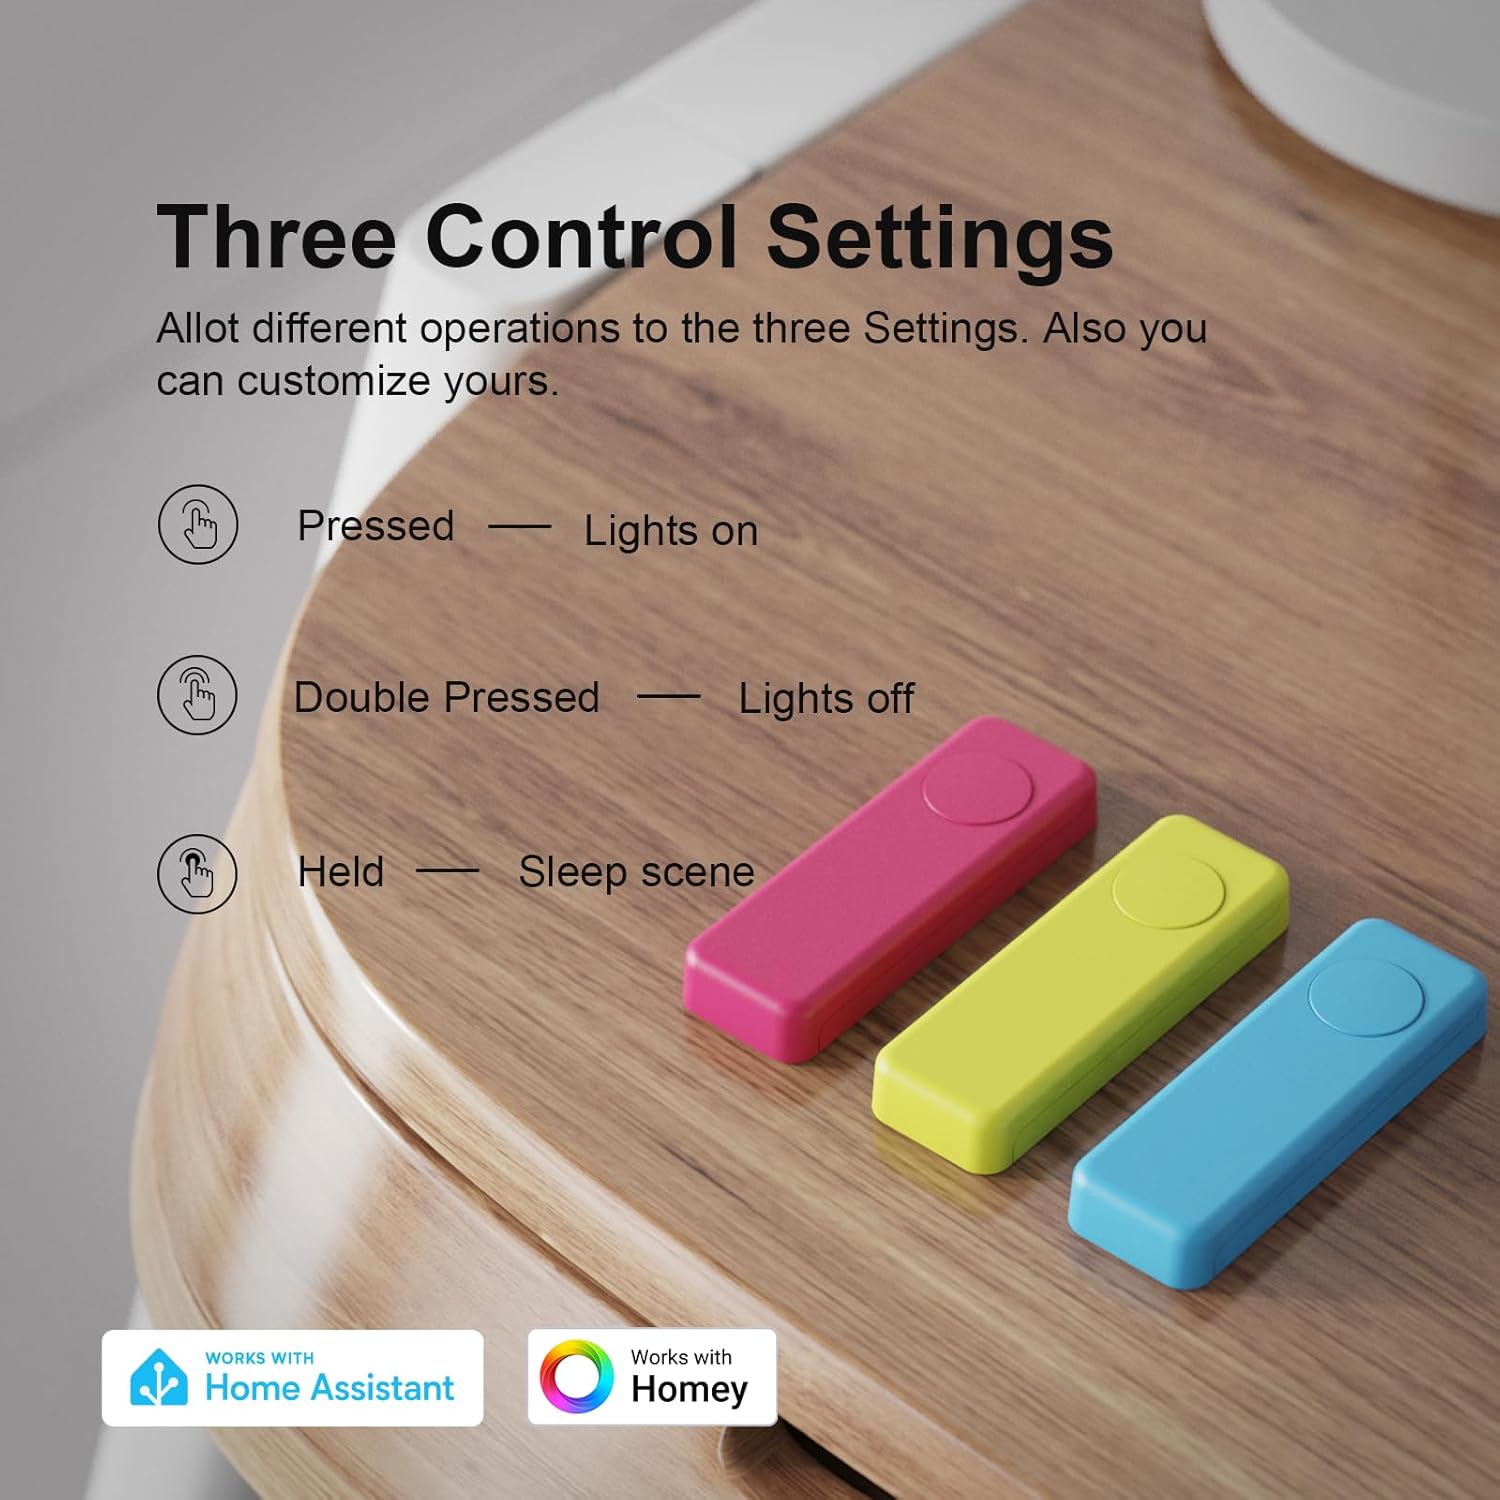
Image: Visual representation of the three programmable control settings for the Smart Button.
THIRDREALITY Wireless Smart Button, Easy to use.
Video: A demonstration of the ease of use and versatility of the THIRDREALITY Wireless Smart Button in a smart home environment.
5. Montavimo parinktys
The compact and wireless design of the Smart Button allows for flexible placement anywhere in your home. Two primary mounting options are provided:
- Dvipusė juosta: Use the included double-sided tape to stick the Smart Button to any flat surface, such as a wall, cabinet, or desk.
- Magnetic Strips: Attach the magnetic strips to the back of the button to allow it to adhere to metallic surfaces, like a refrigerator or a magnetic board.
Choose the mounting method that best suits your desired location and accessibility needs.

Image: Easy installation options for the Smart Button, highlighting its wireless nature and magnetic/adhesive mounting capabilities.
6. Informacija apie akumuliatorių
The THIRDREALITY ZigBee Smart Button is powered by 2 AAA batteries (included). It features low power consumption, designed to last approximately 3 years under normal usage conditions.
6.1. Baterijos keitimas
When the battery level is low, your smart home app may send a notification. To replace the batteries:
- Gently open the back cover of the Smart Button.
- Išimkite senas AAA baterijas.
- Įdėkite dvi naujas AAA šarmines baterijas, užtikrindami teisingą poliškumą (+/-).
- Saugiai uždarykite galinį dangtelį.

Image: Key specifications of the Smart Button, including its 3-year battery life with AAA batteries.
7. Suderinamumas
The THIRDREALITY ZigBee Smart Button is built on the ZigBee 3.0 standard, ensuring broad compatibility and stable performance with a variety of smart home ecosystems.
- Reikalinga: A ZigBee hub (sold separately).
- Suderinami šakotuvai: SmartThings, Aeotec, Hubitat, Third Reality Smart Hub, Home Assistant.
- Apple HomeKit: Compatible via Smart Bridge MZ1 (sold separately).
- OTA atnaujinimai: Supports Over-The-Air (OTA) software updates for continuous improvement.

Image: The Smart Button's compatibility with multiple smart home platforms through the Smart Bridge MZ1.
8. Specifikacijos
| Funkcija | Detalė |
|---|---|
| Prekės ženklas | TREČIOJI DALIS |
| Modelio numeris | ZigBee Smart Button |
| Maitinimo šaltinis | Maitinamas baterijomis |
| Reikalingos baterijos | Yes (2 AAA batteries) |
| Baterijos elemento tipas | Šarminis |
| Prekės svoris | 4.3 uncijos |
| Pakuotės matmenys | 4.25 x 3.78 x 1.26 colio |
| Medžiaga | Plastikiniai |
| Spalva | Raudona/mėlyna/geltona |
| Ryšio protokolas | ZigBee 3.0 |
| Temperatūros diapazonas | 0–45 laipsnių Celsijaus |
9. Problemų sprendimas
- Mygtukas nereaguoja:
- Check battery level in your smart home app. Replace batteries if low.
- Ensure the Smart Button is within range of your ZigBee hub.
- Verify the hub is online and functioning correctly.
- Attempt to re-pair the button with your ZigBee hub.
- Poravimo sudėtingumas:
- Confirm your ZigBee hub is in pairing mode.
- Ensure the button is close to the hub during the pairing process.
- Remove any potential interference sources (e.g., Wi-Fi routers, other ZigBee devices) temporarily.
- Reset the Smart Button (refer to hub-specific instructions or product documentation for reset procedure, usually involves holding the button for an extended period).
- Actions not triggering correctly:
- Review the automation rules or scenes configured in your smart home app.
- Ensure the target devices (lights, fans, etc.) are online and responsive.
- Check for any firmware updates for both the Smart Button and your ZigBee hub.
10. Garantija ir palaikymas
For warranty information, technical support, or further assistance with your THIRDREALITY ZigBee Smart Button, please refer to the official THIRDREALITY websvetainėje arba susisiekite tiesiogiai su jų klientų aptarnavimo tarnyba. Išsaugokite pirkimo kvitą garantiniams reikalavimams.
Gamintojo pagalbos puslapiuose taip pat gali būti internetinių išteklių ir DUK.


