Įvadas
This manual provides instructions for the proper use and maintenance of your Alecto AK-20 Alarm Clock with Thermometer. Please read these instructions carefully before operating the device and retain them for future reference. The AK-20 is designed to display time, date, day, and indoor temperature, featuring multiple alarms, a snooze function, and radio-controlled time synchronization.
Saugos informacija
- Nelaikykite prietaiso ekstremaliose temperatūrose, tiesioginiuose saulės spinduliuose ar didelėje drėgmėje.
- Saugokitės, kad prietaisas nenukristų ir nepatirtų stipraus smūgio.
- Nebandykite patys ardyti ar remontuoti įrenginio. Visus techninės priežiūros darbus patikėkite kvalifikuotiems specialistams.
- Naudotas baterijas išmeskite atsakingai pagal vietines taisykles.
Pakuotės turinys
Išpakuodami įsitikinkite, kad visi daiktai yra supakuoti ir geros būklės:
- Alecto AK-20 Alarm Clock
- User Manual (NL/EN/DE/FR)
Produktas baigtasview
The Alecto AK-20 features a clear digital display and intuitive controls for easy operation.

1 pav.: priekis view of the Alecto AK-20 Alarm Clock, showing the large digital display with time, date, day, and temperature, along with control buttons at the bottom.

2 pav.: Kampinis view of the Alecto AK-20, highlighting the main display and the alarm ON/OFF switches on the right side.
Controls and Display Elements:
- Didelis skaitmeninis ekranas: Shows time (AM/PM indicator), date, day of the week, and indoor temperature.
- LAIKO NUSTATYMO mygtukas: Naudojamas laiko nustatymo režimui įjungti.
- - / + Mygtukai: Used to adjust values (decrease/increase).
- ALARM SET mygtukas: Naudojamas norint įjungti žadintuvo nustatymo režimą.
- ALARM 1-4 ON/OFF Switches: Located on the side for individual alarm activation.
- SNOOZE / LIGHT mygtukas: Located on top, activates backlight and snooze function.
- AUTO LIGHT Switch: Located on the back, controls automatic backlight.
- Perkrovimo mygtukas: Located on the back, for factory reset.

3 pav.: Dešinė pusė view of the alarm clock, showing the physical ON/OFF switches for Alarm 3 and Alarm 4.

4 pav.: Nugara view of the alarm clock, showing the battery compartment, RESET button, and AUTO LIGHT switch.
Sąranka
1. Akumuliatoriaus įdėjimas
- Locate the battery compartment on the back of the alarm clock (refer to Figure 4).
- Atidarykite akumuliatoriaus skyriaus dangtelį.
- Įdėkite dvi AA tipo baterijas, užtikrindami teisingą poliškumą (+ ir -).
- Saugiai uždarykite akumuliatoriaus skyriaus dangtelį.
The display will light up, and the clock will begin searching for the DCF radio signal for automatic time synchronization.
2. Pradinis laiko ir datos sinchronizavimas (DCF)
The AK-20 is a radio-controlled clock. Upon battery installation, it will automatically attempt to synchronize with the DCF signal. This process may take several minutes. A signal icon on the display indicates successful reception.
- Place the clock near a window for better signal reception.
- Venkite laikyti šalia elektroninių prietaisų, kurie gali sukelti trikdžius.
3. Manual Time and Date Setting (Optional)
If DCF synchronization is not desired or unsuccessful, you can set the time and date manually:
- Paspauskite ir palaikykite LAIKO NUSTATYMAS mygtuką, kol pradės mirksėti valandų skaitmenys.
- Naudokite - or + mygtukai valandoms reguliuoti.
- Paspauskite LAIKO NUSTATYMAS dar kartą, kad patvirtintumėte valandas ir pereitumėte prie minučių.
- Pakartokite procesą su minutėmis, metais, mėnesiu ir diena.
- Paspauskite LAIKO NUSTATYMAS paskutinį kartą, kad išeitumėte iš nustatymų režimo.
4. Kalbos pasirinkimas
The device supports multiple languages for day display. To change the language:
- Įprasto laiko rodymo režime paspauskite - mygtuką pakartotinai.
- The day of the week will cycle through available languages (Dutch, French, German, English, Spanish, Italian, Danish, Russian).
- Stop when your desired language is displayed.
Naudojimo instrukcijos
1. Signalų nustatymas
The AK-20 allows setting up to four independent alarms.
- Paspauskite ir palaikykite ALARM SET button until the alarm time (e.g., ALARM-1) starts flashing.
- Naudokite - or + mygtukus, kad nustatytumėte norimą žadintuvo valandą.
- Paspauskite ALARM SET dar kartą, kad patvirtintumėte valandas ir pereitumėte prie minučių.
- Naudokite - or + mygtukus, kad nustatytumėte norimas žadintuvo minutes.
- Paspauskite ALARM SET to confirm and move to the next alarm (ALARM-2, ALARM-3, ALARM-4).
- Repeat steps 2-4 for each alarm you wish to set.
- After setting all desired alarms, press ALARM SET , kad išeitumėte iš žadintuvo nustatymo režimo.
2. Signalizacijos įjungimas / išjungimas
Each alarm has a dedicated ON/OFF switch on the side of the unit (refer to Figure 3).
- Slide the corresponding switch to ON to activate an alarm. An alarm icon will appear on the display.
- Pastumkite jungiklį į IŠJUNGTA to deactivate an alarm. The alarm icon will disappear.
3. Snaudimo funkcija
Kai suskamba žadintuvas, paspauskite SNOŽAS / ŠVIESA button on top of the clock. The alarm will temporarily stop and sound again after a few minutes (typically 5-10 minutes, depending on the model's default setting).
4. Foninio apšvietimo funkcija
The display features a backlight for visibility in low-light conditions.
- Rankinis foninis apšvietimas: Trumpai paspauskite SNOŽAS / ŠVIESA button to activate the backlight for a few seconds.
- Automatinis foninis apšvietimas: On the back of the unit, slide the AUTOMATINIS ŠVIETIMAS pereiti prie ON. The backlight will automatically illuminate in dark environments. Slide to IŠJUNGTA , kad išjungtumėte šią funkciją.
5. Temperatūros ekranas
The integrated thermometer displays the indoor temperature.
- Norėdami perjungti tarp Celsijaus (°C) ir Farenheito (°F), paspauskite + mygtuką, kai rodomas įprastas laiko režimas.
Priežiūra
- Prietaisą valykite minkštu, sausu skudurėliu. Nenaudokite abrazyvinių valiklių ar tirpiklių.
- Jei prietaisas nebus naudojamas ilgesnį laiką, išimkite baterijas, kad išvengtumėte pratekėjimo.
Trikčių šalinimas
| Problema | Galima priežastis | Sprendimas |
|---|---|---|
| Ekranas tuščias arba blankus. | Baterijos išsikrovė arba įdėtos neteisingai. | Pakeiskite baterijas naujomis AA baterijomis, užtikrindami teisingą poliškumą. |
| Laikas neteisingas. | DCF signal not received or manual time not set. | Ensure the clock is in an area with good signal reception. Manually set the time if necessary. |
| Signalizacija neskamba. | Signalizacija neįjungta arba nustatyta neteisingai. | Check the alarm ON/OFF switch on the side. Verify alarm time settings. |
| Neveikia foninis apšvietimas. | AUTO LIGHT switch is OFF or batteries are low. | Check the AUTO LIGHT switch on the back. Replace batteries if needed. |
Jei problema išlieka ir išbandžius šiuos sprendimus, susisiekite su klientų aptarnavimo tarnyba.
Specifikacijos
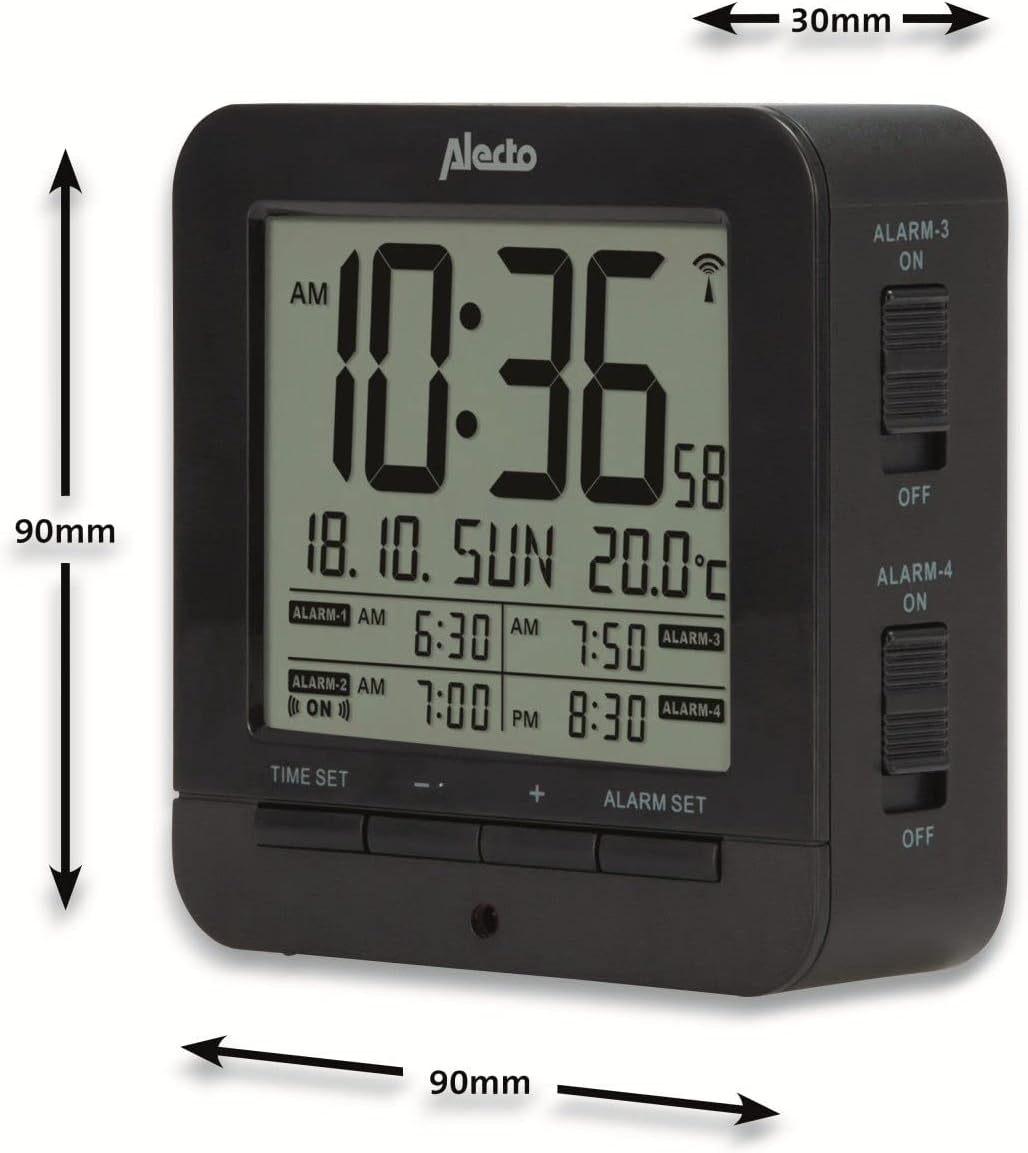
Figure 5: Alecto AK-20 Alarm Clock showing its approximate dimensions: 90mm height, 90mm width, and 30mm depth.
| Funkcija | Detalė |
|---|---|
| Modelio numeris | AK-20 (A003319) |
| Prekės ženklas | Alecto |
| Spalva | Juoda |
| Medžiaga | Akrilnitrilo butadieno stirenas (ABS) |
| Matmenys (A x P x G) | 9 x 9 x 3 cm (apytiksliai 3.54 x 3.54 x 1.18 colio) |
| Ekrano matmenys | 6.4 x 5.4 cm (apie 2.52 x 2.13 colio) |
| Svoris | 231 g (apie 0.51 svaro) |
| Maitinimo šaltinis | 2 x AA baterijos (į komplektą neįeina) |
| Ekrano tipas | Skaitmeninis |
| Ypatingos savybės | Temperature Display, 4 Alarms, Snooze Function, Backlight, DCF Radio Control |
| Temperatūros vienetai | °C / °F pasirenkama |
| Palaikomos kalbos | Dutch, French, German, English, Spanish, Italian, Danish, Russian |
Garantija ir palaikymas
Alecto products are manufactured to high quality standards. For information regarding warranty terms and conditions, please refer to the documentation provided with your purchase or visit the official Alecto website. For technical support or service inquiries, please contact your retailer or the Alecto customer service department.


