1. Įvadas
This manual provides detailed instructions for the installation, operation, and maintenance of your Rosewill FBM-X2-400-HELIX Micro ATX Mini Tower PC Case. This versatile case is designed to accommodate Micro ATX and Mini ITX motherboards, offering a compact yet spacious solution for both office and gaming PC builds. It comes equipped with a pre-installed 400W power supply unit and features excellent airflow design.
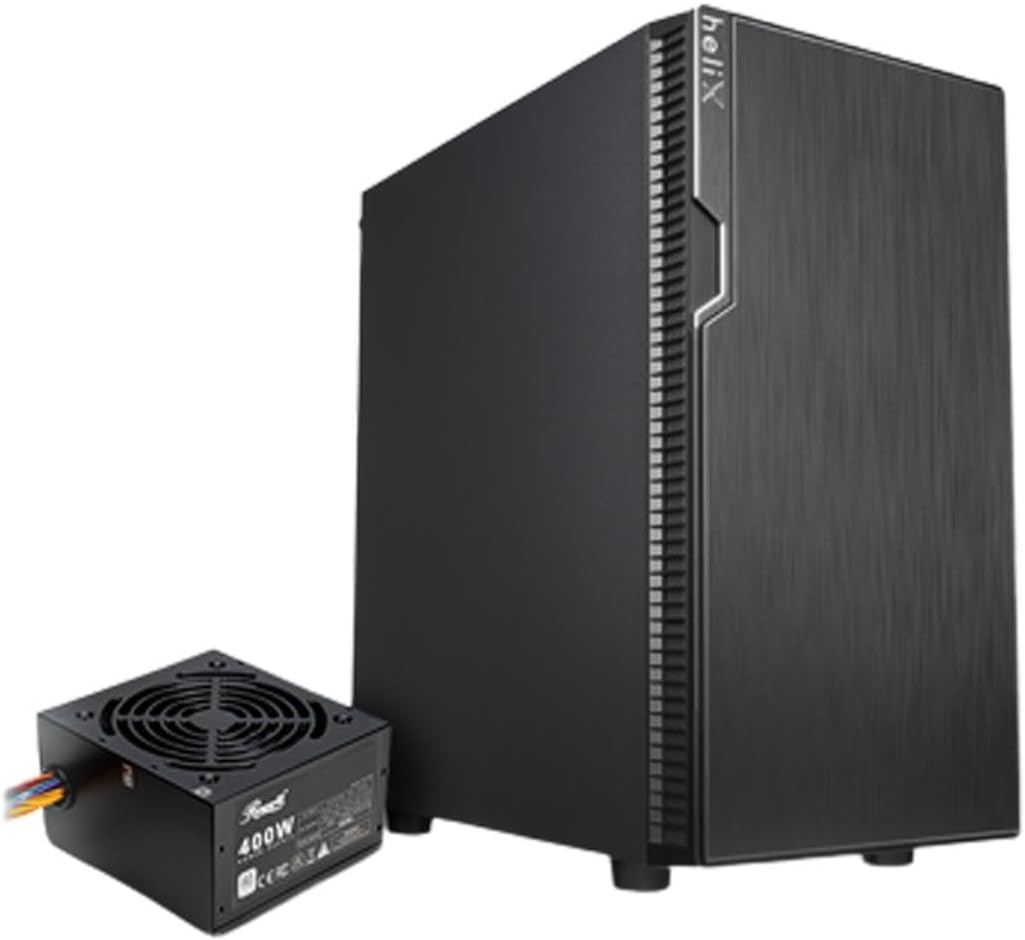
Figure 1: Rosewill FBM-X2-400-HELIX Micro ATX Mini Tower PC Case with included 400W Power Supply Unit.
2. Saugos informacija
- Prieš montuodami ar atlikdami bet kokius kompiuterio korpuso komponentus, visada atjunkite maitinimo šaltinį nuo sieninio lizdo.
- Handle all components with care to prevent damage from electrostatic discharge (ESD). Consider using an anti-static wrist strap.
- Laikykite smulkias dalis ir varžtus vaikams nepasiekiamoje vietoje.
- Užtikrinkite tinkamą vėdinimą aplink kompiuterio korpusą, kad jis neperkaistų.
- Nebandykite modifikuoti korpuso ar jo komponentų, nes tai gali panaikinti garantiją ir sukelti pavojų saugumui.
3. Pagrindinės savybės
- Elegantiškas dizainas: A versatile, compact, and sturdy steel/plastic mini case suitable for office or gaming PC systems.
- Erdvus interjeras: Features four expansion slots, one internal 3.5" drive bay, and three internal 2.5" drive bays. Supports Micro ATX or Mini ITX motherboards.
- Pre-Installed 400W Power Supply Unit: Includes a CE and FCC certified non-modular 400W PSU for convenience.
- Great Cable Management: Designed for easy organization of internal cables and wires.
- Puikus oro srautas: Comes with one pre-installed 120mm fan in the rear. Supports two additional 120mm fans in the front and two 120mm fans on top, or one 240mm radiator in the front.
4. Specifikacijos
| Funkcija | Specifikacija |
|---|---|
| Prekės ženklas | Rosewill |
| Modelio pavadinimas | FBM-X2-400-HELIX |
| Atvejo tipas | Mini bokštas |
| Pagrindinės plokštės suderinamumas | Micro ATX, Mini ITX |
| Pre-Installed PSU | 400W (Non-Modular, CE/FCC Certified) |
| Išorinių diskų skyriai | Nėra |
| Vidinės 3.5 colių diskų angos | 1 |
| Vidinės 2.5 colių diskų angos | 3 |
| Išplėtimo lizdai | 4 |
| Priekinės įvesties / išvesties prievadai | 2x USB 2.0, 1x USB 3.0, garso įvestis / išvestis |
| Iš anksto sumontuoti ventiliatoriai | 1 x 120 mm galinis ventiliatorius |
| Ventiliatoriaus laikiklis (priekinis) | 2x120 mm |
| Ventiliatorių palaikymas (viršuje) | 2x120 mm |
| Radiatoriaus atrama (priekinė) | 1x240 mm |
| Medžiaga | Legiruotasis plienas, plastikas |
| Spalva | Juoda |
| Matmenys (IxPxH) | 16.75 x 16.65 x 10 colio |
| Prekės svoris | 11.82 svaro |
5. Pakuotės turinys
Išpakuodami patikrinkite pakuotės turinį, kad įsitikintumėte, jog yra visi reikalingi daiktai:
- Rosewill FBM-X2-400-HELIX PC Case
- Pre-installed 400W Power Supply Unit
- Priedų dėžutė (kuriame yra varžtai, tarpikliai, kabelių laikikliai ir kt.)
- Vartotojo vadovas (šis dokumentas)
6. Sąranka ir diegimas
Follow these steps to assemble your PC within the Rosewill FBM-X2-400-HELIX case.
6.1. Paruošimas
- Unpack the PC case and place it on a stable, flat surface.
- Nuimkite šoninius skydelius, atsukdami varžtus korpuso gale.
- Gather all necessary components: motherboard, CPU, RAM, storage drives, graphics card (if applicable), and any additional fans or radiators.

Figure 2: Internal layout of the PC case, highlighting the pre-installed power supply and available drive bays.
6.2. Pagrindinės plokštės montavimas
- Install the CPU, CPU cooler, and RAM onto your Micro ATX or Mini ITX motherboard before placing it into the case.
- Align the motherboard with the standoffs inside the case. Ensure the I/O shield is properly seated in the rear opening.
- Secure the motherboard with the appropriate screws from the accessory kit.
6.3. Maitinimo blokas (PSU)
The 400W PSU is pre-installed in the bottom rear section of the case. Connect the necessary power cables to your motherboard (24-pin ATX, 4/8-pin CPU), graphics card (if required), and storage drives.

Figure 3: Included PSU connectors for various components.
6.4. Atminties disko diegimas
The case supports one 3.5" HDD and three 2.5" SSDs/HDDs.
- For 3.5" HDD: Locate the 3.5" drive bay and secure the drive using the provided screws.
- For 2.5" SSD/HDD: Mount the 2.5" drives to the designated mounting points using the provided screws.
- Connect SATA data and power cables to each installed drive.
6.5. Išplėtimo plokštės diegimas
The case provides four expansion slots for graphics cards or other PCI-E devices.
- Remove the necessary slot covers from the rear of the case.
- Insert your graphics card or other expansion card into the appropriate PCI-E slot on the motherboard.
- Pritvirtinkite kortelę varžtu.
6.6. Kabelių valdymas
Norėdami sutvarkyti kabelius, naudokite kabelių išvedimo angas ir tvirtinimo taškus už pagrindinės plokštės dėklo. Tai pagerina oro srautą ir suteikia jūsų kompiuteriui tvarkingesnę išvaizdą.
6.7. Priekinio skydelio jungtys
Prijunkite priekinio skydelio laidus (USB 2.0, USB 3.0, HD garso, maitinimo jungiklio, atstatymo jungiklio, maitinimo šviesos diodo, HDD šviesos diodo) prie atitinkamų pagrindinės plokštės jungčių. Tikslias jungčių vietas rasite pagrindinės plokštės vadove.

Figure 4: Front I/O panel with USB 3.0, USB 2.0, and audio ports.
6.8. Aušinimo sistema
The case includes one pre-installed 120mm rear fan. Additional fans or a 240mm AIO radiator can be installed for enhanced cooling.
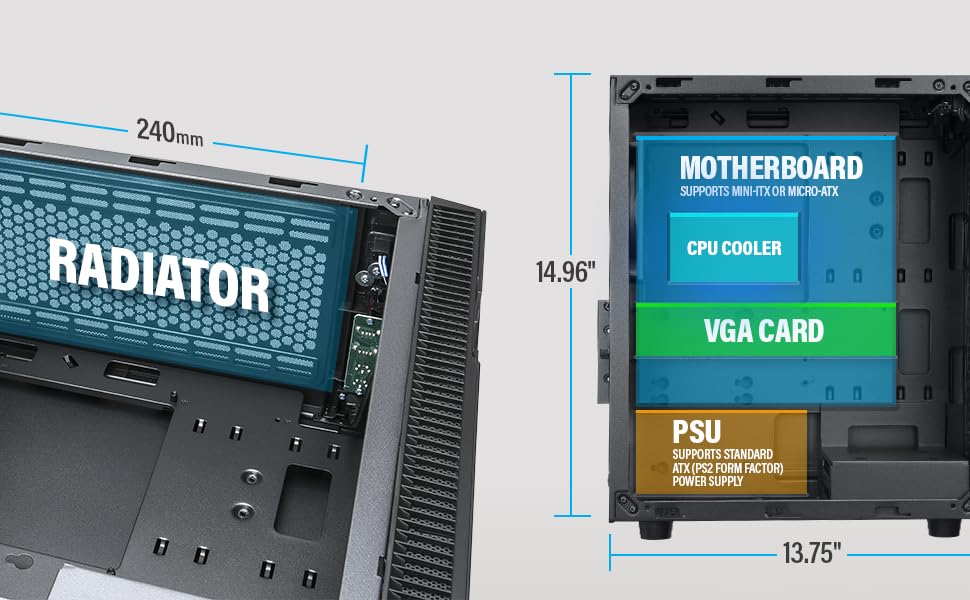
Figure 5: Diagram illustrating component clearance and radiator support.
6.9. Galutinis surinkimas
- Sumontavus visus komponentus ir sutvarkius laidus, vėl pritvirtinkite šoninius skydelius.
- Connect your monitor, keyboard, mouse, and power cable to the PC.
6.10. Official Product Video: Installation Overview
1 vaizdo įrašas: metimas per sekundęview of the Rosewill Micro ATX Mini Tower Case, including its pre-installed 400W PSU and internal features. This video provides a visual guide to the case's design and component layout.
7. Naudojimo instrukcijos
After completing the setup, you can power on your PC.
- Ensure all external cables (power, monitor, peripherals) are securely connected.
- Press the power button located on the front I/O panel of the case.
- The power LED will illuminate, indicating the system is powered on.
- To shut down, use the operating system's shutdown function or press and hold the power button for a few seconds.
8. Priežiūra
Reguliarus techninis aptarnavimas padeda užtikrinti optimalų kompiuterio komponentų veikimą ir ilgaamžiškumą.
- Dulkių filtrai: Periodically check and clean any removable dust filters (e.g., front, top, bottom) to maintain good airflow and prevent dust buildup inside the case.
- Vidinis valymas: Every few months, open the side panels and use compressed air to gently remove dust from fans, heatsinks, and other components.
- Kabelio patikrinimas: Įsitikinkite, kad visi vidiniai kabeliai yra tvirtai prijungti ir netrukdo oro srautui.
9. Problemų sprendimas
Jei kyla problemų, vadovaukitės šiais įprastais trikčių šalinimo patarimais:
- Nėra galios: Check if the power cable is securely connected to both the PSU and the wall outlet. Ensure the power switch on the PSU is in the 'ON' position. Verify front panel power switch connection to the motherboard.
- Nėra ekrano: Ensure your monitor is connected to the graphics card (or motherboard if using integrated graphics) and is powered on. Reseat the graphics card and RAM modules.
- Perkaitimas: Check if all case fans and CPU cooler fans are spinning. Ensure dust filters are clean and there is adequate airflow. Verify thermal paste application on the CPU.
- USB prievadai neveikia: Check the front panel USB cable connections to the motherboard. Ensure drivers are installed for your operating system.
10. Garantija ir palaikymas
For warranty information, technical support, or service inquiries, please refer to the official Rosewill websvetainėje arba susisiekite su jų klientų aptarnavimo skyriumi. Išsaugokite pirkimo įrodymą garantiniams reikalavimams.


