1. Įvadas
This manual provides essential information for the safe and effective operation, setup, maintenance, and troubleshooting of your YESWELDER 205A MMA/Lift TIG Arc Welder. Please read this manual thoroughly before operating the machine to ensure proper use and to prevent injury or damage.

1.1 vaizdas: priekis view of the YESWELDER 205A MMA/Lift TIG Arc Welder, showcasindėl kompaktiško dizaino ir valdymo skydelio.
2. Saugos informacija
Welding operations involve significant risks. Always prioritize safety to prevent electric shock, burns, fire, and other hazards. Adhere to all local and national safety regulations.
Bendrosios saugos priemonės:
- Dėvėkite tinkamas asmenines apsaugos priemones (AAP), įskaitant suvirinimo šalmą su tinkamu užtamsinimu, ugniai atsparius drabužius, suvirinimo pirštines ir apsauginius batus.
- Ensure the welding area is well-ventilated to avoid inhaling fumes.
- Degias medžiagas laikykite toliau nuo suvirinimo vietos.
- Always disconnect power before performing maintenance or adjustments.
- Nenaudokite suvirinimo aparato damp arba drėgnomis sąlygomis.
Integruotos saugos funkcijos:
The YESWELDER 205A is equipped with several safety mechanisms:
- Automatinis ttage Fluctuation Compensation: Helps maintain stable welding performance despite input power variations.
- Apsauga nuo viršsrovių: Automatically shuts down the machine if current exceeds safe limits.
- Apsauga nuo perkrovos: Apsaugo nuo pažeidimų dėl per didelio krūvio.
- Temperatūros valdymas: Monitors internal temperature and initiates automatic shutdown if overheating occurs.
- IP21 Protection Standard: Apsaugo nuo kietų objektų, didesnių nei 12 mm, ir vertikaliai krintančių vandens lašų.
- Electrostatic Coating: Unique coating designed to prevent shock transfer.

2.1 vaizdas: Baigtaview of the YESWELDER 205A's built-in safety features.
3. Produktas baigtasview
The YESWELDER 205A is a versatile 2-in-1 welding machine offering both Stick (MMA) and Lift TIG welding capabilities. It features an advanced IGBT inverter technology for stable arc performance and a user-friendly interface.
Pagrindinės funkcijos:
- Dvigubi suvirinimo režimai: Supports Stick (MMA) and Lift TIG welding.
- Didelė išeiga: Iki 205 amperes, suitable for various welding tasks.
- Išplėstinės funkcijos: Includes Hot Start, Arc Force, and Anti-Stick for improved arc ignition and stability.
- Didelis LED ekranas: Provides clear visibility of current, electrode size, and welding mode.
- Nešiojamas dizainas: Weighs approximately 3.8 kg (8.4 lbs) for easy transport.
- Patvari konstrukcija: Features an additional plastic casing for enhanced protection.
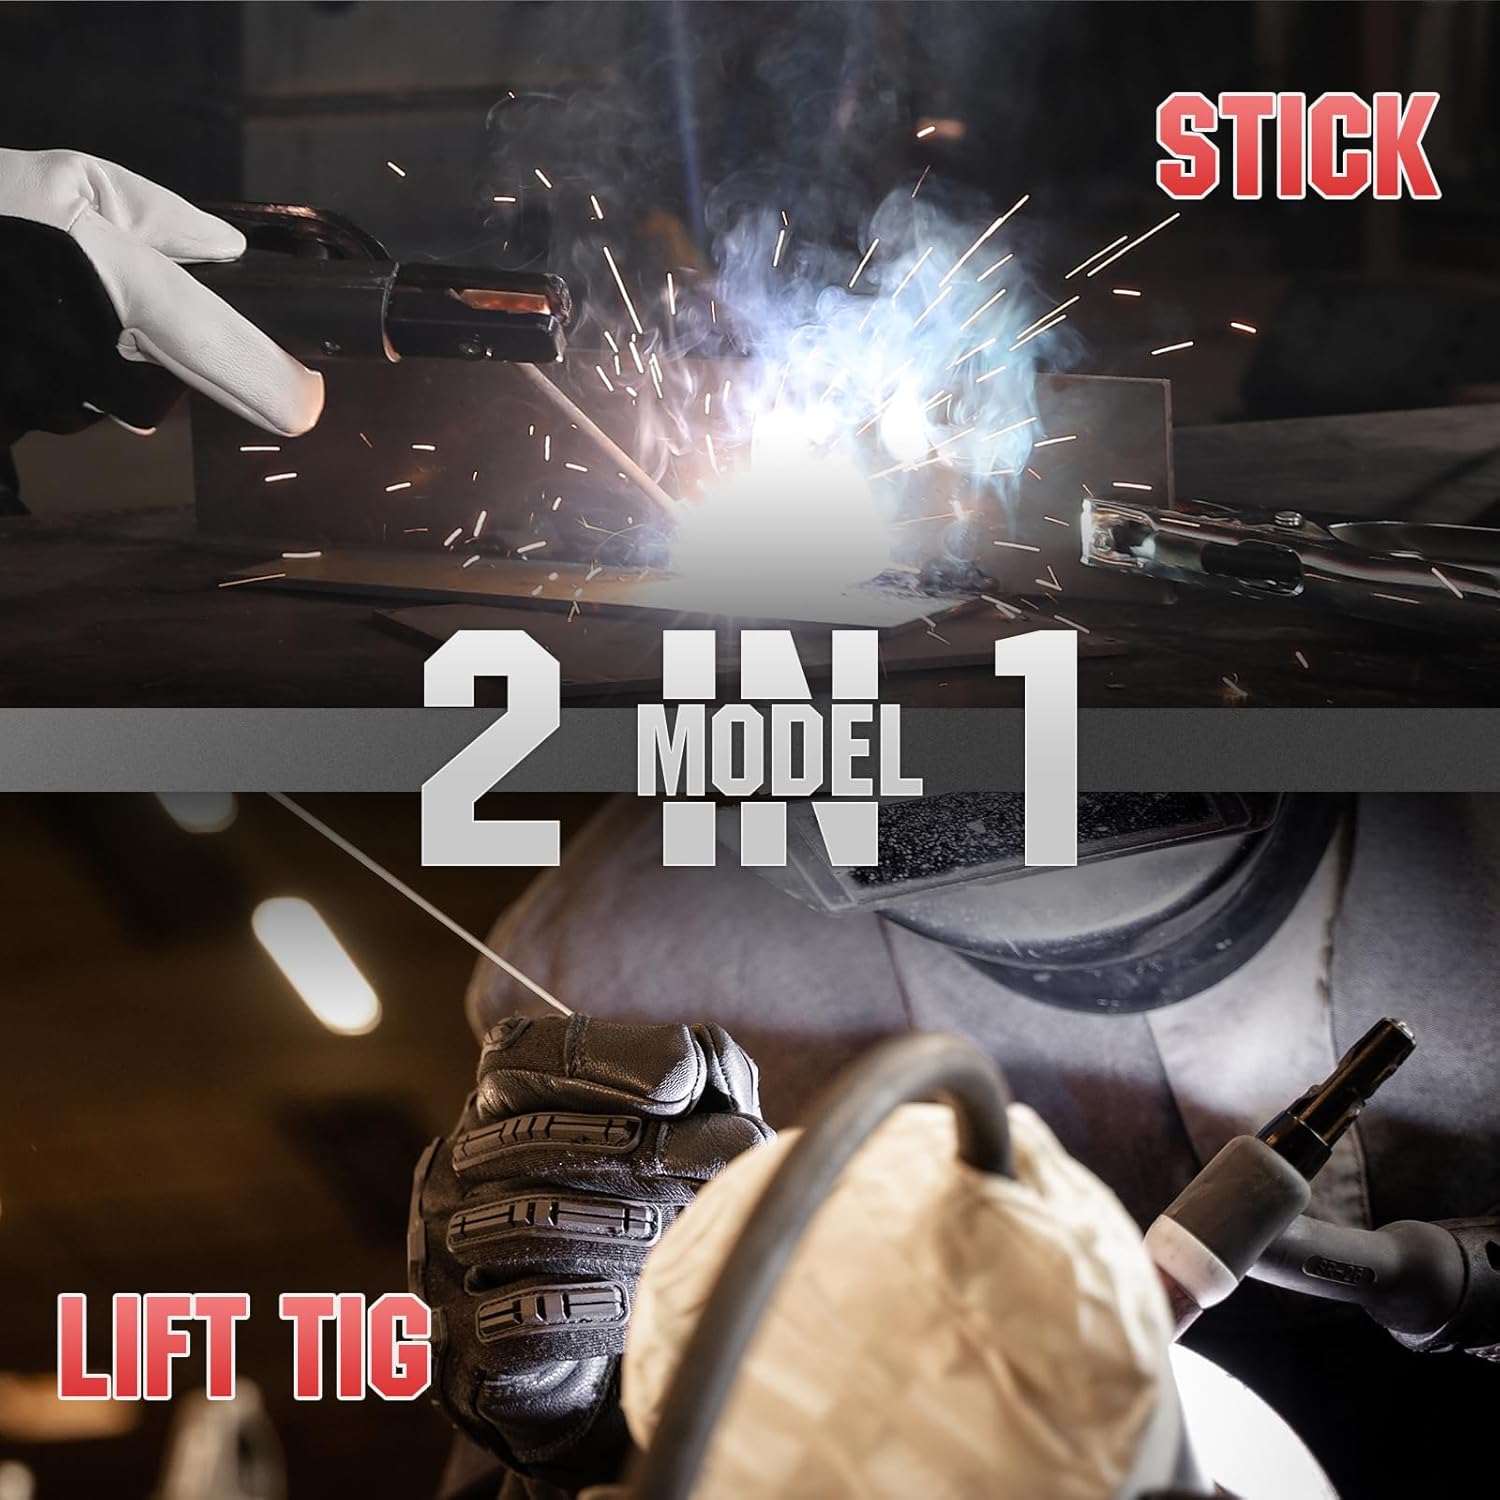
Image 3.1: The YESWELDER 205A supports both Stick (MMA) and Lift TIG welding modes.
Valdymo skydo įvadas:
Familiarize yourself with the control panel components for efficient operation.
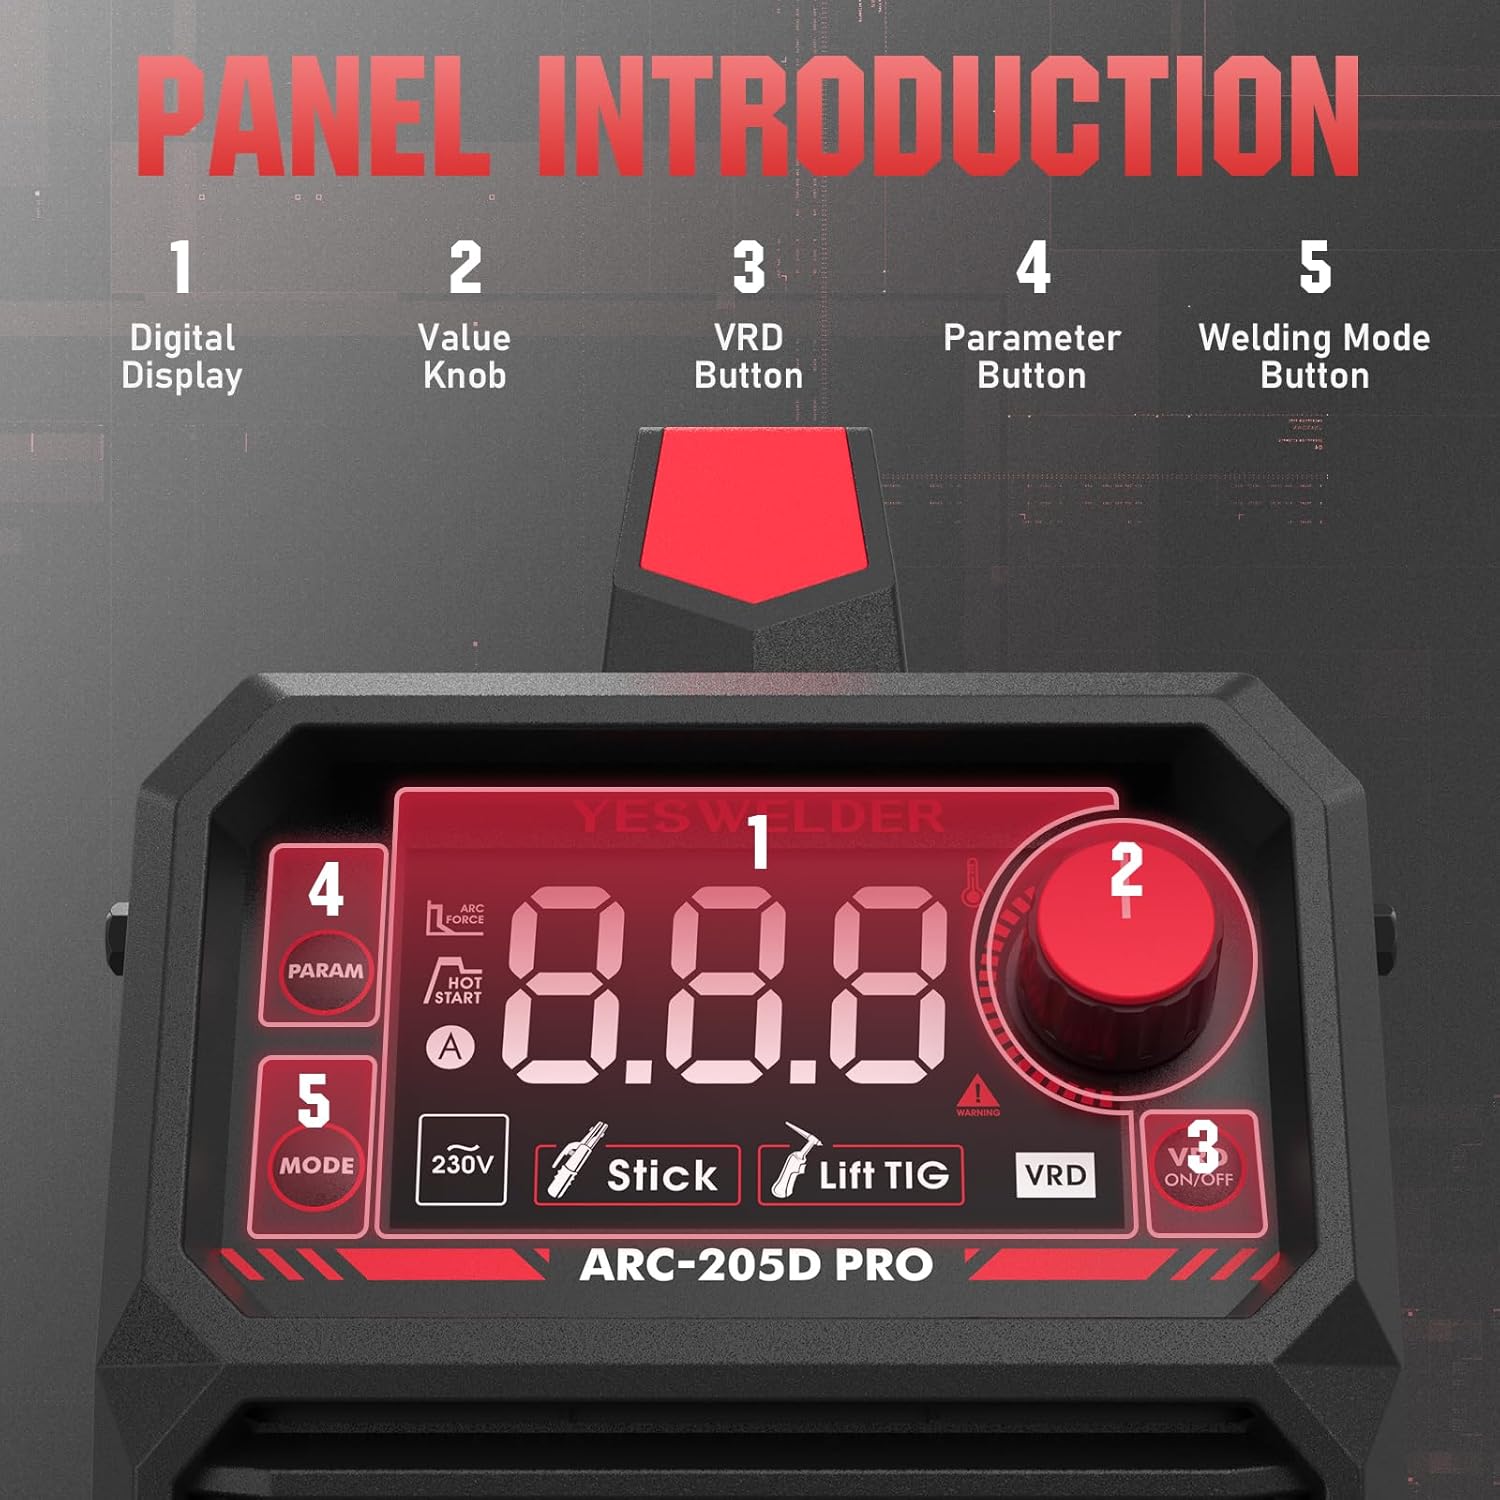
3.2 pav.: Išsamus view of the control panel, indicating the digital display, value knob, VRD button, parameter button, and welding mode button.
- Skaitmeninis ekranas: Shows welding parameters such as current, electrode size, and selected mode.
- Value Knob: Adjusts welding current and other parameters.
- VRD Button: Activates or deactivates Voltage Reduction Device for enhanced safety in certain environments.
- Parameter Button: Cycles through adjustable parameters (e.g., Hot Start, Arc Force).
- Welding Mode Button: Selects between Stick (MMA) and Lift TIG welding modes.

Image 3.3: The upgraded large LED display provides clear and comprehensive information during operation.
4. Sąranka
Proper setup is crucial for safe and effective welding. Follow these steps carefully.
4.1 Išpakavimas ir patikrinimas:
- Remove the welder and all accessories from the packaging.
- Patikrinkite, ar nėra transportavimo pažeidimų. Jei pastebėsite pažeidimų, nedelsdami susisiekite su tiekėju.
- Įsitikinkite, kad yra visi pakavimo sąraše išvardyti komponentai.
4.2 Connecting Accessories:

Image 4.1: Electrode holder and ground clamp jungtys.
- Gruntas Clamp Ryšys: Prijunkite įžeminimą klamp Prijunkite kabelį prie neigiamo (-) suvirinimo aparato išvesties gnybto. Tvirtai pritvirtinkite įžeminimo laidąamp prie ruošinio arba suvirinimo stalo, užtikrindami gerą elektros kontaktą.
- Electrode Holder Connection (for MMA/Stick): Connect the electrode holder cable to the positive (+) output terminal on the welder. Insert the welding electrode into the holder.
- TIG Torch Connection (for Lift TIG - torch sold separately): If performing Lift TIG welding, connect the TIG torch cable to the negative (-) output terminal. Connect the gas hose from the TIG torch to your argon gas regulator.
4.3 Maitinimo jungtis:
- Įsitikinkite, kad suvirinimo aparato maitinimo jungiklis yra IŠJUNGTOJE padėtyje.
- Connect the power input cable to a suitable 230V power outlet. Verify that the power source meets the welder's requirements.
5. Naudojimo instrukcijos
The YESWELDER 205A offers two primary welding modes: Stick (MMA) and Lift TIG.
5.1 Starting the Welder:
- After connecting all cables and ensuring safety, turn the power switch to the ON position.
- The LED display will illuminate, showing the default welding mode and current.
5.2 Stick (MMA) Welding:

Image 5.1: Visual representation of Stick welding (left) and Lift TIG welding (right).
- Pasirinkite režimą: Press the 'Welding Mode Button' until 'Stick' (MMA) is indicated on the display.
- Nustatyti srovę: Use the 'Value Knob' to adjust the welding current (amperes) according to the electrode type and material thickness. The machine supports up to 205A.
- Adjust Parameters (Optional): Press the 'Parameter Button' to cycle through Hot Start and Arc Force settings. Adjust these using the 'Value Knob' as needed for optimal arc ignition and stability.
- Pradėkite suvirinimą: Strike the arc by lightly touching the electrode to the workpiece and quickly lifting it slightly. Maintain a consistent arc length and travel speed.
5.3 Lift TIG Welding:
For Lift TIG welding, a TIG torch with a gas valve is required (not included).
- Pasirinkite režimą: Press the 'Welding Mode Button' until 'Lift TIG' is indicated on the display.
- Nustatyti srovę: Use the 'Value Knob' to adjust the welding current (amperes) based on the material and tungsten electrode size.
- Dujų srautas: Open the gas valve on the TIG torch to establish argon gas flow.
- Inicijuoti lanką: Gently touch the tungsten electrode to the workpiece and then lift it slightly (1-2mm) to initiate the arc. The arc will start at a low current and ramp up to the set current.
- Perform Weld: Jei reikia, palaikykite trumpą lanko ilgį ir rankiniu būdu paduokite užpildymo strypą.
6. Priežiūra
Reguliarus suvirinimo aparato aptarnavimas užtikrina jo ilgaamžiškumą ir optimalų veikimą.
6.1 Kasdienė priežiūra:
- Mašinos išorę valykite sausa, minkšta šluoste.
- Inspect all cables and connections for damage or loose fittings.
- Check the electrode holder and ground clamp dėvėjimui.
6.2 Periodinė priežiūra (kas mėnesį / kas ketvirtį):
- Vidinis valymas: Disconnect power. Open the machine casing and use compressed air to blow out dust and debris from the cooling fins and internal components. Ensure no moisture enters.
- Ventiliatoriaus patikrinimas: Patikrinkite, ar aušinimo ventiliatorius veikia laisvai ir nėra užblokuotas.
- Terminalo apžiūra: Check all power terminals for corrosion or looseness. Tighten if necessary.
Caution: Only qualified personnel should perform internal maintenance. Always disconnect power before opening the machine.
7. Problemų sprendimas
Dažniausiai pasitaikančias problemas ir galimus jų sprendimus žr. toliau pateiktoje lentelėje.
| Problema | Galima priežastis | Sprendimas |
|---|---|---|
| Suvirinimo aparatas neįsijungia | No power from outlet; Power switch off; Internal fuse blown | Check power supply; Turn power switch ON; Contact service for fuse replacement |
| Nėra lanko arba lankas silpnas | Poor ground connection; Incorrect current setting; Wet or old electrodes; Damaged cables | Ensure good ground contact; Adjust current; Use dry electrodes; Inspect and replace cables |
| Perkaitimo indikatorius įjungtas | Exceeded duty cycle; Insufficient ventilation; Fan malfunction | Allow machine to cool down; Ensure clear airflow; Check fan operation |
| Nestabilus lankas | Neteisinga srovė / tūristage; Contaminated workpiece; Improper electrode angle | Adjust settings; Clean workpiece; Correct electrode technique |
8. Specifikacijos
Technical specifications for the YESWELDER ARC-205D-EU model.

Image 8.1: Detailed technical specifications for the ARC-205D model.
| Specifikacija | Vertė |
|---|---|
| Modelio numeris | ARC-205D-EU |
| Įvesties tomastage (U1) | 230 V |
| Max Input Current (I1 max) | 29A |
| Effective Input Current (I1 eff) | 22.4A |
| Output Current (I2) | 205A (MMA), 158A (TIG) |
| Išėjimas ttage (U2) | 18.2V (MMA), 16.3V (TIG) at 60% duty cycle |
| No-Load Voltage (U0) | 65 V |
| Duty Cycle (X) | 60% prie 205A, 100% prie 158A |
| Matmenys (I x P x A) | 31.5 x 12 x 20.8 cm |
| Svoris | 3.8 kg (8.4 svaro) |
| Aušinimo būdas | Ventiliatoriaus aušinimas |
| Izoliacijos laipsnis | F |
| Apsaugos klasė | IP21S |
9. Garantija ir palaikymas
For warranty information, technical support, or service inquiries, please contact YESWELDER customer service. Keep your purchase receipt as proof of purchase.
For further assistance, visit the official YESWELDER websvetainėje arba kreipkitės į jų įgaliotuosius techninės priežiūros centrus.


