1. Svarbios saugos instrukcijos
Prieš naudodami šį prietaisą, atidžiai perskaitykite visus saugos įspėjimus ir instrukcijas, kad išvengtumėte gaisro, elektros smūgio, sužalojimų ar turto sugadinimo. Išsaugokite šį vadovą ateičiai.
- Visada junkite šildytuvą tiesiai į sieninį lizdą. Niekada nenaudokite su ilgintuvu ar perkeliamu maitinimo čiaupu.
- Nenaudokite šildytuvo su pažeistu laidu ar kištuku, taip pat po to, kai šildytuvas sugedo, buvo numestas ar kitaip pažeistas.
- Nenaudokite lauke. Šis šildytuvas skirtas naudoti tik patalpose.
- Laikykite degias medžiagas, tokias kaip baldai, pagalvės, patalynė, popieriai, drabužiai ir užuolaidos, bent 0.9 m (3 pėdų) atstumu nuo šildytuvo priekio ir atokiau nuo šonų bei galo.
- Ypatingas atsargumas yra būtinas, kai bet kurį šildytuvą naudoja vaikai arba neįgalūs asmenys arba kai šildytuvas yra veikiamas be priežiūros.
- Norėdami atjungti šildytuvą, pasukite valdiklius į OFF, tada ištraukite kištuką iš lizdo.
- Nekiškite ir neleiskite pašaliniams daiktams patekti į ventiliacijos arba išmetimo angas, nes tai gali sukelti elektros smūgį, gaisrą arba sugadinti šildytuvą.
- This heater includes an anti-tip safety switch and an overheating protection system. If the heater tips over or overheats, it will automatically shut off.
2. Pakuotės turinys
Išpakuodami patikrinkite, ar yra visi komponentai ir ar jie geros būklės.
- OCEANIC 1500W Electric Oil-Filled Radiator Heater (Main Unit)
- Nuotolinio valdymo pultas
- Wheel Assemblies (2 sets)
- Instrukcijų vadovas
3. Sąranka
3.1 Ratų pritvirtinimas
- Carefully turn the heater upside down on a soft, non-abrasive surface to avoid scratching.
- Locate the two U-shaped bolts and four wing nuts provided.
- Align the wheel assemblies with the mounting holes at the bottom of the heater.
- Insert the U-shaped bolts through the mounting holes and secure them with the wing nuts. Ensure they are tightened firmly.
- Grąžinkite šildytuvą į vertikalią padėtį.

Šoninė view of the heater, illustrating the proper attachment of the wheel assemblies for mobility.
3.2 Įdėjimo gairės
Place the heater on a firm, level surface. Ensure there is adequate clearance from walls, furniture, and other objects (minimum 3 feet / 0.9 meters). Do not place the heater directly below a power outlet.

Example of the heater placed in a living space, demonstrating appropriate clearance from furniture and walls.
4. Naudojimo instrukcijos
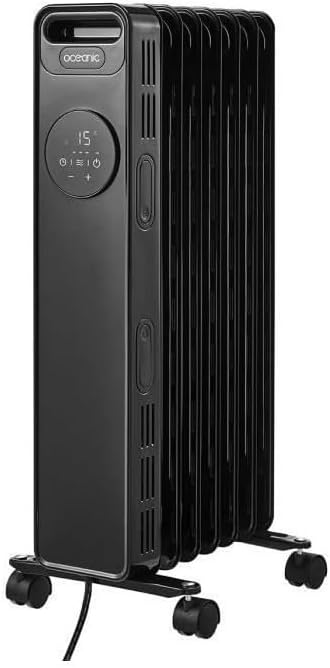
4.1 Valdymo skydas baigtasview

Išsamus view of the heater's LED display and control buttons, including power, mode, timer, and temperature adjustments.
- Maitinimo mygtukas: Įjungia / išjungia šildytuvą.
- Režimo mygtukas: Cycles through heating power settings (600W, 900W, 1500W).
- Temperatūros mygtukai (+/-): Reguliuoja pageidaujamą temperatūrą.
- Laikmačio mygtukas: Nustato veikimo laikmatį (iki 24 valandų).
- Skystųjų kristalų ekranas: Shows current temperature, timer settings, and power mode.
4.2 Įjungimas / išjungimas
- Plug the heater into a suitable 220-240V AC power outlet.
- Press the Power Button on the control panel or remote control to turn the heater ON. The LED display will illuminate.
- To turn OFF, press the Power Button again.
4.3 Setting Temperature and Power
- Once ON, use the + or - buttons to set your desired temperature. The heater will automatically maintain this temperature.
- Paspauskite Režimas button to cycle through the three heating power settings: Low (600W), Medium (900W), and High (1500W). Select the appropriate power for your heating needs.
4.4 Laikmačio funkcijos naudojimas
- Paspauskite Laikmatis button. The display will show '00'.
- Naudokite + or - buttons to set the desired operating duration, from 1 to 24 hours.
- The heater will automatically turn off after the set time has elapsed.
4.5 Nuotolinio valdymo pulto valdymas
The included remote control duplicates the functions of the main control panel, allowing convenient operation from a distance. Ensure the remote has working batteries (not included) and is pointed towards the heater's receiver.
5. Priežiūra
5.1 Valymas
- Prieš valydami visada atjunkite šildytuvą nuo elektros tinklo ir leiskite jam visiškai atvėsti.
- Išorinius paviršius nuvalykite minkšta, damp audinys. Nenaudokite abrazyvinių valiklių ar tirpiklių.
- Nemerkite šildytuvo į vandenį ir neleiskite vandeniui lašėti į vidų.
5.2 Saugykla
When not in use, store the heater in a cool, dry place. It is recommended to use the integrated cable winder to neatly store the power cord.
6. Problemų sprendimas
| Problema | Galima priežastis | Sprendimas |
|---|---|---|
| Šildytuvas neįsijungia. | Nėra maitinimo. Suaktyvinta apsauga nuo perkaitimo. Suaktyvintas apsaugos nuo apvirtimo jungiklis. | Patikrinkite, ar kištukas tvirtai įstatytas į lizdą. Atjunkite, palaukite 30 minučių ir vėl prijunkite. Įsitikinkite, kad šildytuvas stovi ant lygaus, stabilaus paviršiaus. |
| Šildytuvas negamina šilumos. | Per žema temperatūros nuostata. Power mode set to low. | Padidinkite norimą temperatūros nustatymą. Cycle through power modes to a higher setting (900W or 1500W). |
| Nuotolinio valdymo pultas neveikia. | Baterijos išsikrovė arba įdėtos neteisingai. Kliūtis tarp nuotolinio valdymo pulto ir šildytuvo. | Pakeiskite baterijas ir užtikrinkite teisingą poliškumą. Pašalinkite visus signalo kelią blokuojančius objektus. |
7. Specifikacijos
| Funkcija | Detalė |
|---|---|
| Modelio numeris | OCEABHE1500B |
| Maitinimo išvestis | 1500 W (maks.) |
| Heating Power Settings | 600W, 900W, 1500W |
| Elementai | 7 Oil-Filled Elements |
| Termostatas | Elektrinis termostatas |
| Ekranas | LED ekranas |
| Laikmatis | Iki 24 valandų |
| Kontrolė | On-board Panel & Remote Control |
| Saugos ypatybės | Anti-tip switch, Overheating protection |
| Montavimo tipas | Grindų laikiklis (su ratukais) |
| Maitinimo šaltinis | Su laidu elektra |
| Prekės svoris | 9.54 kilogramo |
| Spalva | Juoda |
8. Garantija ir palaikymas
This OCEANIC product is covered by a manufacturer's warranty. For specific warranty terms, duration, and to register your product, please refer to the warranty card included in your package or visit the official OCEANIC website. For technical support, troubleshooting assistance, or to inquire about replacement parts, please contact OCEANIC customer service through their official channels.
Prašome išsaugoti pirkimo įrodymą bet kokiems garantiniams reikalavimams.


