1. Įvadas
Ačiū, kad pirkoteasing the Ysametp 5G WiFi Bluetooth Projector. This device is designed to provide a high-quality home theater experience with its native 1080p Full HD resolution, 4K support, and integrated Android system. Please read this manual thoroughly before using the projector to ensure proper operation and to maximize its lifespan.
2. Saugos informacija
Please observe the following safety precautions to prevent damage to the projector and ensure user safety:
- Maitinimas: Use only the specified power adapter. Ensure the power outlet voltage atitinka projektoriaus reikalavimus.
- Vėdinimas: Neužblokuokite ventiliacijos angų. Užtikrinkite pakankamą oro cirkuliaciją aplink projektorių, kad jis neperkaistų.
- Vieta: Projektorių pastatykite ant stabilaus, lygaus paviršiaus. Venkite jo statyti tiesioginiuose saulės spinduliuose, šalia šilumos šaltinių arba aplinkoje, kurioje yra daug dulkių.
- Valymas: Prieš valydami atjunkite maitinimą. Naudokite minkštą, sausą šluostę. Nenaudokite skystų ar aerozolinių valiklių.
- Akių apsauga: Nežiūrėkite tiesiai į projektoriaus objektyvą, kai lamp įjungtas, nes ryški šviesa gali pažeisti akis.
- Remontas: Nebandykite patys taisyti projektoriaus. Visus techninės priežiūros darbus patikėkite kvalifikuotiems specialistams.
3. Pakuotės turinys
Patikrinkite, ar pakuotėje yra visi reikalingi daiktai:
- Ysametp 5G WiFi Bluetooth Projector (Model DE-M8-E-An)
- Nuotolinio valdymo pultas
- Power Cable (AC 220V with Schuko plug)
- HDMI kabelis
- Vartotojo vadovas
4. Produktas baigtasview
Susipažinkite su projektoriaus komponentais ir sąsajomis.
4.1 Priekis View

Vaizdas: priekis view of the Ysametp Projector, highlighting the projection lens and side ventilation grilles.
4.2 Rear and Side Interfaces
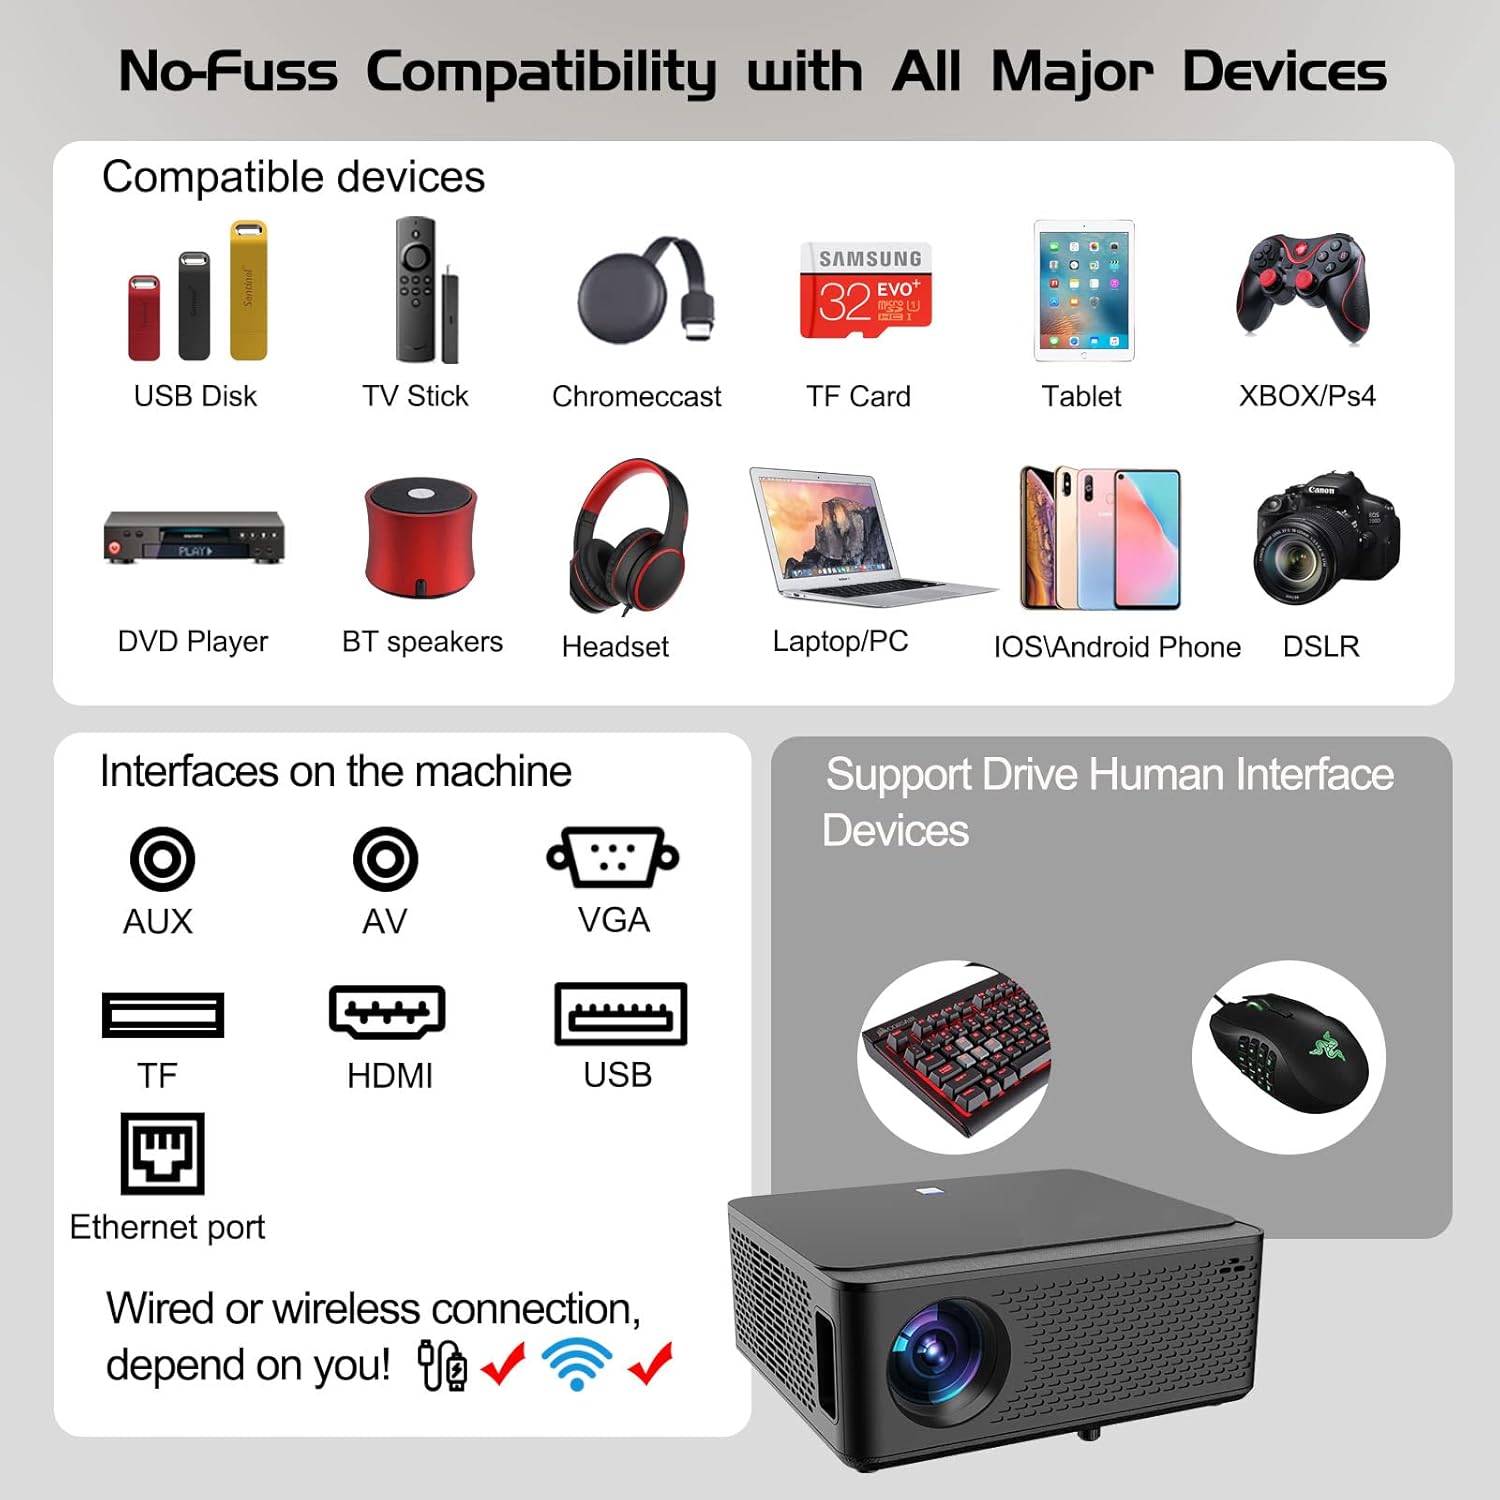
Image: Diagram illustrating the various input and output ports available on the Ysametp Projector, including USB, HDMI, AV, VGA, TF card slot, and Ethernet port.
The projector features a comprehensive set of ports for versatile connectivity:
- Ethernet prievadas: Laidinio interneto ryšiui.
- VGA prievadas: For connecting to older computers.
- USB-A prievadas: For connecting USB flash drives or external devices.
- HDMI prievadas: For high-definition audio and video input from various sources.
- AV įvestis: For connecting analog audio/video devices.
- 3.5 mm garso išvestis: Skirta išoriniams garsiakalbiams arba ausinėms prijungti.
- TF kortelės lizdas: For reading media from Micro SD cards.
- Maitinimo įvestis: Kintamosios srovės maitinimo kabeliui prijungti.
4.3 Viršutiniai valdikliai
The top of the projector includes a power button for basic on/off functionality. Further controls are available via the remote control and the on-screen display.
4.4 Fokuso reguliavimas
A mechanical focus adjustment screw is located on the side of the lens for manual image clarity control.
5. Sąranka
5.1 Įdėjimas
Position the projector on a stable surface. The projection distance will determine the screen size. For optimal viewįsitikinkite, kad projektorius yra statmenas projekcijos paviršiui.
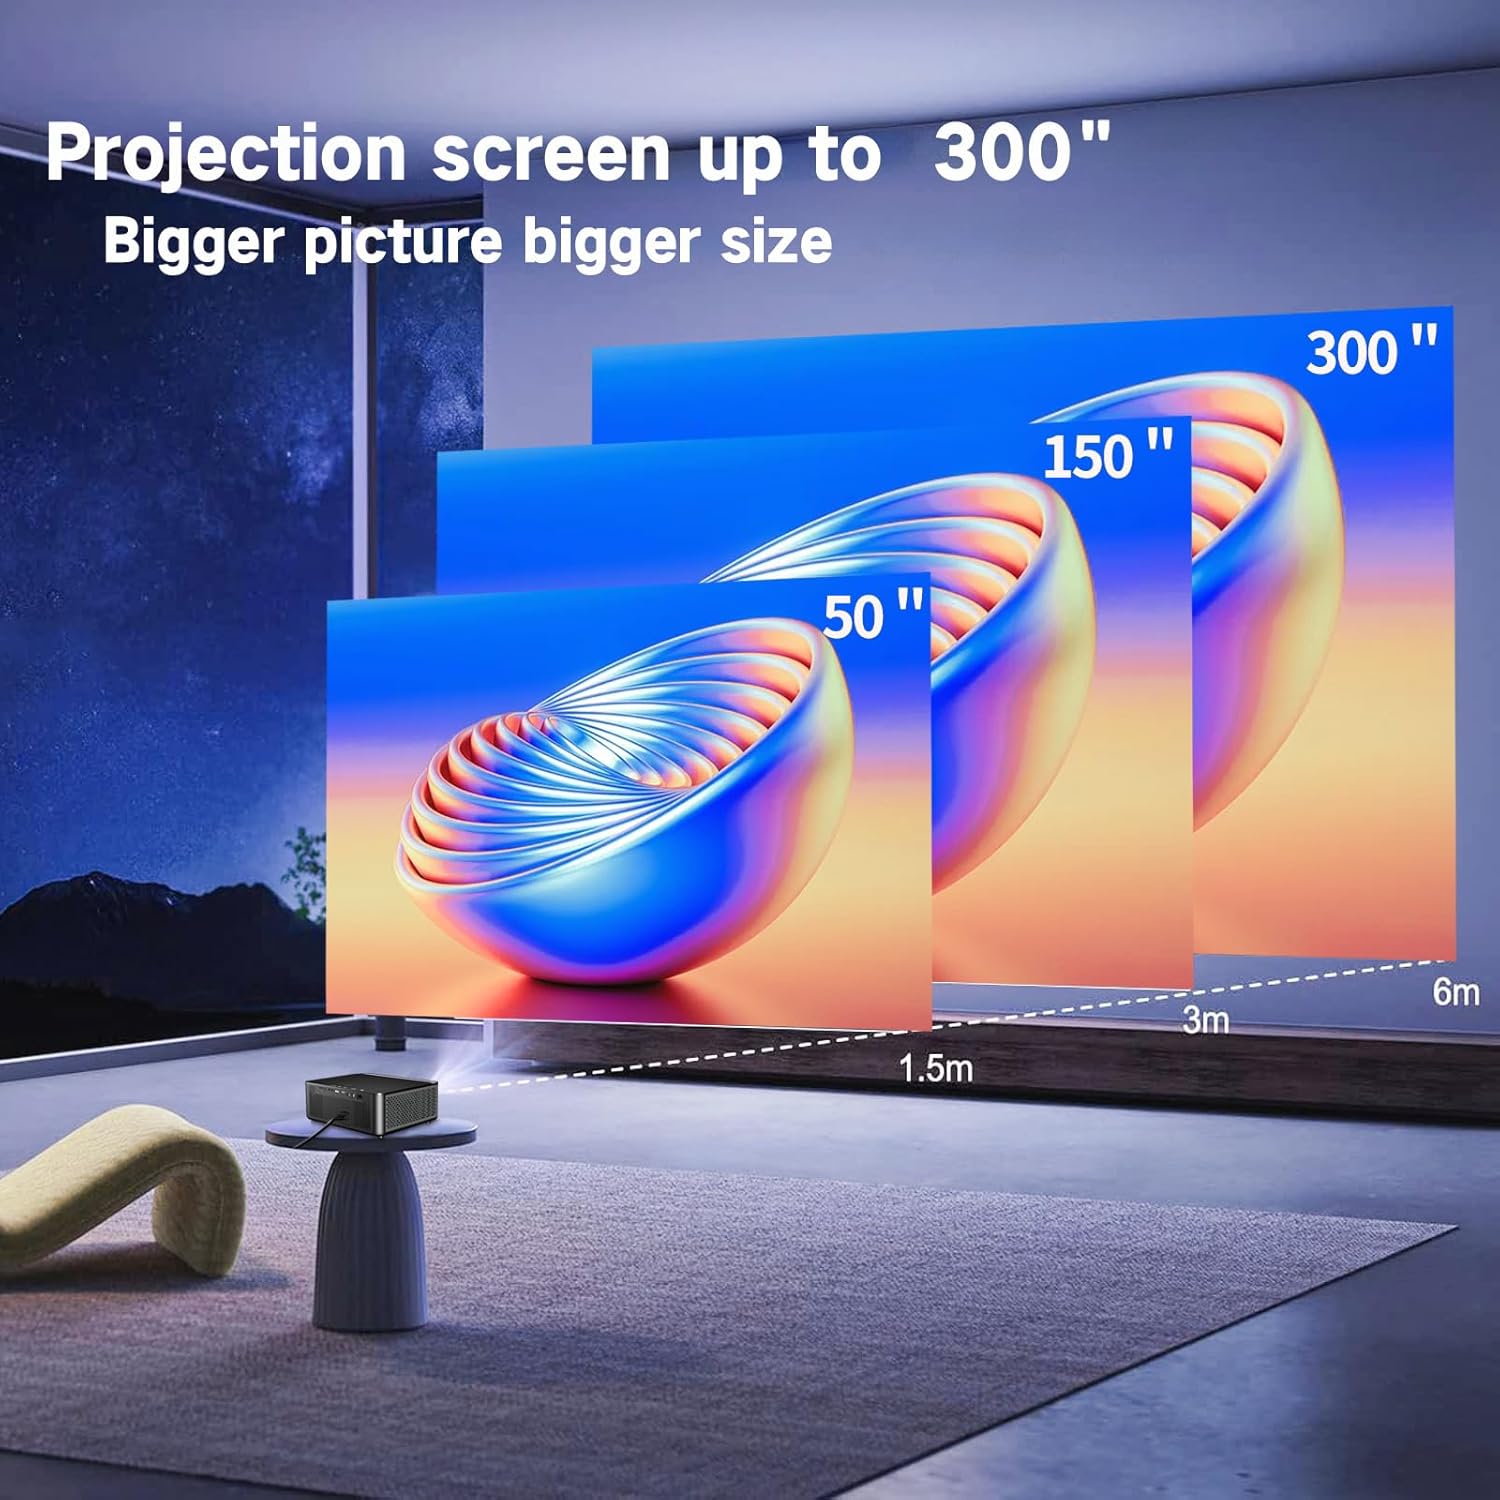
Image: Illustration demonstrating recommended projection distances for achieving screen sizes of 50, 150, and 300 inches.
5.2 Maitinimo jungtis
- Prijunkite maitinimo laidą prie projektoriaus maitinimo įvesties.
- Kitą maitinimo laido galą prijunkite prie tinkamo elektros lizdo.
5.3 Pradinis įjungimas
- Norėdami įjungti įrenginį, paspauskite projektoriaus arba nuotolinio valdymo pulto maitinimo mygtuką.
- Allow a few moments for the projector to boot up.
5.4 Fokusavimas ir trapecijos korekcija
After powering on, adjust the image for clarity and proper geometry:
- Fokusas: Rotate the mechanical focus adjustment screw near the lens until the image appears sharp and clear.
- Keystone korekcija: If the projected image is trapezoidal (wider at the top or bottom), use the 4D keystone correction feature via the on-screen menu to adjust the image corners until it forms a perfect rectangle.

Image: Diagram showing how 4P/4D keystone correction can be used to adjust the corners of a projected image to achieve a rectangular shape.
6. Naudojimo instrukcijos
6.1 Išorinių įrenginių prijungimas
Projektorius palaiko įvairius prijungimo būdus:
- HDMI: Connect gaming consoles (PS4, Xbox), laptops, or other HDMI-enabled devices using an HDMI cable.
- USB: Insert a USB flash drive into the USB-A port to play media files tiesiogiai.
- TF kortelė: Insert a Micro SD (TF) card into the TF card slot to access media.
- VGA/AV: Use these ports for older devices requiring analog connections.
- Bluetooth: Pair Bluetooth speakers or headphones for enhanced audio.

Image: The projector shown with various compatible devices, including laptops, smartphones, gaming consoles, USB drives, and external speakers, demonstrating its versatile connectivity.
6.2 Using the Integrated Android System
The projector comes with an integrated Android system, allowing access to a wide range of applications.

Image: The projector displaying its Android interface, featuring icons for popular streaming services and apps such as Netflix, YouTube, Prime Video, Hulu, Spotify, and TikTok.
- Tinklo prisijungimas: Connect the projector to your home Wi-Fi network via the settings menu or use an Ethernet cable for a wired connection.
- Prieiga prie programos: Navigate the Android interface using the remote control. You can download and install applications from the Google Play Store.
- Srautas: Enjoy content from pre-installed or downloaded streaming services.
6.3 5G WiFi Screen Mirroring
Mirror your smartphone, tablet, or PC screen wirelessly to the projector.

Image: A family enjoying content mirrored from a smartphone onto the large projected screen, illustrating the 5G WiFi Screen Mirroring feature for iOS, Android, and Windows devices.
- Ensure both the projector and your device are connected to the same 5G WiFi network.
- Select the "Screen Mirroring" option on the projector's menu.
- On your smartphone/tablet/PC, activate its screen mirroring function (e.g., "Smart View" for Android, "AirPlay" for iOS, "Cast" for Windows).
- Pasirinkite projektorių iš galimų įrenginių sąrašo, kad užmegztumėte ryšį.
7. Priežiūra
7.1 Objektyvo valymas
Švelniai nuvalykite projektoriaus objektyvą minkštu, nepūkuotu audiniu, specialiai skirtu optiniams paviršiams. Nenaudokite abrazyvinių valiklių ar per didelės jėgos.
7.2 Projektoriaus korpuso valymas
Use a soft, dry cloth to clean the exterior of the projector. Avoid using harsh chemicals or solvents.
7.3 Optical Engine Protection
The projector features a full-sealed optical engine designed to prevent dust from entering the internal components, reducing the need for frequent internal cleaning and extending the device's lifespan.

Paveikslėlis: vidinis view diagram of the projector's full-sealed optical engine, highlighting its design to prevent dust from entering and affecting performance.
7.4 Lamp Gyvenimas
The projector utilizes advanced SmarEco technology to minimize energy consumption and extend the lamp's lifespan up to 60,000 hours, providing long-term reliability.

Paveikslėlis: išsami diagrama, rodantiasing the projector's lamp technology, indicating a lifespan of over 30,000 hours.
8. Problemų sprendimas
Jei kyla problemų dėl projektoriaus, žr. šias dažniausiai pasitaikančias problemas ir sprendimus:
| Problema | Galima priežastis | Sprendimas |
|---|---|---|
| Ekrane nėra vaizdo. | Atsilaisvinęs maitinimo laidas; neteisingas įvesties šaltinis; įrenginys neprijungtas. | Check power connections. Select correct input source (HDMI, AV, etc.). Ensure external device is powered on and connected properly. |
| Vaizdas neryškus. | Nenustatytas fokusavimas; projektorius per toli/per arti. | Adjust the focus ring on the lens. Ensure projector is within optimal projection distance. |
| Vaizdas yra trapecijos formos. | Projektorius nėra statmenas ekranui. | Use the 4D keystone correction feature in the settings menu to adjust the image shape. |
| Nėra garso. | Volume too low; external audio device not connected; incorrect audio output selected. | Increase volume. Check external speaker/headphone connection. Ensure correct audio output is selected in settings. |
| Nepavyksta prisijungti prie „Wi-Fi“. | Neteisingas slaptažodis; už diapazono ribų; tinklo problema. | Verify WiFi password. Move projector closer to router. Restart router and projector. |
9. Specifikacijos
Key technical specifications for the Ysametp 5G WiFi Bluetooth Projector (Model DE-M8-E-An):
- Prekinis ženklas: Ysametp
- Modelio numeris: DE-M8-E-An
- Spalva: Juoda
- Produkto tipas: Nešiojamas projektorius
- Ryšio technologija: HDMI, USB, Wi-Fi (5G), Bluetooth
- Ypatingos savybės: Integrated WiFi, Android System, 4D Keystone Correction
- Suderinami įrenginiai: Game Consoles, Speakers, Laptops, Smartphones, Tablets
- Ekrano skiriamoji geba: Gryna 1920 x 1080 (Full HD) raiška
- Maksimali ekrano skiriamoji geba: 4096 x 2160 (4K palaikymas)
- Ekrano tipas: DLP
- Gaminio matmenys: 26L x 23W x 11H centimetrai
- Formos faktorius: Nešiojami
- Montavimo tipas: Stalo laikiklis
- Lamp Gyvenimo trukmė: Iki 60,000 valandų

Image: A visual comparison highlighting the projector's 20,000 Lumens brightness, Native 1080P resolution, and 4K support, contrasting it with a lower specification projector.
10. Garantija ir palaikymas
The Ysametp Projector comes with a 3-year service warranty. For technical support or warranty claims, please contact Ysametp customer service through your purchase platform or the official Ysametp websvetainę.


