LFF Atomic Clock LWC205 User Manual
Model: LWC205
Digital Wall Clock with Indoor/Outdoor Temperature and Wireless Sensor
1. Įvadas
Ačiū, kad pirkoteasing the LFF Atomic Clock LWC205. This digital clock features a large, easy-to-read display, atomic time synchronization, indoor and outdoor temperature monitoring, and an alarm function. This manual provides detailed instructions for setup, operation, maintenance, and troubleshooting to ensure optimal performance of your device.
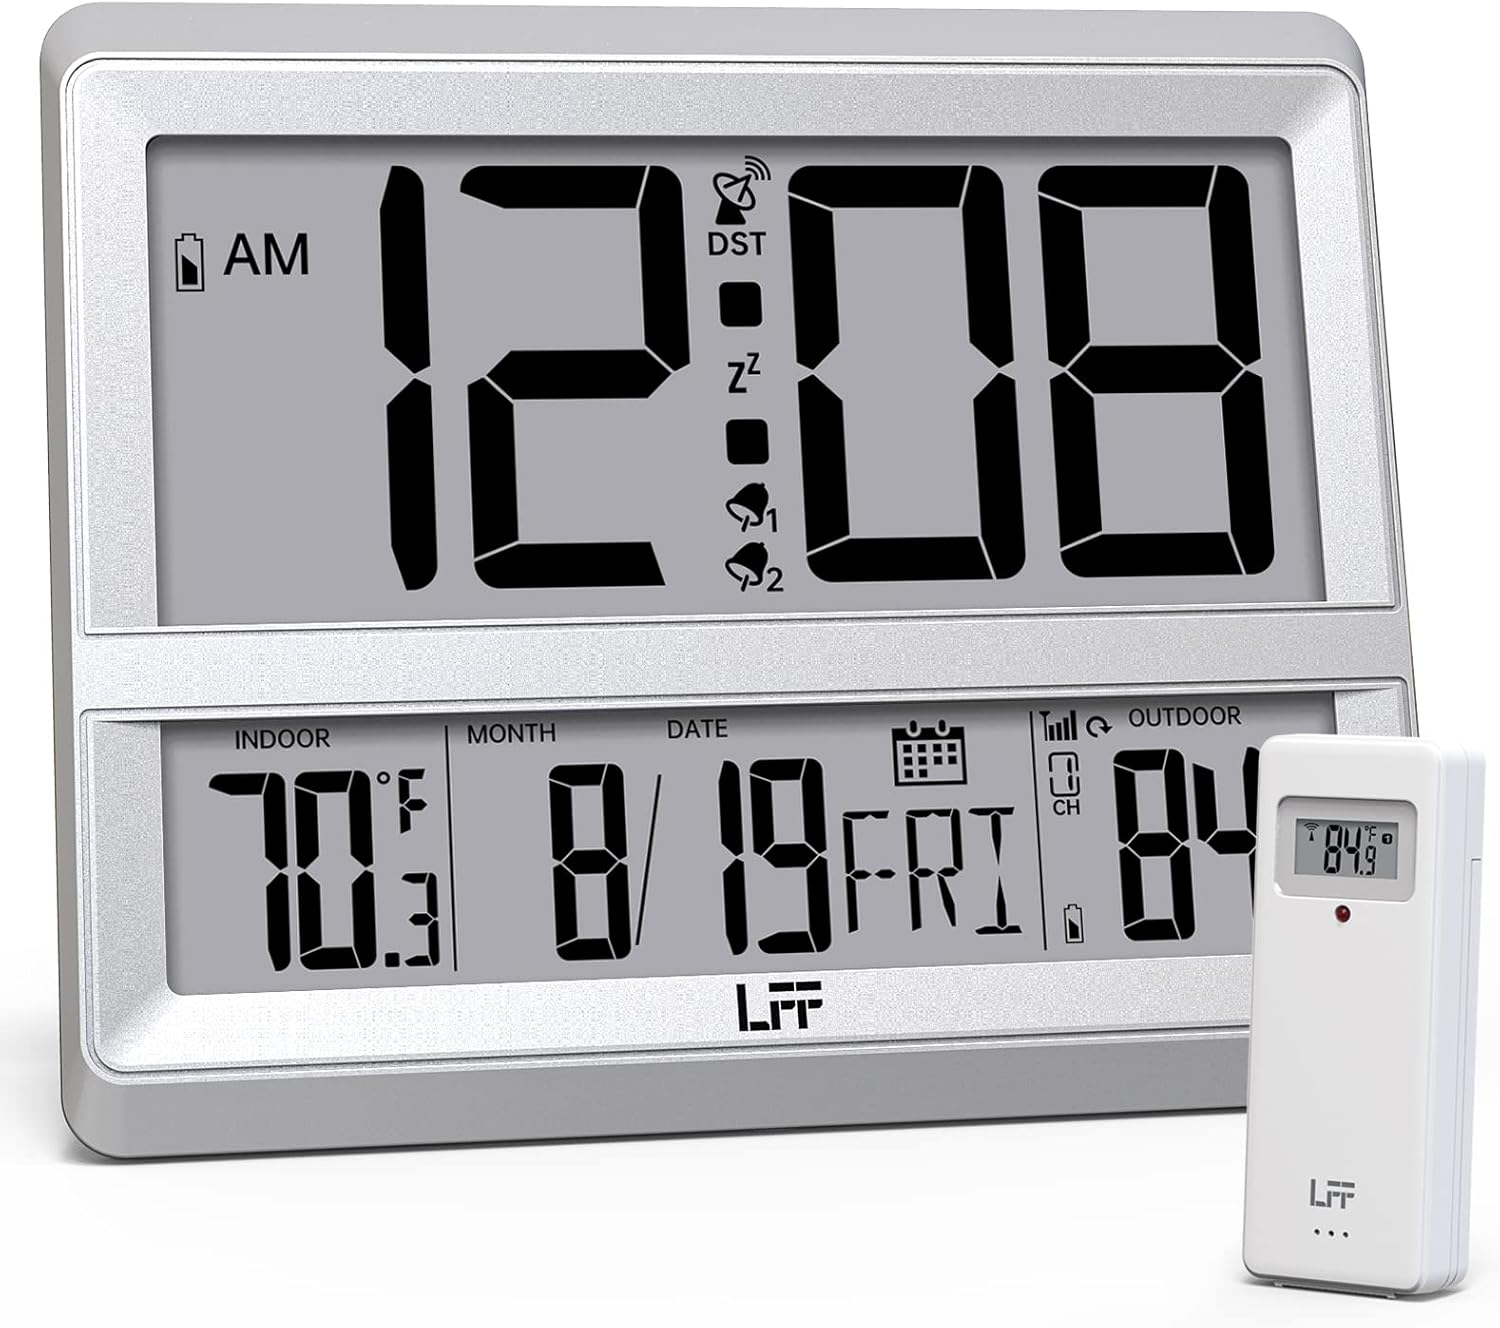
Image 1.1: The LFF Atomic Clock LWC205 main unit and its accompanying wireless outdoor sensor.
2. Produktas baigtasview
2.1 Ekrano elementai

Image 2.1: Detailed diagram illustrating the various display elements and control buttons on the LFF Atomic Clock LWC205. Key features include the alarm clock icon, time display, RCC reception icon, DST symbol, outdoor temperature, indoor temperature, date, and weekday.
2.2 Control Buttons (Rear View)
The control buttons are located on the back of the main clock unit:
- SET mygtukas: Naudojamas nustatymams įvesti ir patvirtinti.
- ALARM mygtukas: Used to set and activate/deactivate the alarm.
- KANALO mygtukas: Used to select the outdoor sensor channel (if multiple sensors are used).
- DOWN/WAVE/°C/°F Button: Used to decrease values during setting, manually initiate atomic time synchronization (wave), or switch between Celsius and Fahrenheit.
- UP/ALARM Button: Used to increase values during setting or activate/deactivate the alarm.
3. Sąranka
3.1 Išpakavimas
Carefully remove all components from the packaging. Ensure you have the main atomic clock unit and the wireless outdoor sensor.
3.2 Akumuliatoriaus įdėjimas
Both the main clock unit and the wireless outdoor sensor require batteries (not included).
- Main Clock Unit: Open the battery compartment on the back of the clock. Insert 3 x AA baterijos, užtikrindami teisingą poliškumą (+/-).
- Belaidis lauko jutiklis: Open the battery compartment on the back of the sensor. Insert 2 x AAA baterijos, ensuring correct polarity (+/-). For temperatures below -4°F (-20°C), lithium batteries are recommended for the outdoor sensor.

Image 3.1: Instructions for installing 3xAA batteries in the main clock unit and 2xAAA batteries in the wireless outdoor sensor.
3.3 Jutiklio išdėstymas
Place the wireless outdoor sensor in a shaded, dry location away from direct sunlight and precipitation. The sensor has a wireless range of up to 330 feet (100 meters) from the main unit. Ensure there are no major obstructions between the sensor and the clock for optimal signal transmission.

Image 3.2: Illustration of the 330ft wireless range between the main clock unit and the outdoor temperature sensor.
3.4 Clock Placement
The LFF Atomic Clock LWC205 offers two placement options:
- Table Clock: Use the integrated stand on the back of the unit to place it on a desk, nightstand, or shelf.
- Wall Clock: Utilize the keyhole slot on the back of the unit to mount it securely on a wall.

Image 3.3: The LFF Atomic Clock can be placed on a table using its built-in stand or mounted on a wall.
4. Naudojimo instrukcijos
4.1 Atomic Time Synchronization (WWVB)
The clock automatically synchronizes with the WWVB radio broadcast from Fort Collins, Colorado, ensuring accurate time. This process typically occurs overnight. For best reception, place the clock near a window and away from electronic interference.

Image 4.1: The atomic clock automatically corrects its time daily by receiving the WWVB signal, covering eight time zones and adjusting for Daylight Saving Time.
4.2 Rankinis laiko ir datos nustatymas
In areas where the WWVB signal is weak or unavailable, you can manually set the time and date:
- Paspauskite ir palaikykite NUSTATYTI mygtuką, kad įjungtumėte laiko nustatymo režimą.
- Naudokite UP or ŽEMYN mygtukais reguliuokite mirksinčią reikšmę (pvz., valandą, minutę, metus, mėnesį, dieną).
- Paspauskite NUSTATYTI mygtuką, kad patvirtintumėte kiekvieną nustatymą ir pereitumėte prie kito.
- The clock will exit setting mode automatically after a few seconds of inactivity or by pressing NUSTATYTI repeatedly until all settings are confirmed.
4.3 Temperature Display (°C/°F)
The clock displays both indoor and outdoor temperatures. To switch between Celsius (°C) and Fahrenheit (°F):
- Paspauskite DOWN/WAVE/°C/°F button to toggle the temperature unit.
4.4 12/24 valandų formatas
Norėdami perjungti 12 valandų ir 24 valandų laiko formatus:
- Paspauskite UP mygtuką, norėdami perjungti 12 valandų (su AM/PM indikatoriumi) ir 24 valandų formatus.
4.5 Aliarmo funkcija
Norėdami nustatyti žadintuvą:
- Paspauskite SIGNALAS mygtuką vieną kartą, kad būtų rodomas dabartinis žadintuvo laikas.
- Paspauskite ir palaikykite SIGNALAS mygtuką, norėdami įjungti aliarmo nustatymo režimą.
- Naudokite UP or ŽEMYN mygtukais, kad sureguliuotumėte valandas ir minutes.
- Paspauskite SIGNALAS mygtuką, kad patvirtintumėte kiekvieną nustatymą.
Norėdami įjungti / išjungti žadintuvą:
- Paspauskite SIGNALAS button repeatedly to cycle through alarm ON/OFF states. An alarm icon will appear on the display when activated.
5. Priežiūra
5.1 Akumuliatoriaus keitimas
When the low battery indicator appears on the display, replace the batteries in the respective unit (main clock or outdoor sensor) promptly to ensure continuous operation and accurate readings. Refer to Section 3.2 for battery types and installation.
5.2 Valymas
Clean the clock and sensor with a soft, dry cloth. Do not use abrasive cleaners or solvents, as these may damage the display or casing.
5.3 Aplinkosaugos aspektai
The outdoor sensor is designed for outdoor use but should be protected from extreme weather conditions. The recommended operating temperature range for the outdoor sensor is -58°F to 158°F (-50°C to 70°C). For temperatures below -4°F (-20°C), lithium batteries are required in the outdoor sensor for reliable performance.
6. Problemų sprendimas
- Nėra ekrano / silpnas ekranas: Check battery installation and replace with fresh batteries if necessary. Ensure correct polarity.
- Nėra lauko temperatūros rodmenų:
- Įsitikinkite, kad lauko jutiklyje baterijos yra tinkamai įdėtos.
- Verify the sensor is within the 330ft wireless range of the main unit.
- Paspauskite KANALAS button on the main unit to ensure it is on the correct channel (if applicable).
- Relocate the sensor or main unit to improve signal reception, avoiding large metal objects or other electronic devices.
- Neteisingas laikas:
- Ensure the clock is attempting to receive the WWVB signal (look for the RCC reception icon).
- Place the clock near a window and away from electronic interference for better signal reception.
- Manually initiate a signal search by pressing the DOWN/WAVE mygtuką.
- If atomic synchronization fails, manually set the time as described in Section 4.2.
- Temperature Readings Seem Inaccurate:
- Įsitikinkite, kad lauko jutiklis yra padėtas šešėlinėje vietoje, atokiau nuo tiesioginių saulės spindulių ar šilumos šaltinių.
- Patikrinkite abiejų įrenginių baterijų lygį.
7. Specifikacijos
| Funkcija | Detalė |
|---|---|
| Prekės ženklas | LFF pratęsimas |
| Modelio numeris | LWC205 |
| Ekrano tipas | Skaitmeninis |
| Spalva | Sidabras |
| Ypatinga funkcija | Atomic Time, Indoor/Outdoor Temperature, Alarm |
| Gaminio matmenys | 7.48 colio pločio x 8.66 colio aukščio |
| Power Source (Clock) | 3 x AA baterijos (į komplektą neįeina) |
| Maitinimo šaltinis (jutiklis) | 2 x AAA baterijos (į komplektą neįeina) |
| Naudojimas viduje / lauke | Indoor (Clock), Outdoor (Sensor) |
| Lauko temperatūros diapazonas | -58°F iki 158°F (nuo -50°C iki 70°C) |
| Patalpų temperatūros diapazonas | nuo 32 °F iki 122 °F (nuo 0 °C iki 50 °C) |
| Belaidžio jutiklio diapazonas | Iki 330 pėdų (100 metrų) |
| Montavimo tipas | Tvirtinimas prie sienos, stalviršis |
| Medžiaga | Akrilnitrilo butadieno stireno (ABS) plastikas |
| Prekės svoris | 0.9 svaro (14.4 uncijos) |
8. Informacija apie garantiją
Warranty information was not provided in the product data. Please refer to the product packaging or contact the manufacturer directly for details regarding warranty coverage and terms.
9. Pagalba klientams
For further assistance or inquiries, please contact LFF customer support. Contact details were not provided in the product data. Please refer to the product packaging or the official LFF websvetainė, kurioje pateikiama klientų aptarnavimo kontaktinė informacija.


