Įvadas
This manual provides comprehensive instructions for the installation, operation, and maintenance of your Natec Cabassu G2 Midi Tower PC Case. Please read this manual thoroughly before beginning installation to ensure proper setup and optimal performance.
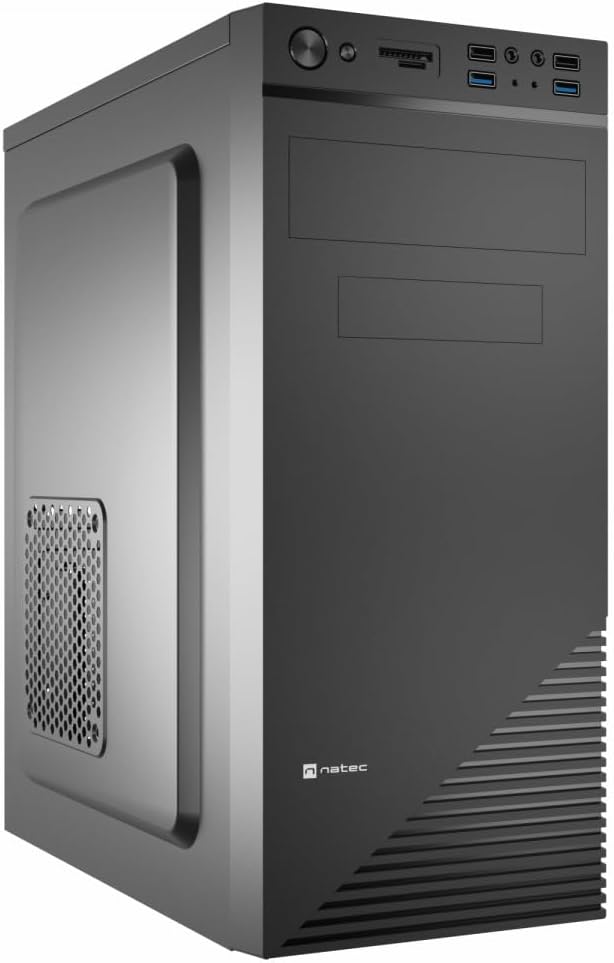
Figure 1: Natec Cabassu G2 Midi Tower PC Case. This image shows the front and left side of the black PC case, highlighting its sleek design and front panel layout.
Saugos informacija
- Prieš montuodami arba išimdami bet kokius komponentus, visada atjunkite maitinimo šaltinį nuo sieninio lizdo.
- Handle components with care to prevent damage from static electricity.
- Laikykite dėklą atokiau nuo vandens, drėgmės ir ekstremalių temperatūrų.
- Užtikrinkite tinkamą vėdinimą, kad išvengtumėte perkaitimo.
- Do not attempt to open the power supply unit.
Pakuotės turinys
Patikrinkite, ar pakuotėje yra visi reikalingi daiktai:
- Natec Cabassu G2 Midi Tower PC Case
- Accessory kit (screws, standoffs, cable ties)
- Vartotojo vadovas (šis dokumentas)
Sąranka ir komponentų diegimas
1. Bylos rengimas
- Padėkite dėklą ant lygaus, stabilaus paviršiaus.
- Remove the side panels by unscrewing the thumbscrews at the rear and sliding the panels backward.

2 pav. Vidus view of the Natec Cabassu G2 case with the side panel removed, illustrating the internal layout for component installation.
2. Pagrindinės plokštės montavimas
- Įstatykite įvesties/išvesties skydą į galinę korpuso angą.
- Align the motherboard with the pre-installed standoffs. The Cabassu G2 supports Mini ITX, Micro ATX, and ATX motherboards.
- Pritvirtinkite pagrindinę plokštę pridėtais varžtais.
3. Maitinimo šaltinio įrengimas
- The power supply mounts at the bottom of the case.
- Slide the power supply into its designated bay from the rear of the case.
- Secure it with screws from the rear.
4. Atminties disko diegimas
- 2.5" Drives (SSDs/HDDs): The case features 3 x 2.5" drive bays. Mount drives using the provided screws in the designated locations.
- 3.5 colio diskai (HDD): The case also supports 3.5" drives.
5. Išplėtimo plokštės diegimas
- Remove the necessary expansion slot covers from the rear of the case (7 expansion slots available).
- Įdėkite vaizdo plokštę arba kitas išplėtimo korteles į pagrindinės plokštės PCIe lizdus.
- Pritvirtinkite korteles varžtais.

3 pav.: galinis view of the Natec Cabassu G2 case, detailing the I/O shield cutout, power supply opening, and seven expansion slots.
6. Kabelių valdymas
Route cables behind the motherboard tray where possible to improve airflow and aesthetics. Use the included cable ties to secure bundles.
7. Connecting Front Panel Cables
Connect the front panel cables (USB 2.0, USB 3.0, audio, power switch, reset switch, HDD LED, power LED) to the corresponding headers on your motherboard. Refer to your motherboard manual for exact pin assignments.

Figure 4: Close-up of the Natec Cabassu G2 front panel, showing 2x USB 2.0 ports, 2x USB 3.0 ports, audio jacks, and power/reset buttons.
Naudojimo instrukcijos
Maitinimo įjungimas/išjungimas
- Maitinimas: Paspauskite maitinimo mygtuką, esantį priekiniame skydelyje.
- Išjungti: Initiate shutdown through your operating system. For a forced shutdown, press and hold the power button for several seconds.
- Atstatyti: Press the reset button on the front panel to restart the system.
Using Front Panel Ports
Priekinis skydelis suteikia patogią prieigą prie:
- 2 x USB 2.0 prievadai
- 2 x USB 3.0 prievadai
- Audio input (microphone) and output (headphone) jacks
Connect compatible devices to these ports as needed.
Priežiūra
Valymas
- Reguliariai valykite korpuso išorę minkšta, d šluosteamp audinys. Venkite abrazyvinių valiklių.
- Use compressed air to remove dust from fan filters and internal components. Ensure the system is powered off and unplugged before cleaning.
Dulkių filtrai
The case may include removable dust filters. Periodically remove and clean these filters to maintain optimal airflow and cooling performance.
Trikčių šalinimas
| Problema | Galima priežastis | Sprendimas |
|---|---|---|
| Sistema neįsijungia. | Power cables not connected properly. Faulty power supply. | Check all power connections (motherboard, CPU, GPU, power supply to wall). Ensure power supply switch is ON. |
| Front panel USB ports not working. | Front panel USB cables not connected to motherboard. | Verify that the USB 2.0 and USB 3.0 headers are correctly connected to the motherboard. |
| Per didelis ventiliatoriaus triukšmas. | Dust accumulation. Loose fan. | Clean dust from fans and filters. Ensure all fans are securely mounted. |
Specifikacijos
| Funkcija | Detalė |
|---|---|
| Modelio pavadinimas | Cabassu G2 |
| Prekės modelio numeris | S5624687 |
| Atvejo tipas | Midi bokštas |
| Matmenys (IxPxH) | 19.69 x 19.69 x 11.02 colio (50 x 50 x 28 cm) |
| Svoris | 7.04 svaro (3.19 kg) |
| Medžiaga | Akrilnitrilo butadieno stirenas (ABS), legiruotas plienas |
| Pagrindinės plokštės suderinamumas | Mini ITX, mikro ATX, ATX |
| 2.5 colių diskų lizdai | 3 |
| Išplėtimo lizdai | 7 |
| Priekinės įvesties / išvesties prievadai | 2 x USB 2.0, 2 x USB 3.0, garso įvestis / išvestis |
| Ventiliatorių palaikymas | 120mm (rear, pre-installed if applicable) |
| Aušinimo būdas | Oras |
| Maitinimo bloko montavimas | Apatinis kalnas |
Informacija apie garantiją
Natec products are covered by a manufacturer's warranty. Specific warranty terms and conditions may vary by region and retailer. Please refer to the warranty card included with your product or visit the official Natec websvetainėje rasite išsamią informaciją apie garantiją ir pretenzijas.
Palaikymas
For technical assistance, troubleshooting, or further inquiries, please visit the official Natec support websvetainėje arba susisiekite su jų klientų aptarnavimo skyriumi. Kontaktinę informaciją paprastai galite rasti ant produkto pakuotės arba oficialiame prekės ženklo puslapyje. websvetainę.
Websvetainė: www.natec-zone.com (Pvzampnuoroda, tikroji nuoroda gali skirtis)


