Įvadas
Thank you for choosing the Epson EB-L210SF projector. This manual provides essential information for the safe and efficient use of your projector. Please read it thoroughly before operating the device and keep it for future reference.
The Epson EB-L210SF is a 3LCD Full-HD projector designed for clear and vibrant image projection. It features a laser light source for long-lasting performance.
Svarbi saugos informacija
- Lazerio sauga: Do not look directly into the projector lens when the laser light source is active. Avoid direct eye exposure to the laser beam.
- Vėdinimas: Ensure adequate ventilation around the projector. Do not block ventilation openings. Overheating can cause damage.
- Maitinimo šaltinis: Naudokite tik šiam projektoriui nurodytą maitinimo šaltinį.
- Tvarkymas: Su projektoriumi elkitės atsargiai. Venkite jo numesti ir stipriai sutrenkti.
- Valymas: Prieš valydami atjunkite maitinimo laidą. Naudokite minkštą, sausą šluostę. Nenaudokite skystų ar aerozolinių valiklių.
Sąranka
1. Išpakavimas ir įdėjimas
Carefully remove the projector and all accessories from the packaging. Place the projector on a stable, level surface. Ensure there is sufficient space around the projector for proper ventilation.

1 pav.: Priekinė ir šoninė dalys view of the Epson EB-L210SF projector, showing the lens and ventilation grilles.
2. Maitinimo prijungimas
- Connect the supplied power cord to the projector's AC inlet.
- Kitą maitinimo laido galą įkiškite į įžemintą elektros lizdą.
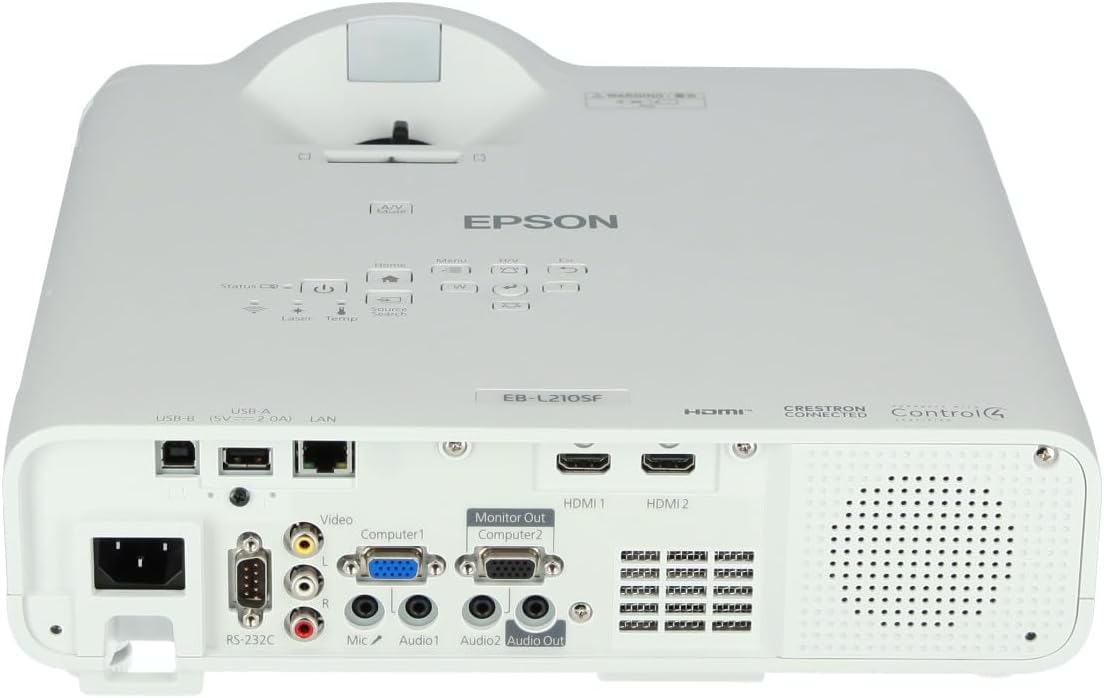
3. Įvesties šaltinių prijungimas
The projector supports various input sources. Connect your device (computer, Blu-ray player, etc.) to the appropriate port on the projector's rear panel.

Figure 2: Rear panel of the projector, displaying various input and output ports including HDMI, Computer (VGA), Video, USB, and Audio connections.
- HDMI: Connect an HDMI cable from your device to one of the HDMI ports (HDMI 1 or HDMI 2).
- Kompiuteris (VGA): Connect a VGA cable from your computer to the Computer 1 or Computer 2 port. For audio, connect a separate audio cable to Audio 1 or Audio 2.
- Vaizdo įrašas: Connect composite video and audio cables to the Video and Audio (R/L) ports.
- USB: Use the USB-A port for connecting USB storage devices or the USB-B port for display over USB.
- LAN: Prijunkite Ethernet kabelį tinklo valdymui ir stebėjimui.
4. Pradinis įjungimas ir vaizdo reguliavimas
- Press the power button on the projector or remote control to turn on the device. The power indicator will illuminate.
- Sureguliuokite fokusavimo žiedas aplink objektyvą, kol vaizdas taps ryškus ir aiškus.
- Naudokite priartinimo svirtis (if available) to adjust the image size.
- Jei vaizdas atrodo trapecijos formos, naudokite kertinio akmens korekcija feature (manual or automatic) to square the image. Refer to the Operating section for details on menu navigation.
Projektoriaus valdymas
1. Valdymo skydelis baigtasview
The control panel on top of the projector allows access to various functions and settings.
3 paveikslas: viršuje view of the projector, highlighting the control panel with buttons for power, menu, source selection, and navigation.
- Maitinimo mygtukas: Įjungia arba išjungia projektorių.
- Šaltinio paieška: Perjungia galimus įvesties šaltinius.
- Meniu mygtukas: Atidaro ekrano meniu (OSD).
- Navigation Buttons (Arrow keys): Naudojamas naršyti meniu parinktis.
- Įvesties mygtukas: Patvirtina meniu pasirinkimus.
- Esc mygtukas: Išeina iš dabartinio meniu arba grįžta į ankstesnį ekraną.
- Namų mygtukas: Accesses the home screen or quick settings.
- A/V nutildymas: Laikinai nutildo garsą ir išvalo ekraną.
2. Įvesties šaltinio pasirinkimas
Paspauskite Šaltinio paieška button on the control panel or remote control to cycle through the connected input sources (e.g., HDMI 1, HDMI 2, Computer 1, Video). The projector will automatically detect and display the active source.
3. Adjusting Image and Audio Settings
Paspauskite Meniu button to access the projector's on-screen display (OSD) menu. Use the navigation buttons to browse categories such as:
- Vaizdas: Reguliuokite ryškumą, kontrastą, spalvas, atspalvį, ryškumą ir spalvų temperatūrą.
- Signalas: Configure input signal settings, aspect ratio, and overscan.
- Nustatymai: General projector settings like language, display options, and power management.
- Garsas: Adjust volume, mute, and audio input selection.
Pasirinkite parinktį ir paspauskite Įeikite to modify its value. Press Esc norėdami išeiti iš meniu.
Priežiūra
1. Projektoriaus valymas
- Išorė: Wipe the projector's exterior with a soft, dry, lint-free cloth. For stubborn dirt, dampšiek tiek sudrėkinkite šluostę vandeniu, tada nusausinkite.
- Objektyvas: Gently wipe the lens with a lens cleaning cloth or lens paper. Avoid using abrasive materials or excessive force.
- Oro filtras: Regularly check and clean the air filter to prevent dust buildup, which can affect performance and cause overheating. Refer to the projector's on-screen menu for filter maintenance reminders.
2. Lazerinis šviesos šaltinis
The Epson EB-L210SF uses a laser light source, which offers a long operational life and does not require lamp replacement. No user maintenance is typically required for the laser light source itself.
Trikčių šalinimas
Jei kyla problemų dėl projektoriaus, žr. šias dažniausiai pasitaikančias problemas ir sprendimus:
| Problema | Galima priežastis / sprendimas |
|---|---|
| Neprojektuojamas vaizdas |
|
| Vaizdas neryškus arba nefokusuotas |
|
| Vaizdas iškraipytas (trapecijos formos) |
|
| Nėra garso |
|
| Projector is not wireless | The Epson EB-L210SF is not inherently a wireless projector. Wireless functionality typically requires an optional external wireless adapter, which is sold separately. Please consult Epson's official website or your retailer for compatible wireless adapters. |
| Overheating warning (Temp indicator) |
|
Specifikacijos
| Funkcija | Detalė |
|---|---|
| Modelio numeris | V11HA75080 |
| Ekrano raiška | 1920 x 1080 (Full HD) |
| Ryšio technologija | HDMI, VGA, USB, LAN |
| Gaminio matmenys | 11.81 x 11.81 x 11.81 colio |
| Prekės svoris | 10.14 svaro |
| Šviesos šaltinis | Lazeris |
| Gamintojas | Epson |
| Rekomenduojami naudojimo būdai | Stebėjimas |
| Ypatinga funkcija | Lengvas |
| Reikalingos baterijos | 1 AAAA (for remote control, not included with projector unit) |
| Pasiekiama pirmoji data | 14 m. lapkričio 2023 d |
Garantija ir palaikymas
Išsamesnės informacijos apie garantiją ieškokite prie gaminio pridėtoje garantijos kortelėje arba apsilankykite oficialioje „Epson“ svetainėje. websvetainėje. Garantijos sąlygos ir nuostatos gali skirtis priklausomai nuo regiono.
For technical support, product registration, or to download the latest drivers and software, please visit the official Epson support website or contact Epson customer service in your region. Contact information can typically be found on the Epson websvetainę.