1. Įvadas
Ačiū, kad pirkoteasing the DAYTECH Window and Door Opening Sensor. This device is designed to enhance security and convenience in your home or business by detecting the opening and closing of doors, windows, and other entry points. It features multiple operation modes, adjustable volume, and remote control functionality. Please read this manual carefully before use to ensure proper installation and operation.
2. Produktas baigtasview
2.1 Pakuotės turinys
- Main Sensor Unit (Receiver)
- Magnetic Strip (Transmitter)
- Nuotolinio valdymo pultas
- Dvipusė lipni juosta
- Vartotojo vadovas
2.2 Komponento identifikavimas
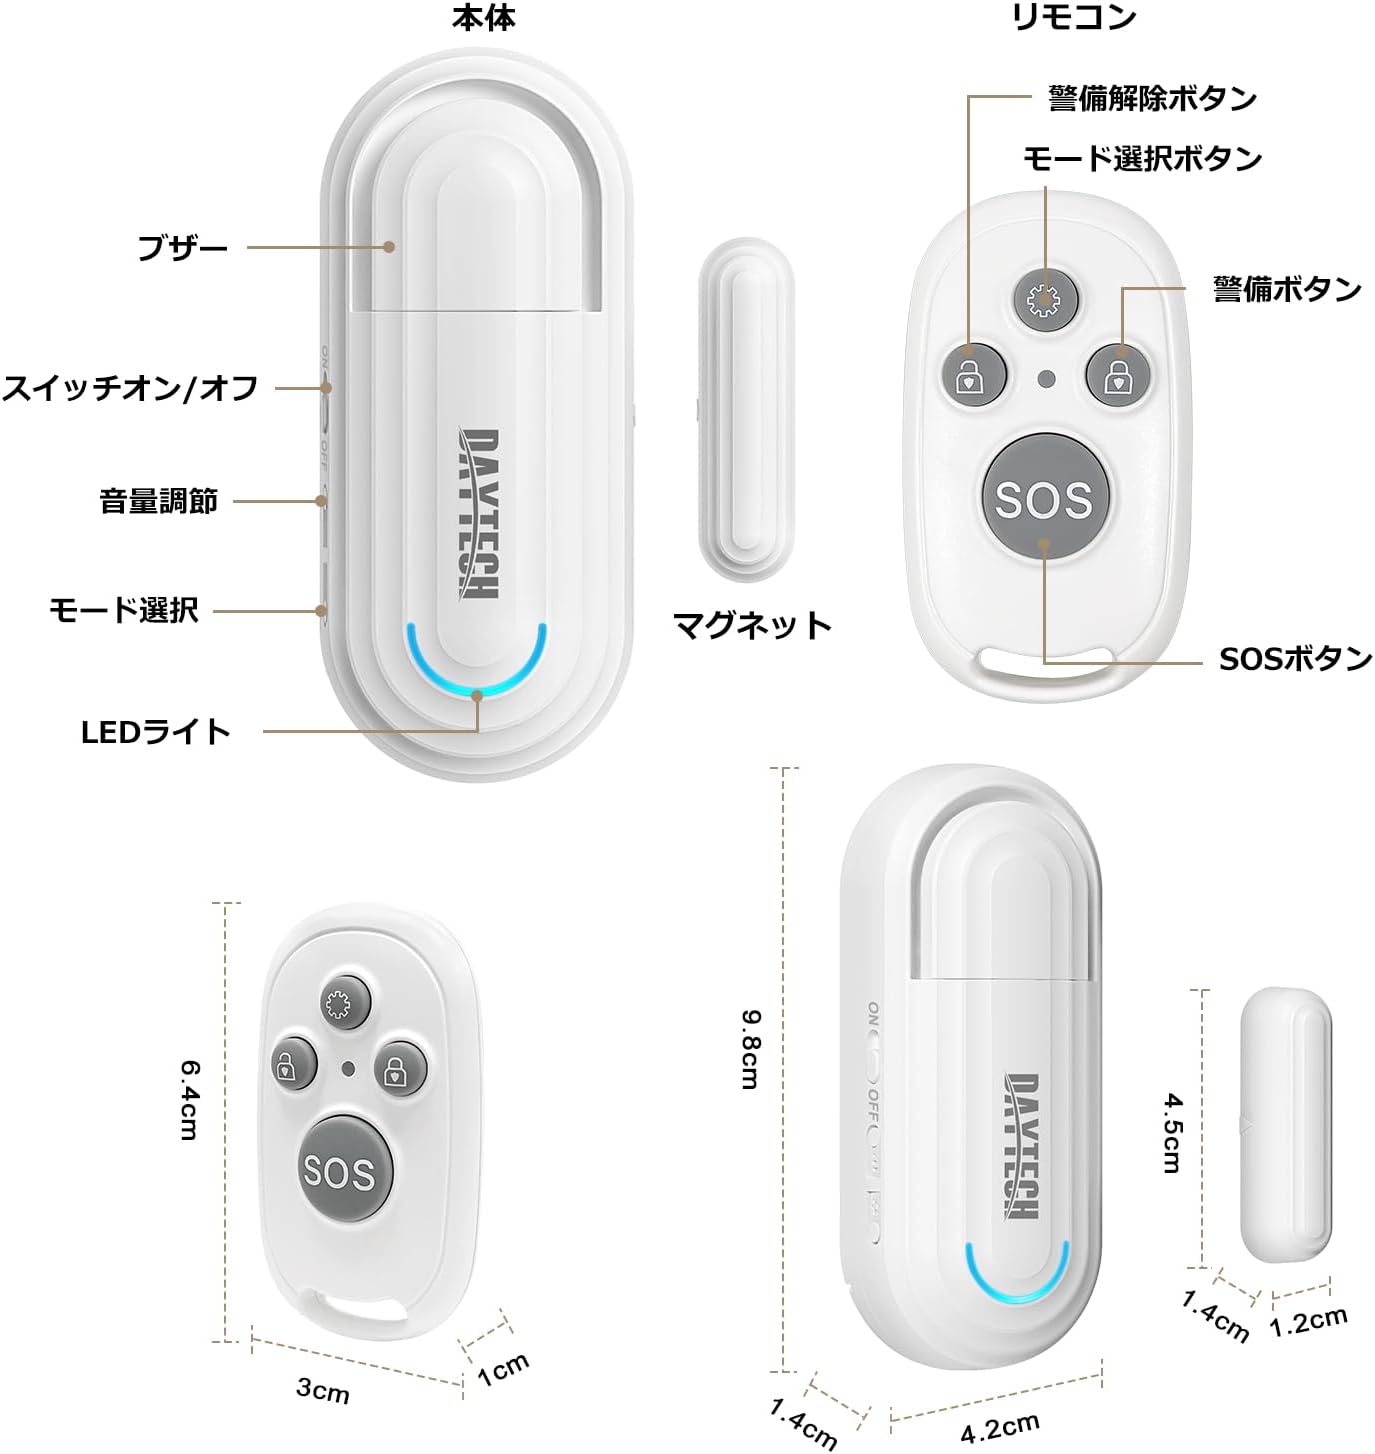
1 paveikslas: Main Sensor Unit, Magnetic Strip, and Remote Control. The main unit features an ON/OFF switch, volume adjustment buttons, mode selection, and an LED indicator. The remote control has arm, disarm, mode selection, and SOS buttons.
- Pagrindinis jutiklio blokas: Contains the alarm speaker, LED light, ON/OFF switch, volume adjustment buttons, and mode selection button.
- Magnetinė juostelė: The smaller component that triggers the sensor when separated from the main unit.
- Nuotolinio valdymo pultas: Used to arm/disarm the alarm, select modes, and activate an SOS function.
3. Savybės
- Nuotolinio valdymo pulto funkcionalumas: Conveniently arm, disarm, and select modes from a distance.
- Keturi veikimo režimai:
- Elderly Monitoring: Alerts when a door is opened, useful for monitoring elderly individuals.
- Visitor Chime: Functions as a doorbell, notifying you of visitors.
- Refrigerator Reminder: Prevents leaving the refrigerator door open.
- Apsaugos nuo vagystės signalizacija: Triggers a loud alarm upon unauthorized entry through windows or doors.
- Four-Level Volume Adjustment: Adjust the alarm volume from 0dB (silent) to 120dB to suit your environment and needs.
- Lengvas montavimas: Simple adhesive installation. Easily attaches to any flat surface like doors, windows, refrigerators, or cabinets using the included double-sided tape.
- Senkančios baterijos priminimas: The sensor emits a sound every 5 minutes when the battery is low.

2 paveikslas: Illustrates the four versatile usage modes of the sensor.
4. Sąranka ir diegimas
4.1 Baterijos įdėjimas (pagrindinis įrenginys)
The main unit requires two AAA alkaline dry cell batteries (not included). Open the battery compartment on the back of the main unit and insert the batteries, ensuring correct polarity. Close the compartment securely.
4.2 Battery Installation (Magnetic Strip & Remote Control)
The magnetic strip (transmitter) and remote control come with pre-installed batteries. If replacement is needed for the magnetic strip, it uses a 12V 23A battery. For the remote control, it uses a CR2032 button cell battery. Carefully open the casing ir pakeiskite bateriją, stebėdami poliškumą.
„1“ vaizdo įrašas: Demonstrates how to replace the battery in the magnetic strip (transmitter unit).
4.3 Pairing the Remote Control with the Main Unit
- Turn on the main sensor unit using the ON/OFF switch.
- Press and hold the mode selection button on the main unit for approximately 5 seconds until you hear a "beep" sound and the LED indicator flashes. This indicates pairing mode.
- While the main unit is in pairing mode, press any button on the remote control. The main unit will emit a confirmation sound, indicating successful pairing.
- Repeat for additional remote controls if necessary.
4.4 Fizinis įrengimas
The sensor can be installed using the provided double-sided adhesive tape. Ensure the installation surface is clean and dry.
- Attach the main sensor unit to the door/window frame.
- Attach the magnetic strip to the door/window itself, aligning it with the main sensor unit.
- Ensure the gap between the main unit and the magnetic strip is less than 1.5 cm (0.6 inches) when the door/window is closed. The triangular marks on both components should align.

3 paveikslas: Correct installation method for the sensor, highlighting the maximum gap between the main unit and magnetic strip.
„2“ vaizdo įrašas: Provides a visual guide on how to set up and pair the door sensor, including battery installation and pairing steps.
5. Naudojimo instrukcijos
5.1 Maitinimo įjungimas/išjungimas
Use the ON/OFF switch on the side of the main sensor unit to power the device on or off.
5.2 Garsumo reguliavimas
Press the volume adjustment button on the main unit to cycle through the four volume levels (0dB, 60dB, 90dB, 120dB).

4 paveikslas: Visual representation of the 4-level volume adjustment feature.
5.3 Režimo pasirinkimas
Press the mode selection button on the main unit or the mode selection key on the remote control to cycle through the four operation modes:
- Elderly Monitoring Mode: Alerts when a door is opened.
- Visitor Chime Mode: Plays a chime when a door is opened.
- Refrigerator Reminder Mode: Alerts if the refrigerator door remains open.
- Anti-theft Alarm Mode: Triggers a loud alarm upon unauthorized opening.
5.4 Nuotolinio valdymo pulto funkcijos

5 paveikslas: Remote control button functions.
- Režimo pasirinkimo klavišas: Cycles through the four operation modes.
- Rankos mygtukas: Activates the alarm/monitoring function.
- Išjungimo mygtukas: Deactivates the alarm/monitoring function.
- SOS mygtukas: Įjungia avarinę signalizaciją.
„3“ vaizdo įrašas: Demonstrates the sensor triggering an alarm when a door is opened, showcasing its basic functionality and installation.
6. Priežiūra
6.1 Valymas
Prietaisą valykite minkštu, sausu skudurėliu. Nenaudokite abrazyvinių valiklių ar tirpiklių.
6.2 Akumuliatoriaus keitimas
When the main unit emits a sound every 5 minutes, it indicates a low battery. Replace the two AAA alkaline batteries in the main unit. For the magnetic strip, replace the 12V 23A battery. For the remote control, replace the CR2032 button cell battery as needed.
7. Problemų sprendimas
- No alarm when door/window opens:
- Įsitikinkite, kad pagrindinis įrenginys įjungtas.
- Check if the gap between the main unit and magnetic strip is less than 1.5 cm.
- Patikrinkite, ar baterijos tinkamai įdėtos ir nėra išsikrovusios.
- Confirm the correct mode is selected (e.g., Anti-theft Alarm mode).
- Nuotolinio valdymo pultas neveikia:
- Patikrinkite nuotolinio valdymo pulto bateriją.
- Re-pair the remote control with the main unit (refer to Section 4.3).
- Alarm is too loud/quiet:
- Adjust the volume using the volume adjustment button on the main unit (refer to Section 5.2).
- Low battery reminder constantly sounding:
- Pakeiskite pagrindinio įrenginio baterijas.
8. Specifikacijos
| Funkcija | Detalė |
|---|---|
| Prekės ženklas | DAYTECH |
| Modelio numeris | DA09 |
| Gaminio matmenys (pagrindinis įrenginys) | 5 x 2 x 8 cm |
| Produkto svoris | 100 g |
| Maitinimo šaltinis (pagrindinis įrenginys) | 2 x AAA Alkaline Batteries (1.5V DC, not included) |
| Power Source (Magnetic Strip) | 1 x 12V 23A Battery (included) |
| Power Source (Remote Control) | 1 x CR2032 Button Cell Battery (included) |
| Jutiklio technologija | Magnetinis jutiklis |
| Garsumo lygiai | 4 levels (0dB, 60dB, 90dB, 120dB) |
| Diegimo tipas | Lipnus kalnas |
9. Saugos informacija
- Saugokite įrenginį nuo vandens ir didelės drėgmės.
- Do not attempt to disassemble or repair the device yourself. Contact customer support if needed.
- Išmeskite panaudotas baterijas laikydamiesi vietinių taisyklių.
- Baterijas laikykite vaikams nepasiekiamoje vietoje.
10. Garantija ir palaikymas
DAYTECH offers a lifetime quality guarantee for this product. If you have any questions or encounter issues during use, please feel free to contact our customer support. We are committed to providing high-quality products and services.
Contact information can typically be found on the product packaging or the official DAYTECH websvetainę.


